A full stack app is two programs that share one repository. The frontend compiles into plain HTML, CSS and JavaScript files that a browser downloads. The backend is a process that listens on a port and answers API calls. On your laptop you start both with npm run dev, each on its own port, and the browser talks to localhost.
A VPS gives you an empty Linux machine and nothing else. Nobody builds your frontend, nobody restarts your backend when it crashes, nobody decides which of the two should answer a request, and nobody installs a certificate. You own all four jobs. This guide walks the whole path: how to deploy a full stack app on a VPS with the frontend and the backend kept separate, served by Nginx, kept alive by PM2, and protected by free SSL.
Two tools do most of the work here, so it helps to know what they are before you meet them. Nginx is a web server. It listens on the public ports, sends files back to the browser, and can also hand a request to another program on the same machine and return that program's answer, which is the part people call a reverse proxy. PM2 is a process manager for Node.js. It starts your backend, starts it again when it crashes or when the server reboots, and keeps the logs you read when something goes wrong.
Following names are used throughout the guide: app acme, site example.com, API api.example.com, server IP 203.0.113.10, Linux user deploy, backend port 3000.
What you will build
One VPS running an Ubuntu LTS release, with both halves of the app on it:
- a React frontend, built once and served as static files from
example.com, - a Node.js and Express API on
api.example.com, proxied to port 3000, - PostgreSQL listening only on
127.0.0.1, - PM2 restarting the API after a crash and after a reboot,
- Let's Encrypt certificates on both names, renewed automatically,
- a firewall, a non-root user and key-only SSH,
- a one-command redeploy, and the same thing again as a GitHub Actions workflow.
The stack is named so that you can copy the commands without editing them. The same steps work for other stacks. Swap React for Vue or Svelte, swap Express for FastAPI, Laravel or Go, and only the build command and the port number change.
Before you start
You need:
- a VPS with at least 2 GB of RAM, running Ubuntu 24.04 LTS or 26.04 LTS (consider Hostinger's KVM plans, it gives you full root access and install Ubuntu for you; a 1 GB plan also works if you build the frontend elsewhere),
- a domain name whose DNS you can edit (Cloudflare Registrar sells them at cost and gives you the DNS panel in the same place),
- your code in a Git repository,
- an SSH key pair on your machine (run
ssh-keygen -t ed25519if you have never made one), - local tools: Node.js,
gitand an SSH client.
What a VPS deployment involves
A hosting platform like Vercel or Render quietly does four jobs for you. On a VPS you do all four yourself:
- Build the frontend. A browser cannot run your JSX or your TypeScript. Something must turn
client/into a folder of static files. - Keep the backend running.
node index.jsdies when you close the terminal, when the process throws, and when the machine reboots. A process manager fixes all three. - Route each request. One IP address, two parts of the app, one port 443. A reverse proxy reads the hostname and decides who answers.
- Add HTTPS. The padlock in the address bar comes from a certificate. Browsers mark a plain
http://site as not secure, so you need a certificate on the server and a renewal that runs on its own.
Two more jobs have no deadline, which is why people forget them. Nobody installs security updates on the machine, and nobody backs up the database. The checklist near the end covers both.
Should the API use a subdomain or a path?
Before any of that, decide how the two halves share the domain, because the Nginx config and the cookie settings follow from the answer.
A subdomain puts the API on api.example.com and the site on example.com. The two are separate origins, so the browser applies CORS rules and your backend has to allow the frontend explicitly. In return you get two separate Nginx configs, two sets of logs, and the option to move the API to its own machine later by changing one DNS record.
A path puts the API on example.com/api. Everything is one origin, so there is no CORS and cookies need no thought. The cost is that both halves are tied to one hostname and one Nginx config.
Pick the subdomain if the API has any other client, such as a mobile app, or if you expect to split the machines. Pick the path if this frontend is the only consumer and you want the shortest route to working. This guide uses the subdomain and shows the path variant in Step 7.
Architecture
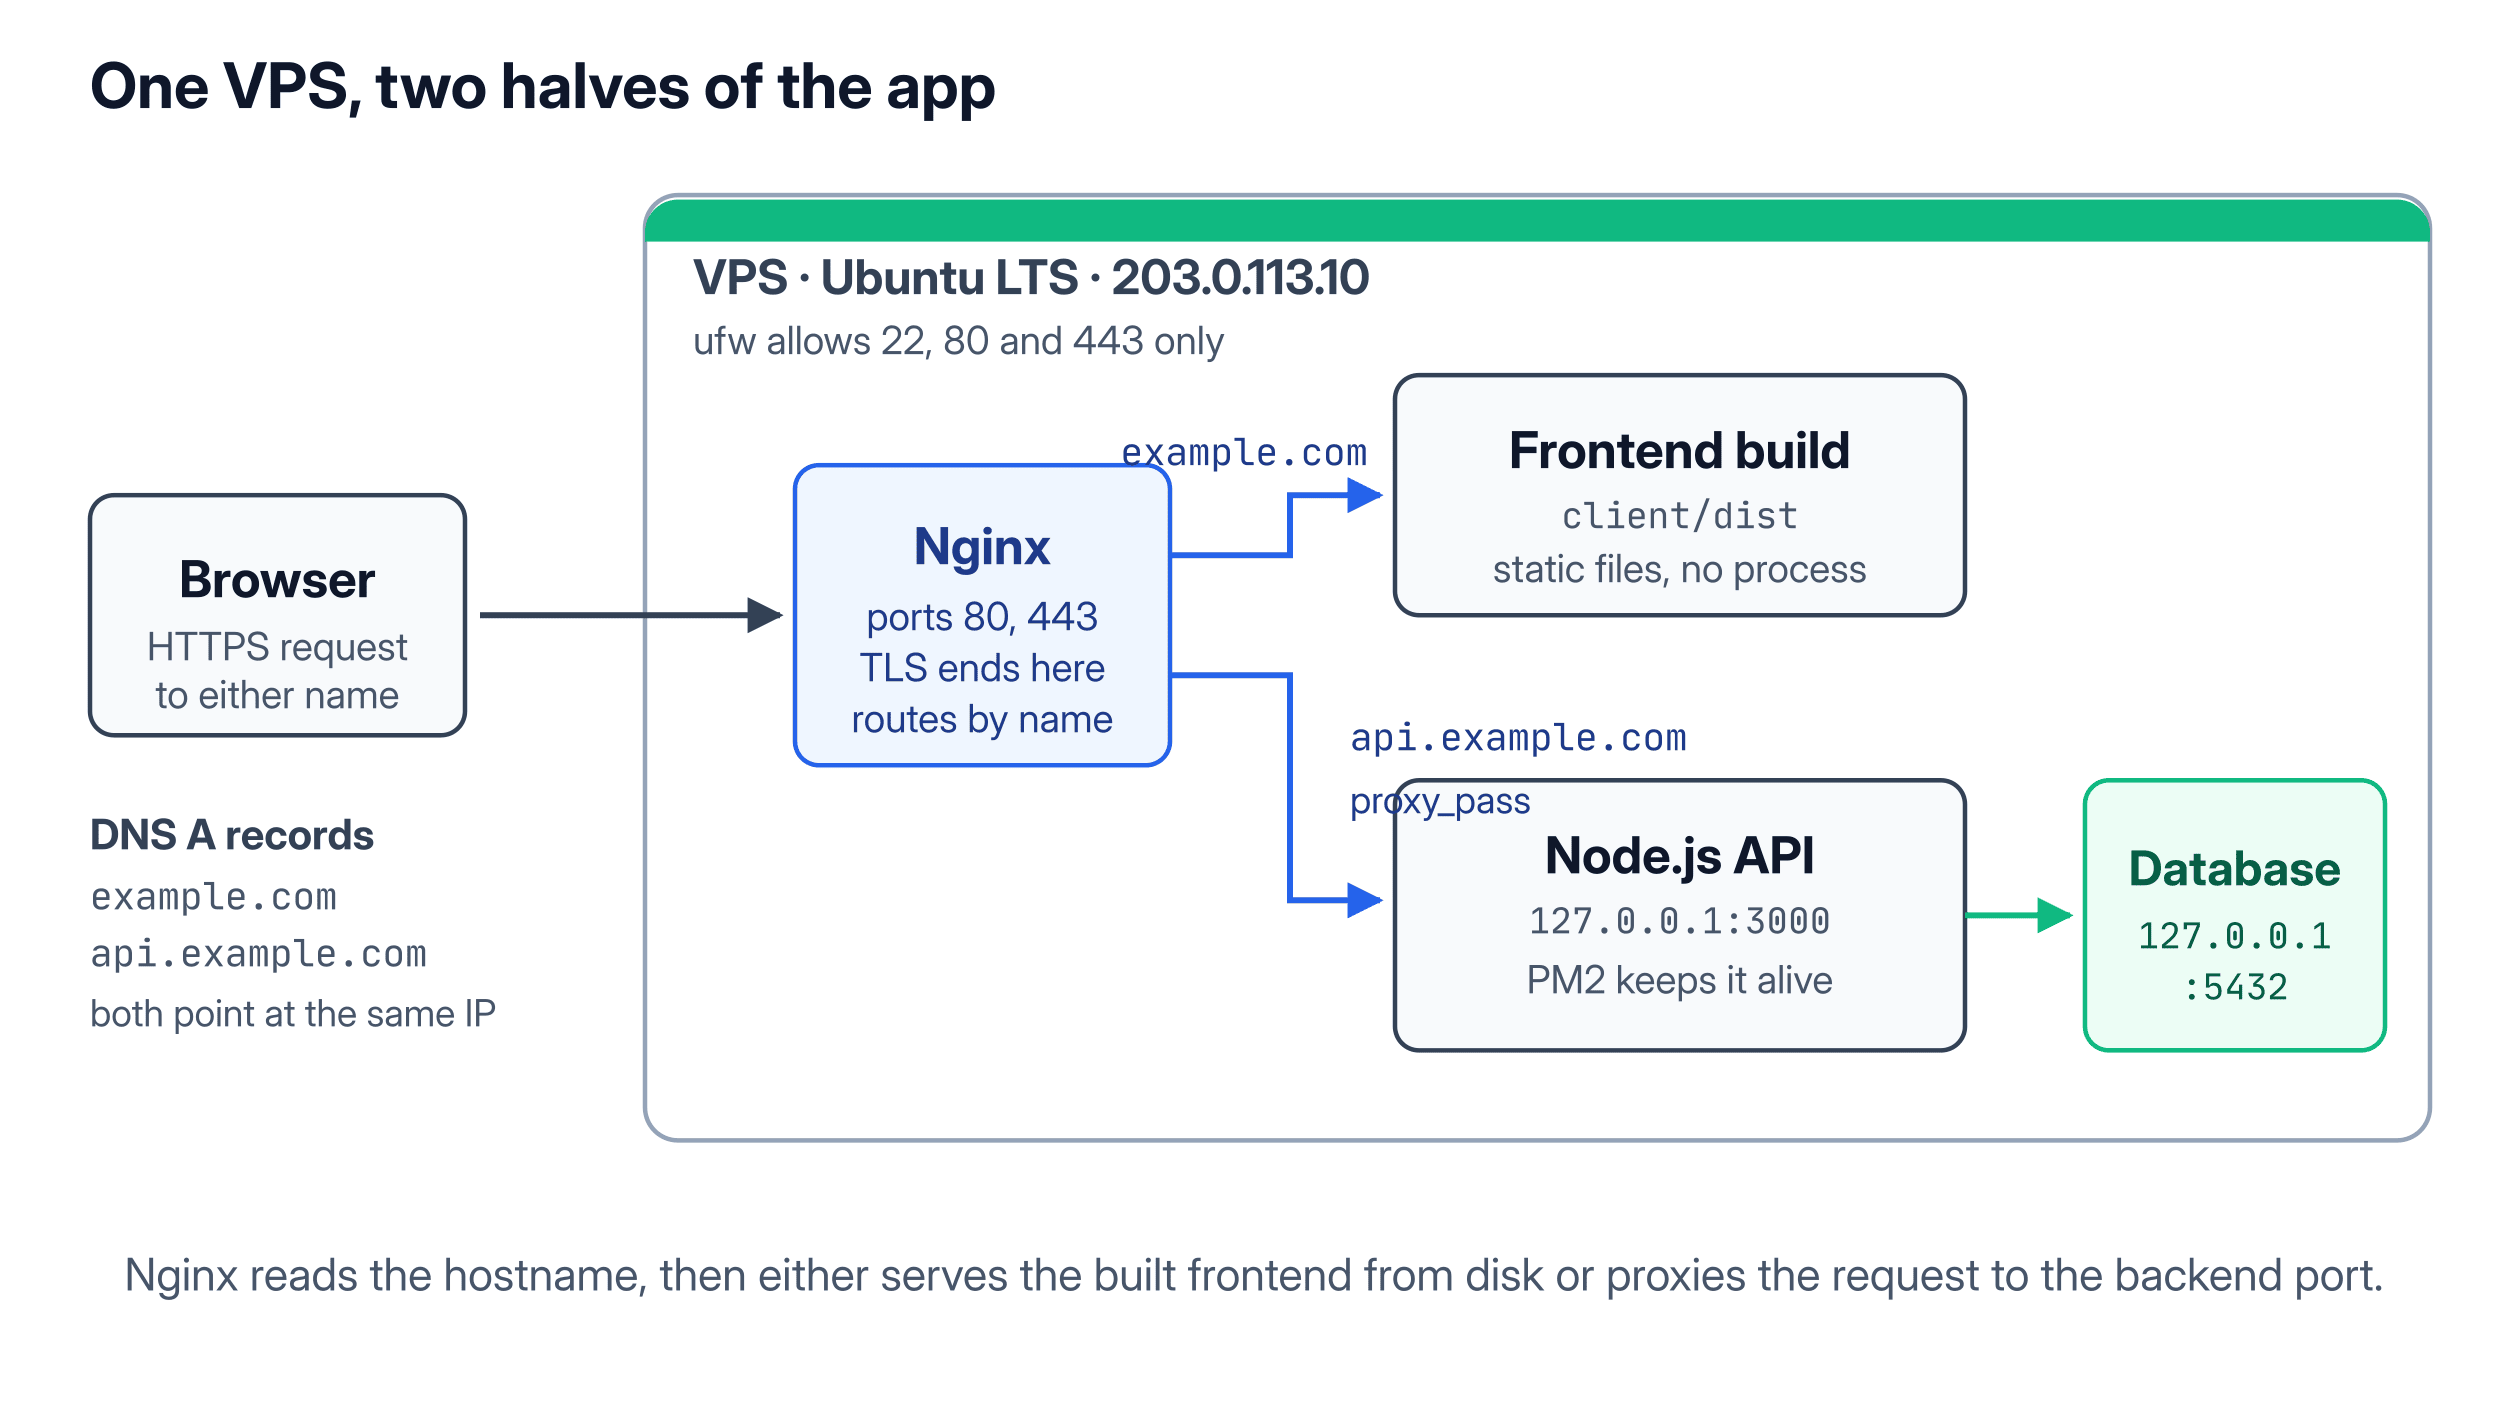
Keep this picture open while you work through the steps. Both names resolve to the same IP, and Nginx is the thing that tells them apart.
Step 1: Create the VPS and secure it
Start in your hosting provider's dashboard. If you have no server yet, Hostinger takes a few minutes from signup to a running Ubuntu machine, which is all this guide needs. Create a new server, pick an Ubuntu LTS image as the operating system, choose a plan with the memory listed above, and upload your SSH public key when the form asks for one. The provider then gives you an IP address, and that address is how you reach the machine from anywhere.
Everything after this runs in a terminal. Open the terminal on your own computer and connect to the server as root, the all-powerful account that every new VPS starts with. From the moment that command succeeds, every line you type goes to the server and not to your own computer.
ssh root@203.0.113.10
apt update && apt upgrade -y
The second line updates the software that came with the image. apt is Ubuntu's package manager, and you use it again in the next step.
Root can change or delete anything on the machine, and nothing asks you to confirm. So create a normal user instead, let it run admin commands with sudo, and copy your SSH key over so you can log in as that user.
adduser deploy
usermod -aG sudo deploy
rsync --archive --chown=deploy:deploy ~/.ssh /home/deploy
Open a second terminal and check that ssh deploy@203.0.113.10 works. Do that before the next change, because the next change closes the root login, and a mistake here locks you out of your own server.
Once the new login works, open the SSH settings file in nano, a text editor that is already installed:
sudo nano /etc/ssh/sshd_config
Find these two settings and set both to no, then save with Ctrl+O and leave with Ctrl+X. The first one stops anybody logging in as root. The second one stops password logins, so only your key opens the door.
PermitRootLogin no
PasswordAuthentication no
Restart SSH so the new settings apply. Your open root session survives the restart, which is why you tested the new login first.
sudo systemctl restart ssh
Now close the root session with exit and work in the deploy one from here on. That is why every command below starts with sudo.
Next comes the firewall, which decides what the internet is allowed to reach. Ubuntu ships ufw for this, and you need exactly three ports open: 22 for SSH, 80 for plain HTTP, and 443 for HTTPS. Port 80 stays open because Certbot uses it in Step 8 and because visitors who type http:// get redirected from there.
sudo ufw allow 22/tcp
sudo ufw allow 80/tcp
sudo ufw allow 443/tcp
sudo ufw enable
sudo ufw status
One more thing before you install anything. Swap is disk space that Linux uses as spare memory when RAM runs out. Disk is far slower than RAM, but a slow build beats a build that dies, and a frontend build can ask for more memory than a 1 GB or 2 GB server has.
sudo fallocate -l 2G /swapfile
sudo chmod 600 /swapfile
sudo mkswap /swapfile
sudo swapon /swapfile
echo '/swapfile none swap sw 0 0' | sudo tee -a /etc/fstab
The last line writes the swap file into /etc/fstab, the list of storage Linux mounts at boot, so the swap comes back after a reboot.
Step 2: Install Node.js, Nginx and PostgreSQL
Ubuntu's own nodejs package lags several versions behind, so take Node from NodeSource instead. The setup_lts.x script always points at the current LTS line, which is Node 24 at the time of writing.
curl -fsSL https://deb.nodesource.com/setup_lts.x | sudo -E bash -
sudo apt install -y nodejs nginx postgresql git
node -v
Those four packages cover everything the app needs: Node.js runs the backend, Nginx answers the browser, PostgreSQL stores the data, and Git pulls the code. Now create the database and a user for it. Give the user a real password, because the backend uses it to connect in Step 4.
sudo -u postgres psql -c "CREATE DATABASE acme;"
sudo -u postgres psql -c "CREATE USER acme WITH PASSWORD 'a-long-random-password';"
sudo -u postgres psql -c "ALTER DATABASE acme OWNER TO acme;"
The third line matters more than it looks. Since PostgreSQL 15, GRANT ALL PRIVILEGES ON DATABASE no longer lets the user create tables, so migrations fail with "permission denied for schema public". Making the user the owner of the database avoids all of those errors.
Leave the database port closed. PostgreSQL listens on
127.0.0.1:5432by default, and the API reaches it over that loopback address. Never open 5432 in the firewall to "connect from my laptop"; use an SSH tunnel for that instead. A MongoDB install follows the same rule, and MongoDB with a public port and no password is one of the most common ways a hobby project leaks its whole database.
Step 3: Put the code on the server
With the services installed, copy the code onto the server. Keep it under /var/www, the folder Nginx can already read, and make the deploy user its owner so later deploys need no sudo.
sudo mkdir -p /var/www/acme
sudo chown deploy:deploy /var/www/acme
git clone https://github.com/you/acme.git /var/www/acme
The guide assumes the two halves sit side by side in that folder:
/var/www/acme
├── client   # React frontend, builds into client/dist
└── server   # Express API, entry point server/src/index.js
For a private repository, generate a key on the server and add its public half to the repository as a read-only deploy key:
ssh-keygen -t ed25519 -C "deploy@acme" -f ~/.ssh/id_ed25519 -N ""
cat ~/.ssh/id_ed25519.pub
Step 4: Set environment variables for both halves
The code is on the server, but it still points at localhost and has no secrets. The backend and the frontend both read configuration from the environment, and they do it at completely different moments, which is the single most confusing thing about this step.
The backend reads its values when the process starts, so a change needs a restart. Put them in server/.env and keep that file out of Git.
# server/.env
NODE_ENV=production
PORT=3000
DATABASE_URL=postgres://acme:a-long-random-password@127.0.0.1:5432/acme
JWT_SECRET=a-long-random-string
CORS_ORIGIN=https://example.com
chmod 600 /var/www/acme/server/.env
The frontend reads its values when the build runs, so a change needs a rebuild. Vite only exposes variables that start with VITE_, and it writes their values straight into the JavaScript bundle.
# client/.env.production
VITE_API_URL=https://api.example.com
Frontend environment variables are not secrets. They are compiled into files that anybody can download and read. An API key in
VITE_SOMETHINGis a published API key. Keys belong inserver/.env, behind an endpoint that checks who is asking. The same applies toNEXT_PUBLIC_andNUXT_PUBLIC_variables. If you need a refresher on how the backend should prove identity instead, see everything about JSON Web Tokens.
Step 5: Build the frontend
Now turn the frontend source into the files Nginx will serve. Install the packages with npm ci, which reads package-lock.json and installs those exact versions, so the server ends up with the same packages your laptop has. It is faster than npm install as well.
cd /var/www/acme/client
npm ci
npm run build
Vite writes the result to client/dist. Create React App writes to build, and Angular writes to dist/<project-name>. Whatever the folder is called, it now holds plain files with no program behind them, and that is why serving the frontend costs the server almost nothing.
"Killed" in the middle of the build means the machine ran out of memory. Add the swap file from Step 1, then raise Node's heap limit with
NODE_OPTIONS="--max-old-space-size=2048" npm run build. The better fix is to stop building on the server at all: build in CI and copy the finished folder up, as Step 11 does.
A Next.js or Nuxt app with server rendering is not static. It is a Node process, so it does not belong in this step. Build it, run it under PM2 exactly like the API in Step 6, and point Nginx at its port instead of at a folder.
Step 6: Run the backend with PM2
The frontend needs no process. The backend is the opposite: it has to be running, all the time, and it has to come back by itself. PM2 is a process manager that restarts a crashed app, starts your apps again after a reboot, and keeps their logs.
sudo npm install -g pm2
Describe the app in a config file rather than a long command line, so the next person can read what runs and how.
// server/ecosystem.config.cjs
module.exports = {
    apps: [
        {
            name: 'acme-api',
            cwd: '/var/www/acme/server',
            script: 'src/index.js',
            node_args: '--env-file=.env',
            instances: 2,
            exec_mode: 'cluster',
            max_memory_restart: '400M',
        },
    ],
}
Here is what each field does.
node_args: '--env-file=.env'loadsserver/.envinto the process. Node 20 and newer read that flag natively, so you do not need thedotenvpackage.exec_mode: 'cluster'withinstances: 2runs two copies behind Node's built-in load balancer, which uses the second CPU core and makes zero-downtime reloads possible in Step 11. Useinstances: 'max'to take every core.max_memory_restart: '400M'restarts a copy that grows past 400 MB, which keeps a slow memory leak from taking the machine down with it.
Start it, save the process list, and ask PM2 to install itself as a boot service:
cd /var/www/acme/server
pm2 start ecosystem.config.cjs
pm2 save
pm2 startup   # prints one sudo command; run exactly that command
pm2 logs acme-api --lines 50
Bind the API to
127.0.0.1, not0.0.0.0. Writeapp.listen(process.env.PORT, '127.0.0.1'). A server bound to0.0.0.0answers the whole internet on port 3000, which skips Nginx, skips HTTPS and skips the firewall rule you wrote. The only thing that should reach the API is Nginx, from the same machine.
Want one tool less? systemd is already on the machine and does the same job with a unit file and Restart=always. This guide uses PM2 because pm2 logs, pm2 reload and the memory limit are simpler to reach for, and those are the three things you use most in the first month.
Step 7: Configure Nginx as a reverse proxy
Both halves are now running or built, and nothing on the public internet can reach either of them. Nginx is the piece that answers on 80 and 443 and then decides, from the hostname, whether to read a file off the disk or forward the request to port 3000.
Nginx keeps one config file per site in /etc/nginx/sites-available/. Create the first one for the frontend with sudo nano /etc/nginx/sites-available/example.com and paste this in:
# /etc/nginx/sites-available/example.com
server {
    listen 80;
    server_name example.com www.example.com;

    root /var/www/acme/client/dist;
    index index.html;

    location / {
        try_files $uri $uri/ /index.html;
    }

    location /assets/ {
        expires 1y;
        add_header Cache-Control "public, immutable";
    }

    gzip on;
    gzip_types text/css application/javascript application/json image/svg+xml;
}
The important line is try_files $uri $uri/ /index.html. Your frontend handles paths like /dashboard in JavaScript, and no file of that name exists on the disk. Without this line, Nginx answers a refresh of that page with a 404. This tells it to look for a real file, then a real folder, then fall back to index.html and let the frontend router sort it out. The /assets/ block is safe to cache for a year because the build puts a content hash in every filename, so a new build produces new names.
Now the API, in a file of its own. Open it with sudo nano /etc/nginx/sites-available/api.example.com:
# /etc/nginx/sites-available/api.example.com
server {
    listen 80;
    server_name api.example.com;

    client_max_body_size 10M;

    location / {
        proxy_pass http://127.0.0.1:3000;
        proxy_http_version 1.1;
        proxy_set_header Host $host;
        proxy_set_header X-Real-IP $remote_addr;
        proxy_set_header X-Forwarded-For $proxy_add_x_forwarded_for;
        proxy_set_header X-Forwarded-Proto $scheme;
        proxy_set_header Upgrade $http_upgrade;
        proxy_set_header Connection "upgrade";
    }
}
Three lines in there need a word of explanation.
- The
X-Forwarded-*headers carry the visitor's real IP and the original protocol. Without them every request looks to your app as if it came from127.0.0.1over plain HTTP, which breaks rate limiting, logging and any redirect you build fromreq.protocol. client_max_body_sizecaps an upload. Nginx's default is 1 MB and it rejects anything larger with a 413 before your code ever runs.proxy_http_version 1.1with theUpgradeandConnectionheaders lets a WebSocket connection through. Leave them in even if you have no WebSockets yet. They cost nothing, and they save you a long search on the day you add one.
Enable both sites, drop the default one, check the syntax, and reload:
sudo ln -s /etc/nginx/sites-available/example.com /etc/nginx/sites-enabled/
sudo ln -s /etc/nginx/sites-available/api.example.com /etc/nginx/sites-enabled/
sudo rm /etc/nginx/sites-enabled/default
sudo nginx -t
sudo systemctl reload nginx
Prefer one domain with no CORS? Delete the API server block and add this to the frontend one instead. The trailing slash on
proxy_passstrips the/api/prefix, so your Express routes stay as they are.location /api/ { proxy_pass http://127.0.0.1:3000/; proxy_set_header Host $host; proxy_set_header X-Forwarded-For $proxy_add_x_forwarded_for; proxy_set_header X-Forwarded-Proto $scheme; }
A 403 on the frontend is a permissions problem, not a config problem. Nginx runs as
www-dataand needs execute permission on every folder from/down todist. Files under/var/wwware fine; files under/home/deployusually are not, because a home directory is700. Runnamei -l /var/www/acme/client/dist/index.htmlto see which folder blocks it.
Step 8: Add free SSL with Certbot
The site answers on plain HTTP now. That proves the routing works, and no real site should stop there. Certificates come free from Let's Encrypt, and Certbot both requests them and rewrites your Nginx config to use them.
DNS has to be correct first, because the certificate authority proves ownership by fetching a file from your server over port 80. Add two A records, both pointing at 203.0.113.10: one for example.com and one for api.example.com. Add www too if you use it. New to DNS records? See how DNS works.
Wait until dig +short example.com returns your IP, then run Certbot once for every name:
sudo apt install -y certbot python3-certbot-nginx
sudo certbot --nginx -d example.com -d www.example.com -d api.example.com
Certbot edits both server blocks in place: it adds listen 443 ssl, points at the certificate files, and adds a redirect from port 80. Renewal is a systemd timer that the package installs for you, so the only thing left is to confirm it works.
sudo certbot renew --dry-run
systemctl list-timers | grep certbot
Using Cloudflare? Turn the orange proxy cloud off until the certificate is issued, because Cloudflare answers the challenge request itself and Certbot never sees it. Once the certificate exists, turn the proxy back on and set the SSL mode to Full (strict). Any other mode either breaks the loop or leaves the hop between Cloudflare and your VPS unencrypted.
Step 9: Fix CORS and cookies across two origins
HTTPS is on and both names answer, and then the first real API call from the browser fails. This is the price of splitting the two halves. CORS, short for cross-origin resource sharing, is the browser rule that stops a page on one address from reading a response from another address. The browser counts example.com and api.example.com as two different addresses, so it blocks the response until the API says that caller is welcome.
Allow exactly the one origin that should be calling, and allow credentials so the browser will attach cookies:
// server/src/index.js
import cors from 'cors'

app.set('trust proxy', 1)

app.use(cors({
    origin: process.env.CORS_ORIGIN,   // https://example.com
    credentials: true,
}))
app.set('trust proxy', 1) tells Express that one proxy sits in front of it, so req.ip reads the real visitor address from X-Forwarded-For and req.protocol reports https. Without it, every visitor shares one IP as far as your rate limiter is concerned.
Cookies need one more detail. A cookie set by api.example.com is not sent to example.com unless you widen it to the parent domain:
res.cookie('session', token, {
    httpOnly: true,
    secure: true,
    sameSite: 'lax',
    domain: '.example.com',
})
The two names are different origins, but they are still the same site, because both of them end in example.com. That is why sameSite: 'lax' is enough here. Only when the API lives on a genuinely different domain do you need sameSite: 'none', which then also requires secure: true. For how these choices compare with storing a token in the browser, see local storage vs session storage vs cookies.
Step 10: Verify the deployment
Before you call it done, check each piece on its own, so a failure points at one thing instead of at "the deploy".
| Check | Command | Expected |
|---|---|---|
| Frontend | curl -I https://example.com | 200 and content-type: text/html |
| Client-side route | curl -I https://example.com/dashboard | 200, not 404 |
| API | curl https://api.example.com/health | {"ok":true} |
| HTTP redirect | curl -I http://example.com | 301 to the https:// URL |
| Certificates | sudo certbot certificates | both names listed, ~90 days left |
| Survives a reboot | sudo reboot, then pm2 list | acme-api online |
| CORS | open the site, watch the browser console | API calls succeed, no CORS error |
The reboot test is the one people skip and the one that matters. If pm2 list comes back empty, you missed the command that pm2 startup printed, or you never ran pm2 save.
Step 11: Automate deploys with a script and GitHub Actions
Every step so far was manual. That is fine the first time and tiring by the tenth. The smallest useful automation is a script on the server that does the same steps in the same order every time.
#!/usr/bin/env bash
# /var/www/acme/deploy.sh
set -euo pipefail

cd /var/www/acme
git pull origin main

cd server
npm ci --omit=dev
npm run migrate      # drop this line if the project has no migrations
pm2 reload acme-api

cd ../client
npm ci
npm run build
Two lines in that script deserve attention. set -euo pipefail stops the script at the first failing command, so a failed migration never reaches pm2 reload and a half-deployed app. pm2 reload restarts the cluster copies one at a time, so the other copy keeps answering and no request is dropped; pm2 restart would stop both at once.
Make it executable with chmod +x deploy.sh, and a deploy becomes ssh deploy@203.0.113.10 /var/www/acme/deploy.sh.
GitHub Actions is the same script with the heavy part moved off the server. The frontend builds on the runner, the finished folder goes up with rsync, and only the backend part runs over SSH.
# .github/workflows/deploy.yml
name: deploy
on:
  push:
    branches: [main]
jobs:
  deploy:
    runs-on: ubuntu-latest
    steps:
      - uses: actions/checkout@v4
      - uses: actions/setup-node@v4
        with: { node-version: '24' }
      - run: npm ci && npm run build
        working-directory: client
      - uses: webfactory/ssh-agent@v0.9.0
        with:
          ssh-private-key: ${{ secrets.DEPLOY_KEY }}
      - run: ssh-keyscan 203.0.113.10 >> ~/.ssh/known_hosts
      - run: rsync -az client/dist/ deploy@203.0.113.10:/var/www/acme/client/dist/
      - run: ssh deploy@203.0.113.10 '/var/www/acme/deploy-server.sh'
DEPLOY_KEY is a private key whose public half is in /home/deploy/.ssh/authorized_keys on the VPS. deploy-server.sh is the script above with the client section removed, since the runner already built it.
Do not add
--deleteto thatrsync. During a deploy, a browser tab that loaded the oldindex.htmlis still asking for the old hashed asset files. Deleting them mid-rollout gives those readers a blank page. Leave the old files and clean them up on your own schedule.
Common VPS deployment errors and fixes
Most first deploys break in one of seven ways, and each one leaves a different clue.
502 Bad Gateway means Nginx is fine and nothing answered on the port behind it. Run pm2 list to see whether the app is online, then curl http://127.0.0.1:3000/health on the server itself. If the app is running but the curl fails, the port in proxy_pass and the port in .env disagree.
404 on every page except the home page is the missing try_files fallback in Step 7. It only shows up when you refresh a client-side route or share a deep link, which is why it survives testing.
403 Forbidden on the frontend is a file permission problem. Check the whole path with namei -l, and move the project under /var/www if it is sitting in a home directory.
A CORS error in the browser console almost always means CORS_ORIGIN does not match the address bar character for character. http against https, or www against the bare domain, both count as different origins.
Killed during npm run build is the out-of-memory killer. Add swap, raise --max-old-space-size, or build in CI.
Certbot reporting a failed challenge means it could not fetch its own file over port 80. The DNS record is wrong or not propagated, port 80 is closed in ufw, or Cloudflare's proxy is intercepting the request.
A new API URL that changes nothing is the frontend build cache. Those values were compiled into the bundle, so the fix is npm run build again, then a hard refresh.
Production checklist
The app is live, which means the work changes from building to keeping it alive. Do these before you forget the machine exists:
- Back up the database with a nightly
pg_dumpsent somewhere off the VPS. A backup on the same disk is not a backup. - Rotate the logs with
pm2 install pm2-logrotate, or PM2's log file grows until the disk is full. - Turn on unattended security updates with
sudo apt install unattended-upgrades. - Install
fail2banto ban the IPs that will knock on port 22 within hours of the server going up. - Monitor
/healthfrom outside with any free uptime service, since a server that is down cannot tell you. - Rate limit the auth routes in Nginx with
limit_req_zone, before somebody tries a password list against your login endpoint. - Keep
.envout of Git and atchmod 600. A leakedJWT_SECRETis every session at once. - Run
pm2 saveafter any change to what PM2 runs, because the boot list is the saved one, not the running one.
VPS deployment FAQ
Can I host the frontend and backend on the same VPS?
Yes, and it is the normal setup for small and medium apps. Nginx serves the built frontend from disk and forwards API requests to the backend process on a local port, so the two never collide. Separate machines only start paying off when one half needs to scale independently of the other.
How much RAM do I need to deploy a full stack app on a VPS?
2 GB is comfortable for a Node API, Nginx and a small PostgreSQL database together. 1 GB works if you build the frontend in CI instead of on the server and add a swap file. Frontend builds, not traffic, are what exhaust a small server first.
Do I need Docker to deploy on a VPS?
No. Nginx, PM2 and a database installed directly on the machine run a production app perfectly well, and the stack above has fewer moving parts to debug. Docker earns its keep when you run several apps with conflicting dependencies on one box, or when you want the same image in CI and production.
How do I deploy a MERN app on a VPS?
The same eleven steps, with two substitutions. Install MongoDB instead of PostgreSQL and bind it to 127.0.0.1 with authentication on, and set MONGO_URI in server/.env instead of DATABASE_URL. The React build, PM2, Nginx and Certbot steps are identical.
Is a VPS cheaper than Vercel plus a managed backend host?
Usually yes at small scale, where one Hostinger VPS runs the frontend, the API and the database together for the price of a single managed add-on. The real cost is your time: you own the patching, the backups and the 3 a.m. restart that a platform would have handled. Going the other way, serverless on AWS Lambda removes the machine entirely and bills you per request instead.
Should I build the frontend on the VPS or in CI?
Build in CI once the project is past the first week. It keeps the production machine's memory free, it fails before anything reaches the server, and it makes the deploy a file copy instead of a build.
Do I need a separate SSL certificate for the API subdomain?
No. One Certbot run with several -d flags issues one certificate covering every name, and one renewal timer keeps all of them current.
Recap
You took an empty Ubuntu VPS and gave it a hardened login, a firewall and swap. You installed Node.js, Nginx and PostgreSQL, built the frontend into static files, and put the backend under PM2 so it survives a crash and a reboot. Nginx then routed example.com to the built files and api.example.com to port 3000, Certbot put free SSL on both, and CORS plus a parent-domain cookie let the two origins trust each other. A deploy script and a GitHub Actions workflow turned all of it into one command.
One idea sits under every step. The frontend is files, and the backend is a process. Files need a web server and a cache header. A process needs a supervisor, a port, and a proxy in front of it.
What to try next
- Add a staging copy on
staging.example.comandapi.staging.example.com, deployed from astagingbranch. - Put a
limit_req_zonerule in front of the login route and watch it return 429. - Move the database to a managed provider and compare the restore time with your
pg_dumpscript. - Add a WebSocket endpoint and confirm the
Upgradeheaders from Step 7 already carry it.
To sharpen the backend fundamentals under all of this, see the Top 111 backend interview questions and the SQL guide for the database half.