

Read once and then come back when you have a Vue.js interview. This guide covers 150 most common Vue JS interview questions and answers for freshers, intermediate developers, and senior Vue.js developers. You’ll find Vue 3 and Composition API questions, reactivity, component communication, Vue Router, Pinia, forms, performance, testing, Nuxt, and many other Vue.js questions for your next interview.
You will not find generic JavaScript questions about closures or promises here. If you want that side of the interview covered, the Top 100 Frontend Interview Questions article handles HTML, CSS, and JavaScript fundamentals. The answers here are written the way you would actually explain them out loud.
Vue.js Fundamentals Questions
1. What is Vue.js, and what kind of problems does it solve?
Vue.js is a JavaScript framework for building user interfaces. Instead of writing code that manually finds DOM elements and updates them whenever your data changes, you describe your UI as a template that maps to your data, and Vue takes care of updating the DOM when that data changes.
The core problem it solves is keeping the UI in sync with application state without you having to track every possible change by hand. As an app grows, manually wiring up event listeners and DOM updates becomes error prone and hard to maintain. Vue's reactivity system watches your data, and its component model lets you break a page into small, reusable, self-contained pieces (each with its own template, logic, and styles) that can be composed into full applications.
It scales from a single <script> tag dropped into an HTML page for small interactive widgets, all the way up to full single-page applications built with Vite, Vue Router, and Pinia.
2. What are the key features that make Vue.js popular?
- Reactivity system: change a piece of state and every part of the UI that depends on it updates automatically, no manual DOM wiring.
- Approachable templates: Vue templates are close to plain HTML with a small set of directives added on top, so the learning curve is gentle.
- Single File Components: template, logic, and styles live together in one
.vuefile, which keeps components easy to reason about. - Incremental adoptability: you can use Vue for one widget on a page, or build an entire app with it, there is no all-or-nothing decision.
- Composition API: lets you organize and reuse logic by feature instead of by option type, which helps in larger components.
- Official ecosystem: Vue Router, Pinia, and Vite are maintained by the same team and designed to work together out of the box.
- Performance: Vue 3's compiler and reactivity system are tuned to do less work at runtime through compile-time optimizations.
3. What is a Single File Component (.vue file), and what are its three blocks?
A Single File Component is a .vue file that groups everything a component needs, its markup, its logic, and its styles, into one file instead of spreading them across separate HTML, JS, and CSS files. A build tool (Vite, in modern Vue) compiles this file into a regular JavaScript module.
It's made up of three blocks:
<template>
    <button @click="increment">Count: {{ count }}</button>
</template>

<script setup>
import { ref } from 'vue'

const count = ref(0)

function increment() {
    count.value++
}
</script>

<style scoped>
button {
    color: #10b981
}
</style>
<template>holds the HTML-like markup for the component.<script>(or<script setup>) holds the component's logic: state, computed values, methods, lifecycle hooks.<style>holds CSS for the component. Addingscopedlimits those styles to this component only, so they won't leak out and affect other parts of the app.
4. How do you create and mount a Vue application (createApp)?
createApp is the function that bootstraps a Vue application. You pass it your root component, and it returns an app instance that you then attach to a real DOM element with .mount().
// main.js
import { createApp } from 'vue'
import App from './App.vue'

const app = createApp(App)

app.mount('#app')
createApp(App) creates the app instance, and .mount('#app') tells Vue to render the root component into the DOM element with id="app", replacing its contents. Everything registered on this app instance, global components, directives, plugins like Vue Router or Pinia, is scoped to this one application, which also makes it possible to run multiple independent Vue apps on the same page without them interfering with each other.
5. What is the difference between Vue 2 and Vue 3 at a high level?
| Aspect | Vue 2 | Vue 3 |
|---|---|---|
| Reactivity | Object.defineProperty getters/setters | ES Proxy, can detect property addition/deletion and array index changes |
| API style | Options API only | Options API and Composition API, <script setup> |
| Root template nodes | Exactly one root element required | Multiple root nodes (fragments) allowed |
| TypeScript | Bolted on, weaker inference | Written in TypeScript, first-class inference |
| Global API | Vue.component(...), mutates a global | createApp(...) instance, no shared global state |
| Built-in components | <Transition>, <KeepAlive> similar | Same, plus <Teleport> and <Suspense> |
| Performance | Good | Faster initial render and updates via compiler optimizations (static hoisting, patch flags) |
| Support | End of life since end of 2023 | Actively developed, default for new projects |
Practically, the two biggest changes for day to day development are:
- Proxy-based reactivity system (which removed a lot of Vue 2's edge cases around adding new object properties or setting array indices) and,
- Composition API, which gives you a way to organize logic by feature instead of splitting it across
data,methods, andcomputed. The Options API still works in Vue 3, it's just no longer the default recommendation.
Read the Vue 3 Migration Guide for a full breakdown of what changed and how to upgrade from Vue 2 to Vue 3.
6. What does the Vue template compiler do to your <template> block?
Vue's compiler turns your <template> block into a JavaScript render function that produces virtual DOM nodes, roughly the same job JSX does in React, except Vue does it for its own HTML-like template syntax instead of requiring JSX.
<template>
    <p>{{ message }}</p>
</template>
compiles down to something conceptually like:
function render(ctx) {
    return h('p', null, ctx.message)
}
The important part is that this doesn't happen by naively re-running that function and diffing everything on every update. Vue 3's compiler analyzes the template ahead of time and adds optimizations: it marks static content (content with no bindings) so it's created once and skipped on every future re-render (static hoisting), and it attaches "patch flags" to dynamic nodes that tell the runtime exactly what kind of thing changed (text, a class, a prop), so updates only touch what actually needs touching instead of doing a full diff of the whole tree. This is why Vue 3 templates tend to outperform a hand-written render function for the same UI, the compiler has information a hand-written function doesn't.
7. What is the difference between the runtime-only build and the runtime+compiler build of Vue?
The runtime-only build contains everything needed to create components and update the DOM, but it does not include the template-to-render-function compiler. The runtime+compiler build includes that compiler as well, so it can compile a template string into a render function directly in the browser.
When you build a Vue app with Vite (or Vue CLI before it), your .vue files' <template> blocks are compiled to render functions ahead of time, during the build step. Because of that, the app only ever needs the smaller, runtime-only build in production, there's nothing left to compile at runtime.
You need the runtime+compiler build only in the rarer case where Vue has to compile a template string that exists at runtime rather than build time, for example mounting straight onto an in-DOM template with no build step, or passing a template string via the template option. For a normal SFC-based project scaffolded with create-vue, this distinction is handled for you automatically and you'll almost never touch it directly.
8. What is <script setup>, and why is it now the recommended way to write components?
<script setup> is a compile-time shorthand for using the Composition API inside a Single File Component. Anything you declare at the top level, variables, functions, imports, is automatically available in the <template> block, without you needing to explicitly return it.
<!-- Without <script setup> -->
<script>
import { ref } from 'vue'

export default {
    setup() {
        const count = ref(0)
        function increment() {
            count.value++
        }
        return { count, increment }
    }
}
</script>

<!-- With <script setup> -->
<script setup>
import { ref } from 'vue'

const count = ref(0)
function increment() {
    count.value++
}
</script>
It's recommended over the plain Composition API syntax and over the Options API for a few concrete reasons. There's much less boilerplate: no wrapping setup() function, no manual return statement, no components: {} registration since imported components are used directly in the template. TypeScript inference works better because everything is a normal top-level binding rather than being funneled through an object literal. It also compiles to more efficient JavaScript than a plain <script> component, since the compiler can statically link template usages directly to the setup bindings. The Options API still exists and is fully supported, but for new components <script setup> is what the Vue team and most current documentation lead with.
9. What is the difference between a Vue "app instance" and a "component instance"?
The app instance is created once, at the top of your application, with createApp(). It represents the whole application and is where you register things globally: global components, directives, plugins (Vue Router, Pinia), and app-level configuration. There's typically only one app instance per application.
A component instance exists per component, per place it's used. Every time a <UserCard> component is rendered on the page, Vue creates a separate component instance for it, holding that specific instance's local state (its refs, computeds, props, and so on). Two <UserCard> components on the same page have two entirely independent component instances, even though they share the same component definition.
const app = createApp(App)   // one app instance
app.component('UserCard', UserCard)  // registered globally, on the app
app.mount('#app')
With the Composition API you rarely interact with component instances directly, ref and computed already give you what you need inside a component. But the distinction still matters conceptually: app-level registration (plugins, global components) happens once on the app instance, while a component's own reactive state is scoped to its own component instance and doesn't leak to other instances of the same component.
10. What is Vite, and why did the Vue ecosystem move to it from Webpack-based tooling?
Vite is a build tool created by Evan You, Vue's creator, and it's now the default tooling for new Vue projects (via create-vue), replacing the older Webpack-based Vue CLI.
The main problem it solves is dev server startup and update speed on larger applications. Webpack-based tools have to bundle your entire dependency graph before the dev server can serve the first page, which gets slower as a project grows. Vite instead serves your source files as native ES modules directly to the browser during development, so there's no upfront bundling step, the dev server starts almost instantly regardless of app size. It pre-bundles heavier dependencies (like Vue itself or large npm packages) once using esbuild, which is written in Go and dramatically faster than JavaScript-based bundlers for that job.
Hot Module Replacement is also faster with Vite, because when you edit a file, Vite only needs to invalidate and re-serve that one module over the existing native ESM graph, instead of re-bundling a chunk of the dependency graph the way Webpack does.
For production builds, Vite switches to Rollup, which produces a well-optimized, tree-shaken bundle. Vue CLI is now in maintenance mode, and Vite, alongside first-class support for <script setup> SFC compilation, is the officially recommended way to scaffold and build Vue applications today.
Template Syntax and Directives
11. What is template interpolation (the mustache {{ }} syntax)?
Template interpolation is how you insert a JavaScript value into the text content of an element using double curly braces. Vue evaluates the expression inside the braces and inserts the result as text, then keeps it updated automatically whenever the underlying reactive data changes.
<template>
    <p>Hello, {{ user.name }}</p>
    <p>{{ price * quantity }}</p>
</template>
The content inside {{ }} must be a single JavaScript expression, not a statement, so {{ user.name }} and {{ isActive ? 'On' : 'Off' }} work, but assignments or if statements do not. This keeps templates declarative: you say what should be displayed, not the sequence of steps to compute and update it, and Vue's reactivity system handles re-rendering that text whenever the referenced values change.
12. What is the difference between v-bind and v-on, and what are their shorthand forms?
v-bind connects a piece of reactive data to an HTML attribute or a component prop, keeping it updated when the data changes. v-on attaches an event listener to an element or component, running a handler when that event fires.
| Directive | Purpose | Shorthand | Example |
|---|---|---|---|
v-bind | Bind an attribute/prop | : | :src="imageUrl" |
v-on | Listen for an event | @ | @click="handleClick" |
<template>
    <img :src="avatarUrl" :alt="user.name" />
    <button @click="save">Save</button>
</template>
In practice, almost everyone uses the shorthand forms (: and @) rather than writing out v-bind: and v-on:, they read closer to plain HTML attributes and event handlers. Both directives can also take a dynamic argument, like :[attributeName]="value" or @[eventName]="handler", when the attribute or event name itself needs to be computed rather than fixed in the template.
13. What is the difference between v-if and v-show?
v-if conditionally renders an element: when the condition is false, Vue does not render the element to the DOM at all, and any component inside it is fully unmounted (its lifecycle hooks fire accordingly). v-show always renders the element, but toggles its CSS display property between none and its normal value.
<template>
    <div v-if="isLoggedIn">Welcome back</div>
    <div v-show="isPanelOpen">Panel content</div>
</template>
This leads to different cost trade-offs. v-if has a higher toggle cost (it has to create or destroy DOM nodes and mount or unmount components each time), but a lower initial cost if the condition starts false, since nothing is rendered until it becomes true. v-show has a higher initial render cost (it renders the element regardless of the condition), but toggling it later is cheap since it's just a CSS change.
As a rule of thumb, use v-show for something that toggles often, like a dropdown or tab panel, and v-if for something that rarely changes, or where you specifically want the component to be destroyed and recreated, like a modal that should reset its internal state each time it opens.
14. What does v-for do, and why does it need a :key?
v-for renders a list of elements by looping over an array, object, or range, once per item.
<template>
    <ul>
        <li v-for="item in items" :key="item.id">
            {{ item.name }}
        </li>
    </ul>
</template>
The :key is how Vue tracks which DOM node corresponds to which piece of data across re-renders. Without a stable key, Vue's default patching strategy tries to reuse and mutate existing DOM elements in place rather than tracking identity, based only on position. If the list gets reordered, filtered, or has items inserted or removed, that in-place patching can update the wrong element's content, or leave stale local state (like text typed into an input, or a child component's own internal state) attached to the wrong logical item. Giving each item a unique, stable :key, usually an id from your data rather than the array index, tells Vue exactly which existing element maps to which item, so it can correctly reorder and reuse elements instead of guessing.
15. Why is using the array index as a :key in v-for considered risky?
An index-based key ties an item's identity to its position in the array (0, 1, 2, ...) rather than to the actual data it represents. That's fine as long as the list never reorders and items are only ever added at the end. It breaks down the moment items are inserted at the front, removed from the middle, filtered, or sorted, because the item that used to be at index 2 is now a completely different item, but Vue still sees "key 2" and assumes it's the same element as before.
<!-- risky -->
<li v-for="(item, index) in items" :key="index">
    <input v-model="item.text" />
</li>
If you remove the first item from items here, Vue thinks the element previously at index 1 is unchanged, and only the last element needs removing, so it reuses the existing <input> DOM nodes and their typed-in values in place rather than tracking which input belonged to which item. The visible result is inputs (or any local component state) appearing to hold onto the wrong row's data after the list changes.
The fix is to key on something stable that actually identifies the item, typically an id from your data:
<li v-for="item in items" :key="item.id">
    <input v-model="item.text" />
</li>
Index keys are only acceptable for lists that are static and never reordered or filtered.
16. How do you bind dynamic classes with :class (object and array syntax)?
:class lets you toggle CSS classes based on reactive state instead of concatenating class name strings by hand. It accepts an object, an array, or a mix of both, and it can be combined with a plain static class attribute on the same element.
<template>
    <!-- object syntax: keys are class names, values are booleans -->
    <div :class="{ active: isActive, 'text-danger': hasError }"></div>

    <!-- array syntax: list of class values -->
    <div :class="[baseClass, isActive ? 'active' : '']"></div>

    <!-- array with an object inside -->
    <div :class="[baseClass, { active: isActive }]"></div>
</template>
The object syntax is the most common for conditional classes: each key is a class name, and it's applied only when its value is truthy, so { active: isActive } adds the active class whenever isActive is true. The array syntax is more useful when you're combining several class expressions together, like a static base class plus a computed one. Both forms are fully reactive, so classes update automatically whenever the underlying state changes, and both can be used alongside a regular static class="..." attribute, Vue merges them.
17. How do you bind dynamic inline styles with :style?
:style binds inline CSS styles to an element using a JavaScript object or array of objects, instead of building a style string by hand.
<template>
    <div :style="{ color: activeColor, fontSize: fontSize + 'px' }"></div>

    <!-- camelCase or kebab-case (quoted) keys both work -->
    <div :style="{ 'font-size': fontSize + 'px' }"></div>

    <!-- array syntax merges multiple style objects -->
    <div :style="[baseStyles, overrideStyles]"></div>
</template>
Object keys can be written in camelCase (fontSize) or kebab-case with quotes ('font-size'), both map to the same CSS property. Values that need units, like pixel sizes, have to include the unit as part of the string, Vue does not automatically append px. The array syntax is useful when you want to merge a base set of styles with conditional overrides, later objects in the array take precedence for any overlapping properties. Vue also automatically adds vendor prefixes for CSS properties that need them, so you generally don't need to write -webkit- or -moz- variants yourself.
18. What are event modifiers in Vue (.stop, .prevent, .once, .self, .capture, .passive)?
Event modifiers are suffixes you attach to v-on (or @) that handle common event-related tasks declaratively in the template, instead of you having to call things like event.preventDefault() inside the handler function itself.
| Modifier | Effect |
|---|---|
.stop | Calls event.stopPropagation(), stops the event from bubbling further |
.prevent | Calls event.preventDefault(), stops the browser's default action (e.g. form submit) |
.once | The handler fires at most once, then the listener is removed |
.self | Only triggers if the event's target is the element itself, not a child |
.capture | Listens during the capture phase instead of the bubble phase |
.passive | Tells the browser the handler won't call preventDefault(), improving scroll performance |
<template>
    <form @submit.prevent="handleSubmit">
        <button @click.stop="removeItem">Remove</button>
    </form>
</template>
Modifiers can be chained, like @click.stop.prevent, and Vue applies them in the order they're written. Keeping this logic in the template rather than the handler keeps the handler function focused purely on what it should do, not on generic DOM event plumbing.
19. What are the built-in v-model modifiers (.lazy, .number, .trim)?
v-model normally syncs on the input event, meaning it updates on every keystroke. The built-in modifiers change that default behavior.
<template>
    <!-- sync on 'change' instead of 'input' (fires on blur/enter) -->
    <input v-model.lazy="message" />

    <!-- automatically cast the entered value to a Number -->
    <input v-model.number="age" type="number" />

    <!-- automatically trim leading/trailing whitespace -->
    <input v-model.trim="username" />
</template>
.lazy switches the sync point from the input event to the change event, so the bound value updates only after the field loses focus or the user presses Enter, useful if you don't need to react on every keystroke. .number casts the entered string to a number automatically, which is handy since form inputs always produce strings by default, even for type="number" fields. .trim strips leading and trailing whitespace from the value automatically. Modifiers can be combined, like v-model.lazy.trim="username".
20. What does v-bind="object" do (binding a whole object of attributes at once)?
Passing an object directly to v-bind, without an argument, binds every key/value pair in that object as a separate attribute or prop on the element, in one go, instead of writing out each binding individually.
<script setup>
const linkAttrs = {
    href: 'https://devportalnotes.com',
    target: '_blank',
    rel: 'noopener'
}
</script>

<template>
    <a v-bind="linkAttrs">Visit site</a>
    <!-- equivalent to -->
    <a :href="linkAttrs.href" :target="linkAttrs.target" :rel="linkAttrs.rel">Visit site</a>
</template>
This is useful for grouping a set of related attributes into one config object rather than repeating :attr="obj.attr" for each one, and it's also commonly used together with $attrs, for example v-bind="$attrs" on a component's root element to forward any attributes the parent passed down that weren't explicitly declared as props. If the same attribute is also set individually on the element, the order in the template decides which one wins, later bindings override earlier ones.
21. Can you use v-if and v-for on the same element, and why is it discouraged?
Technically you can put both directives on the same element, but it's discouraged, and in Vue 3 it will actually throw a compile-time error rather than silently doing something confusing.
The reason is precedence. In Vue 3, v-if has higher precedence than v-for on the same element, meaning it's evaluated first, before the v-for variable even exists in scope. So something like this is invalid, because todo isn't defined yet when v-if runs:
<!-- invalid in Vue 3, todo is not yet defined -->
<li v-for="todo in todos" v-if="!todo.done" :key="todo.id">
    {{ todo.text }}
</li>
There are two clean ways to fix it. Filter the list before it reaches the template, with a computed:
<script setup>
import { computed } from 'vue'

const activeTodos = computed(() => todos.value.filter(todo => !todo.done))
</script>

<template>
    <li v-for="todo in activeTodos" :key="todo.id">{{ todo.text }}</li>
</template>
Or move the v-if to a wrapping <template> tag around the loop, so it applies per iteration without conflicting with v-for on the same element:
<template v-for="todo in todos" :key="todo.id">
    <li v-if="!todo.done">{{ todo.text }}</li>
</template>
The computed approach is usually preferred, since it also avoids re-running the filter check on every single render for items that were already filtered out.
22. What is v-once, and when would you use it?
v-once tells Vue to render an element (and everything inside it) exactly once, and then treat it as static content from then on, skipping it on all future re-renders even if the data it originally displayed changes.
<template>
    <h1 v-once>{{ title }}</h1>
</template>
It's a performance optimization for content you know will never need to update after the first render, like a heading built from a prop that's set once and never changes, or a large chunk of content where re-evaluating bindings on every render would be wasted work. Because the element is skipped entirely during Vue's update process, it also slightly reduces the amount of work the virtual DOM diffing has to do elsewhere in that render pass. It's a fairly niche optimization though, reach for it only when you've identified a genuinely static piece of an otherwise dynamic template, not as a default habit.
23. What is v-pre, and when would you use it?
v-pre tells the compiler to skip an element and all of its children entirely, no directive processing, no interpolation. Whatever is written in the markup is output as raw, literal HTML, including any {{ }} mustache syntax.
<template>
    <span v-pre>{{ this will not be evaluated }}</span>
</template>
There are two typical uses. One is a small performance gain: for large blocks of markup with no dynamic bindings or directives at all, skipping compilation on them entirely avoids unnecessary compiler work. The other, more common use is displaying literal Vue syntax to a reader, for example a documentation page that wants to show {{ message }} as text rather than have Vue try to evaluate message as an expression. Outside of those two cases it's rarely needed in everyday component code.
24. What is v-cloak, and is it still relevant in modern Vue?
v-cloak is a directive that stays on an element until Vue has finished compiling and mounting it, and it's normally paired with a small CSS rule to hide the element until that happens:
<style>
[v-cloak] {
    display: none
}
</style>

<div id="app" v-cloak>
    {{ message }}
</div>
Its purpose is to prevent a brief flash of uncompiled mustache syntax, literally seeing {{ message }} on screen for a moment, before Vue takes over. That flash can happen when a browser downloads and parses an HTML page (with the raw template already in the DOM) and then has to wait for the Vue script to load and compile it, which is a scenario specific to using Vue directly via a CDN <script> tag with an in-DOM template.
In a modern, build-tool-based Vue app (Vite, create-vue, SFCs), it's mostly irrelevant. Your templates are compiled to render functions at build time, and the app only renders into the DOM once Vue is already running, so there's no raw, uncompiled template sitting in the page waiting to be parsed, and therefore nothing for v-cloak to hide. You'd only reach for it today if you're using the no-build, CDN-script approach to Vue rather than a bundled SFC application.
Reactivity System
25. What is reactivity, and how does Vue's reactivity system work at a high level?
Reactivity is what lets Vue automatically update the DOM when your data changes, without you writing any manual "update the UI now" code. You change a variable, and the parts of the page that depend on it just update themselves.
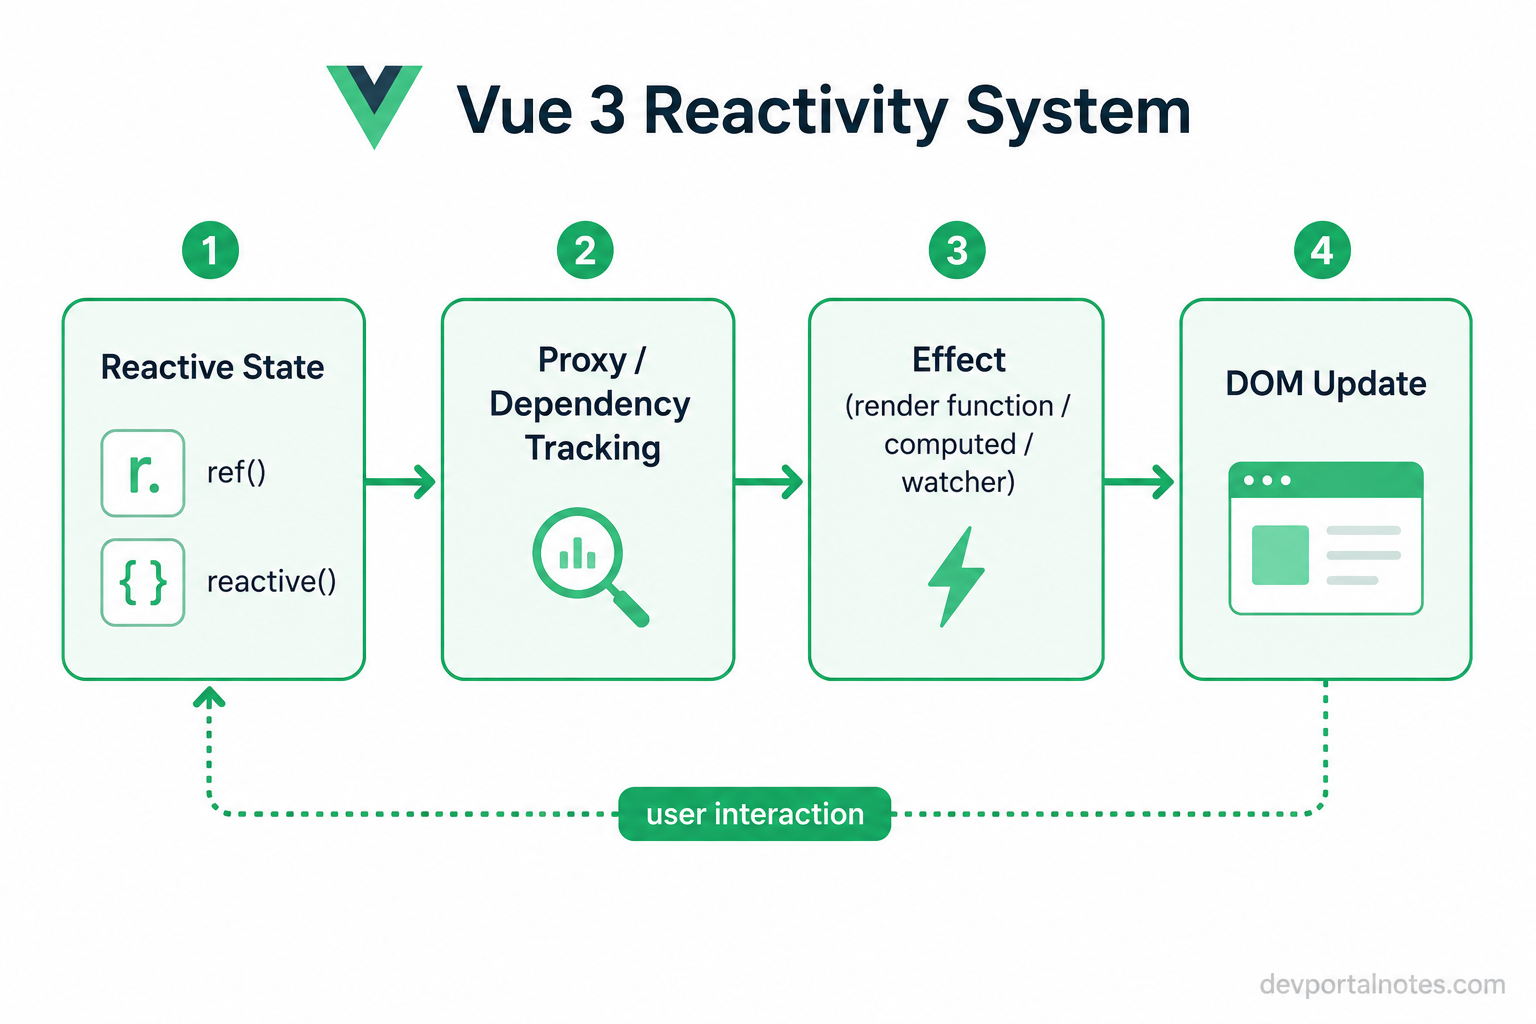
Under the hood, Vue 3 wraps your data in a Proxy (through reactive()) or in a special object with a .value property (through ref()). When a component renders, Vue tracks which reactive properties were read during that render, this is called dependency tracking. When one of those properties is later written to, Vue knows exactly which parts of the app depend on it and schedules them to re-run.
import { reactive, effect } from 'vue'

const state = reactive({ count: 0 })

effect(() => {
    console.log('count is', state.count)
})

state.count++  // logs "count is 1" automatically
The effect() function above is the low-level primitive Vue's reactivity is built on. Component render functions are, at their core, just an effect that Vue creates for you. So the whole system boils down to two steps repeating forever: track what a piece of code reads, and re-run that code when what it read changes.
26. What is the difference between ref() and reactive()?
Both are ways to create reactive state, but they wrap values differently. ref() takes any value, including primitives like numbers and strings, and wraps it in an object with a single .value property. reactive() takes an object (or array, Map, Set) and returns a Proxy of it directly, no wrapper needed.
import { ref, reactive } from 'vue'

const count = ref(0)
count.value++

const state = reactive({ count: 0 })
state.count++
The practical differences that matter:
ref() | reactive() | |
|---|---|---|
| Works with primitives | Yes | No, only objects |
| Access syntax in script | .value | Direct property access |
| Access syntax in template | Auto-unwrapped | Direct property access |
| Can be reassigned entirely | Yes (count.value = newVal) | No, reassigning loses reactivity |
| Destructuring | Safe, still reactive | Breaks reactivity |
A common convention is to use ref() for most state, since it works for everything and reassigning the whole value is common in day to day code, and reach for reactive() when you have a tightly related group of fields that will always be read and written together, like a form object.
27. Why do you need .value to read a ref in a <script> block but not in the template?
A ref is just a plain JavaScript object with a getter and setter defined on its .value property (using Object.defineProperty internally, or a class with a getter/setter, depending on the version). JavaScript has no way to intercept "reading a variable" the way a Proxy can intercept "reading a property," so outside of a template, there is no magic available: you have to explicitly go through .value to trigger the getter that Vue attached.
Templates are different because they are not really JavaScript, they are compiled. Vue's compiler walks the template, and for any top-level variable it knows came from a ref() (because it was returned from setup() or is a top-level binding in <script setup>), it automatically inserts the .value access for you during compilation. This is called ref unwrapping.
<script setup>
import { ref } from 'vue'
const count = ref(0)
function increment() {
    count.value++ // must use .value here
}
</script>

<template>
    <button @click="increment">{{ count }}</button>
    <!-- no .value needed, compiler handles it -->
</template>
One gotcha: unwrapping only happens for refs that are top-level in the template's data context. A ref nested inside a plain object, like state.myRef where state is a reactive object, does get auto-unwrapped because reactive() unwraps nested refs on property access. But a ref inside a plain array or a non-reactive object does not unwrap automatically, you still need .value there.
28. How is Vue 3's Proxy-based reactivity different from Vue 2's Object.defineProperty based reactivity?
Vue 2 made objects reactive by walking every property on them at creation time and replacing each one with a getter/setter pair using Object.defineProperty. This approach had real limitations. Because it worked property by property, Vue 2 could not detect new properties added to an object after creation, this.obj.newProp = 'x' was silently non-reactive unless you used Vue.set(). It also could not detect array index assignment (arr[0] = 'x') or length changes, so Vue 2 had to override array methods like push and splice with reactive versions instead.
Vue 3 solves both problems by wrapping the entire object in a Proxy instead of touching individual properties.
const state = reactive({ count: 0 })
state.newProp = 'hello'   // reactive in Vue 3, was not in Vue 2

const list = reactive([1, 2, 3])
list[0] = 99               // reactive in Vue 3, needed Vue.set in Vue 2
list.length = 0            // also tracked correctly
A Proxy intercepts operations at the object level (get, set, has, deleteProperty, and so on), so any property, whether it existed at creation time or was added later, and any array operation, goes through the same trap. This also means Vue 3 no longer needs to eagerly walk and instrument every nested property up front; conversion happens lazily, only when a nested object is actually accessed, which is also a performance win for large state trees.
29. What are the limitations of reactive() that make ref() necessary for primitives?
reactive() is built on JavaScript's Proxy, and a Proxy can only wrap objects, it has nothing to intercept on a primitive like a number or a string, since primitives are passed by value, not by reference. If reactive(0) were allowed, there would be no object identity for Vue to attach a Proxy to, so Vue explicitly disallows it (and warns you in development if you try).
This is exactly the gap ref() fills. Instead of trying to make the primitive itself reactive, ref() wraps it inside an object ({ value: 0 }) and makes that wrapper object's .value property reactive using a getter/setter pair. Now there is an object for Vue to track, and reassigning .value triggers updates just like changing a property on a reactive() object would.
import { ref } from 'vue'

const count = ref(0)        // works, wrapped in an object internally
// const count = reactive(0)  // invalid, warns and just returns 0
This is also why ref() is the more general tool: it works for primitives, objects, and everything in between (in fact, if you pass an object to ref(), it internally calls reactive() on it), whereas reactive() is strictly limited to object types.
30. What happens if you destructure a reactive() object, and how do toRefs fix it?
When you destructure a reactive() object, you pull out the current value of each property as a plain, disconnected variable. That variable is no longer linked to the Proxy, so changing the original state does not update it, and changing the destructured variable does not update the original state either. Reactivity is lost.
import { reactive } from 'vue'

const state = reactive({ count: 0, name: 'Vue' })
const { count, name } = state

state.count++
console.log(count) // still 0, not connected anymore
toRefs() fixes this by converting every property on a reactive object into its own individual ref, each one linked back to the original source through a getter/setter. Destructuring the result of toRefs() gives you refs, not disconnected values, so the connection survives.
import { reactive, toRefs } from 'vue'

const state = reactive({ count: 0, name: 'Vue' })
const { count, name } = toRefs(state)

state.count++
console.log(count.value) // 1, still connected
This pattern shows up constantly in composables. If a composable returns a reactive object directly and the caller destructures it, reactivity breaks silently with no error. Returning toRefs(state) (or a plain object of individual refs) instead means the caller can safely destructure without losing the connection to the underlying state.
31. What is the difference between toRef and toRefs?
toRef() creates a single ref linked to one property of a reactive object (or a ref linked to any getter/setter pair, or even a plain default value). toRefs() does the same thing but for every property on a reactive object at once, returning a plain object full of refs.
import { reactive, toRef, toRefs } from 'vue'

const state = reactive({ count: 0, name: 'Vue' })

const countRef = toRef(state, 'count')     // just one property
const refs = toRefs(state)                  // { count: Ref, name: Ref }
Use toRef() when you only need to pass one property of a reactive object down to a child component or a composable while keeping it linked to the source, for example toRef(props, 'modelValue'). Use toRefs() when you want to destructure the whole object at once, most commonly at the end of a composable function so callers can pull out individual pieces with object destructuring without losing reactivity. Both directions stay live: writing to countRef.value updates state.count, and writing to state.count updates countRef.value.
32. What does readonly() do, and when would you wrap a value with it?
readonly() takes a reactive object (or a plain object, or even a ref) and returns a new proxy where every mutation attempt is intercepted and blocked. In development, trying to write to a readonly value logs a warning and the write is silently ignored; in production the warning is stripped but the write still does nothing. Reads still work normally, and the readonly version still tracks dependencies and updates the UI when the underlying source changes.
import { reactive, readonly } from 'vue'

const original = reactive({ count: 0 })
const copy = readonly(original)

copy.count++       // warns in dev, does nothing
original.count++   // this still works, and copy.count reflects it too
The main use case is enforcing one-way data flow. A common pattern is a composable or a store that owns some state internally and wants to expose it to the rest of the app without letting outside code mutate it directly, forcing all changes to go through explicit functions or actions instead.
function useCounter() {
    const state = reactive({ count: 0 })
    function increment() {
        state.count++
    }
    return {
        state: readonly(state),
        increment
    }
}
This is also exactly how props behave by default in Vue components: a child receives readonly reactive props precisely so it cannot accidentally mutate state that the parent owns.
33. What is the difference between shallowRef/shallowReactive and their deep versions?
By default, ref() and reactive() are deep: if you give them a nested object, Vue recursively makes every nested property reactive too, so changing state.user.address.city still triggers updates. That recursive conversion has a cost, especially for large or deeply nested objects.
shallowRef() only makes the .value assignment itself reactive; it does not touch anything inside the value. shallowReactive() only makes the top-level properties reactive; nested objects inside it stay as plain, non-reactive objects.
import { shallowRef, shallowReactive } from 'vue'

const state = shallowRef({ user: { name: 'Kashyap' } })
state.value.user.name = 'Changed' // does NOT trigger an update
state.value = { user: { name: 'New' } } // this DOES trigger an update

const obj = shallowReactive({ nested: { count: 0 } })
obj.nested.count++  // does NOT trigger an update
obj.nested = { count: 1 } // this DOES trigger an update
The typical use case is performance: large data structures you receive from an API and treat as immutable blobs (only ever replaced wholesale, never mutated piece by piece), or integrating with external state management or non-Vue libraries where you do not want Vue's reactivity conversion overhead applied to every nested field. If you find yourself mutating deep inside a shallow value and expecting the UI to update, that is the tell that you reached for the wrong one.
34. What is markRaw(), and when would you use it?
markRaw() marks an object so that Vue's reactivity system will never convert it into a reactive Proxy, even if you later pass it into reactive(). It permanently opts that specific object out of tracking.
import { reactive, markRaw } from 'vue'

class HeavyThirdPartyInstance {
    // some large external library instance
}

const state = reactive({
    instance: markRaw(new HeavyThirdPartyInstance())
})

state.instance // plain object, never wrapped in a Proxy
This matters for two reasons. First, performance: wrapping large complex objects (like a charting library instance, a map instance, or a big class hierarchy) in a reactive Proxy adds tracking overhead for no benefit if you never need Vue to react to changes on it. Second, and more importantly, some third party objects genuinely break when wrapped in a Proxy, because the library does internal identity checks (===) that fail once the object is a Proxy wrapper rather than the original instance, or because the library's internal methods do not expect to be called through a Proxy. markRaw() is the escape hatch for storing these kinds of objects inside otherwise reactive state without either problem.
35. What do isRef, unref, and toValue do?
These are small utility functions for writing code, usually composables, that needs to work with values that might or might not be refs.
isRef(value) is a type guard that tells you whether something is a ref, returning true or false. It is mostly used in composables that accept flexible arguments and need to branch based on what they were given.
unref(value) returns value.value if value is a ref, or returns value unchanged if it is not. It is shorthand for isRef(value) ? value.value : value, letting you safely read a value without knowing in advance if it was passed as a ref or a plain value.
import { ref, isRef, unref } from 'vue'

function double(x) {
    return unref(x) * 2
}

double(4)       // 8
double(ref(4))  // 8, unwraps automatically
toValue() does something similar to unref() but goes a step further: it also unwraps getter functions, calling them if the input is a function, and it is reactive, meaning if you use it inside an effect or computed, it will re-track dependencies correctly even as the source changes. This makes toValue() the recommended way to normalize arguments in composables, since it accepts a plain value, a ref, or a getter function and always gives you the current value back.
import { toValue } from 'vue'

function useFeature(source) {
    watchEffect(() => {
        const value = toValue(source) // works whether source is a value, a ref, or () => something
        console.log(value)
    })
}
36. What is nextTick(), and why do you sometimes need it after changing reactive state?
Vue does not update the DOM the instant you change reactive state. Instead, it batches updates: if you change several reactive properties in the same tick of the event loop, Vue queues a single re-render and flushes it asynchronously, rather than re-rendering after every individual assignment. This is a deliberate performance optimization, since re-rendering the DOM synchronously on every single mutation would be wasteful if you are about to change ten more properties right after.
nextTick() returns a promise that resolves after Vue has finished flushing its update queue and the DOM has actually been patched to reflect the new state. You use it whenever you need to read something from the DOM (like an element's height, or its scroll position) immediately after a state change that affects that element.
<script setup>
import { ref, nextTick } from 'vue'

const show = ref(false)
const box = ref(null)

async function reveal() {
    show.value = true
    // at this point, the DOM has not updated yet, box.value has no height
    await nextTick()
    // now the DOM is updated, safe to measure
    console.log(box.value.offsetHeight)
}
</script>
Without await nextTick(), reading box.value.offsetHeight right after show.value = true would give you stale measurements, because the v-if that reveals the element has not actually run yet in the DOM.
37. How does Vue know which parts of the DOM to update when reactive state changes?
Vue does not diff the entire DOM tree blindly on every change. It compiles each component's template into a render function, and when that render function runs, Vue builds a virtual DOM tree, a lightweight JavaScript object representation of what the real DOM should look like. On the next render, Vue compares (diffs) the new virtual DOM tree against the previous one, and only applies the minimal set of real DOM operations needed to make the actual DOM match.
Reactivity is what decides when to re-run that render function in the first place. Every component's render function is wrapped in a reactive effect. While it runs, Vue records every reactive property it read, count.value, state.name, and so on, building a dependency map. When one of those exact properties changes later, Vue looks up which effects depend on it and re-runs only those, not every component in the app.
Vue 3's compiler also adds an optimization on top of the raw virtual DOM diff called static analysis: at compile time, it can see which parts of a template are static (never change) and which are dynamic (bound to reactive data), and it marks the dynamic ones with "patch flags." At render time, Vue skips comparing static nodes entirely and jumps straight to patching only the flagged dynamic bindings. This is why Vue 3's rendering is noticeably faster than a naive virtual DOM diff: reactivity narrows down which components re-render, and compiler flags narrow down which parts of those components actually get touched in the DOM.
38. What is an "effect" in Vue's reactivity system?
An effect is a piece of code that Vue re-runs automatically whenever a reactive value it depends on changes. It is the core primitive that everything else in Vue's reactivity is built on top of, computed, watch, watchEffect, and even component rendering are all effects under the hood.
The low-level function is effect(), exported from @vue/reactivity (not typically something you call directly in application code, but useful for understanding the mechanism). When you call effect(fn), Vue runs fn immediately, and while it runs, tracks every reactive property that gets read inside it. Vue then subscribes that effect to each of those properties. The next time any of them changes, Vue re-runs fn automatically.
import { reactive, effect } from 'vue'

const state = reactive({ count: 0 })

effect(() => {
    console.log('count changed to', state.count)
})

state.count = 5 // effect re-runs, logs "count changed to 5"
watchEffect() is essentially a thin, component-lifecycle-aware wrapper around this same effect() mechanism: it runs your function immediately, tracks dependencies automatically, and cleans itself up when the component unmounts. Understanding that render functions, watchers, and computed properties are all "just effects" underneath is the key to understanding why Vue's reactivity feels automatic: you never manually subscribe to anything, reading a value inside any of these effect-based APIs is the subscription.
39. What is effectScope(), and when would you reach for it?
effectScope() groups multiple reactive effects, computed properties, and watch/watchEffect calls together so they can all be stopped, cleaned up, and garbage collected as one unit, instead of you having to track and stop each one individually.
Normally, when effects are created inside a component's setup() (or <script setup>), Vue automatically binds their lifecycle to that component and disposes of them when the component unmounts, so you rarely think about this. But composables that create watchers or computed values outside of a component's setup context, for example inside a plugin, a store, or a standalone utility that is not itself a component, do not get that automatic cleanup. effectScope() is the manual tool for that situation.
import { effectScope, ref, watch, computed } from 'vue'

const scope = effectScope()

scope.run(() => {
    const count = ref(0)
    const double = computed(() => count.value * 2)
    watch(count, (val) => console.log('count is', val))
})

// later, stop everything created inside the scope at once
scope.stop()
Everything created inside scope.run(fn) gets registered to that scope automatically, so a single scope.stop() tears down every watcher and computed inside it, preventing memory leaks. This is mostly relevant if you are authoring composables or libraries meant to be used outside typical component setup, most app code never needs to call effectScope() directly because components handle this for you.
40. What are common reactivity gotchas that trip up developers coming from Vue 2 or from React?
A handful of mistakes come up constantly, regardless of framework background.
Forgetting .value on a ref outside the template. Since templates auto-unwrap refs but plain script code does not, it is easy to write count++ instead of count.value++ and wonder why nothing updates.
Destructuring a reactive() object. As covered earlier, this disconnects the destructured variables from the source. The fix is toRefs(), or simply preferring ref() for values that will need to be passed around individually.
Replacing an entire reactive() object. Reassigning a reactive variable entirely, state = { count: 1 }, breaks the reactive connection, because you have pointed the variable at a brand new plain object instead of mutating the existing Proxy. Mutate properties on the existing object instead, or use ref() if whole-value replacement is something you do often.
let state = reactive({ count: 0 })
state = { count: 1 } // breaks reactivity, this is now a plain object
Expecting synchronous DOM updates. Coming from imperative DOM code, developers often read element.offsetHeight or similar right after a state change and get stale results, because Vue batches DOM updates. This is what nextTick() is for.
Losing reactivity across component boundaries with plain destructured props. Destructuring props in <script setup> (const { title } = defineProps(...)) loses reactivity for that variable in the same way destructuring a reactive object does; Vue's compiler has some special-case handling for this in default value expressions, but generally you should access props.title directly, or wrap it with toRef(props, 'title') if you need to pass it elsewhere as a standalone reactive reference.
Coming from React and expecting immutability. React developers are trained to never mutate state directly (setState with a new object/array) because React relies on reference equality checks. Vue is the opposite: reactive() and ref() are built specifically so you can mutate in place (state.items.push(x), state.count++) and have Vue detect it automatically. Cloning state defensively before mutating it, out of a React-trained instinct, is unnecessary in Vue and just adds overhead.
Computed Properties, Watchers, and Methods
41. What is a computed property, and how is it different from a method?
A computed property is a value that's derived from other reactive state and automatically updates when that state changes. A method is just a plain function you call yourself, it doesn't know anything about reactivity on its own.
The practical difference is caching. A computed property tracks the reactive values it reads and only recalculates when one of them actually changes. A method reruns every single time you call it, including every time the component re-renders, even if the result would be identical.
<script setup>
import { ref, computed } from 'vue'

const price = ref(100)
const quantity = ref(3)

const total = computed(() => price.value * quantity.value)

function getTotal() {
    return price.value * quantity.value
}
</script>
Use total in the template if you're going to reference it more than once, use a method when you need to pass arguments or trigger something on an event like a click.
42. Why are computed properties cached, and why does that matter for performance?
Vue caches a computed property's return value and only recomputes it when one of its reactive dependencies changes. Until then, reading the computed property anywhere in the template just returns the cached value instantly, it doesn't rerun your function.
This matters because templates can re-render often (any reactive state used in that component changing triggers a re-render), and it's easy to reference the same derived value in several places. If that derived value were a method call instead, an expensive operation like filtering a 10,000-item array would run again on every render, even when the array and filter criteria haven't moved at all.
const results = computed(() => items.value.filter(i => i.active))
Here results only re-filters when items (or something read inside the function) actually changes, no matter how many times it's used in the template or how often the component re-renders for unrelated reasons.
43. What is a computed setter, and when would you use one?
By default a computed property is read-only, you pass it a getter function and it returns a value. A computed setter lets that same computed property also be written to, by passing an object with get and set instead of a plain function.
You reach for this when you want a derived value to behave like a normal writable piece of state from the outside, usually to keep two related pieces of data in sync. A classic example is splitting a full name into first and last name:
<script setup>
import { ref, computed } from 'vue'

const firstName = ref('Ada')
const lastName = ref('Lovelace')

const fullName = computed({
    get() {
        return `${firstName.value} ${lastName.value}`
    },
    set(newValue) {
        const [first, last] = newValue.split(' ')
        firstName.value = first
        lastName.value = last
    }
})
</script>
Now fullName.value = 'Grace Hopper' updates both firstName and lastName behind the scenes. This is also common when binding a computed directly with v-model on a form input that needs to transform a value on the way in and out.
44. What is the difference between computed and watch?
computed is for deriving a value you're going to use somewhere, typically in the template. watch is for running a side effect in response to a change, it doesn't give you a value to render, it gives you a callback to react in.
computed | watch | |
|---|---|---|
| Returns | A reactive value (ref) | Nothing, runs a callback |
| Purpose | Derive/transform data | Run side effects (API calls, logging, DOM work) |
| Caching | Yes, cached until dependencies change | No caching, just runs the callback |
| Access to old value | No | Yes, (newVal, oldVal) => {} |
| Typical use | <p>{{ fullName }}</p> | Fetching data when a route param changes |
A good rule of thumb: if you're about to write watch just to set another ref to a transformed version of the first one, that's almost always better expressed as a computed. Reach for watch when the reaction is something computed can't express, like calling an API, writing to localStorage, or manipulating a non-Vue library.
45. What is the difference between watch and watchEffect?
Both let you run a function in response to reactive state changing, but they differ in how they figure out what to track and when they first run.
watch is explicit: you tell it exactly which source (or sources) to watch, and it only reruns when that specific source changes. It's lazy by default, meaning it doesn't run on setup, only after the watched source changes, and it gives you both the new and old value.
watchEffect is implicit: it runs your function immediately once, and automatically tracks whatever reactive values you happened to read inside it during that run. It reruns whenever any of those tracked values change. It does not give you the old value.
// watch: explicit source, lazy, gives old/new value
watch(userId, (newId, oldId) => {
    fetchUser(newId)
})

// watchEffect: auto-tracks dependencies, runs immediately
watchEffect(() => {
    fetchUser(userId.value)
})
Use watch when you want to watch a specific, narrow source and need the old value, or when you don't want the effect to run immediately. Use watchEffect when the effect naturally reads several reactive values together and you just want "rerun whenever any of these change" without listing them out by hand.
46. What does the deep option do on watch, and when do you actually need it?
By default, watch on an object or array only fires when the reference itself is replaced, not when a property inside it changes. So watch(user, callback) won't fire if you do user.value.name = 'New Name', because user.value still points to the same object.
The deep: true option makes Vue recursively walk into the object and track every nested property, so the callback fires on mutations anywhere inside it, not just on reassignment.
const user = ref({ name: 'Ada', settings: { theme: 'dark' } })

watch(user, () => {
    console.log('something inside user changed')
}, { deep: true })
You need deep specifically when you're watching a ref or reactive object/array and care about nested mutations rather than the whole thing being swapped out. Be careful with it though: deep watching a large or deeply nested object walks the entire structure on every change, which can hurt performance. If you only care about one nested field, it's usually cheaper to watch a getter for that specific path, like watch(() => user.value.settings.theme, callback), instead of turning on deep.
47. What does the immediate option do on watch?
Normally, watch is lazy: the callback only runs the first time the watched source changes, not when the watcher is first set up. immediate: true makes Vue also run the callback right away, once, with the current value, before waiting for any change.
watch(userId, (id) => {
    fetchUser(id)
}, { immediate: true })
This is handy any time the side effect should also happen on initial load, not just on subsequent changes, for example fetching data based on a prop that already has a value the moment the component mounts. Without immediate, you'd have to duplicate the fetch call once outside the watcher and once inside it.
48. How do you clean up a side effect inside watchEffect using its onCleanup callback?
watchEffect passes an onCleanup function as an argument to the callback you give it. You call onCleanup(fn) to register a function that Vue will run right before the effect reruns, and also when the watcher is stopped (for example, when the component unmounts). It's how you cancel or undo whatever the previous run of the effect started, so stale work doesn't leak into the next run.
This matters most for async work like fetch requests or timers, where a fast-changing dependency could otherwise fire off several overlapping requests and let an old, slow response overwrite a newer one.
watchEffect((onCleanup) => {
    const controller = new AbortController()

    fetch(`/api/users/${userId.value}`, { signal: controller.signal })
        .then(res => res.json())
        .then(data => { user.value = data })

    onCleanup(() => controller.abort())
})
Every time userId changes, Vue calls the cleanup function first, aborting the in-flight request, before running the effect again with the new id. The same pattern works for clearing a setTimeout, removing an event listener, or unsubscribing from anything you subscribed to inside the effect.
Components: Props, Events, and v-model
49. What are props, and how do you declare and validate them?
Props are how a parent component passes data down into a child component. They flow one way, from parent to child, and the child treats them as read-only input.
In <script setup>, you declare props with the defineProps macro, either as a simple array of names or, more usefully, as an object where each entry describes the type, whether it's required, a default value, and an optional custom validator.
<script setup>
const props = defineProps({
    title: {
        type: String,
        required: true
    },
    count: {
        type: Number,
        default: 0
    },
    status: {
        type: String,
        default: 'idle',
        validator: (value) => ['idle', 'loading', 'done'].includes(value)
    }
})
</script>
During development, Vue checks incoming prop values against this declaration and logs a console warning if a required prop is missing, a type doesn't match, or the validator returns false. This validation is stripped out in production builds, it's a development aid, not runtime enforcement, so it doesn't replace proper input handling for anything user-facing.
50. Why shouldn't you mutate a prop directly inside a child component?
Props are meant to flow in one direction, from parent down to child. The parent owns the actual reactive source, the child's prop is just a reference to the current value of that source. If the child reassigns the prop directly, it's fighting the parent for ownership of that state: Vue will log a warning in development, and any local change gets silently overwritten the next time the parent re-renders with its own value.
<script setup>
const props = defineProps(['count'])

// Avoid: mutating a prop directly
function increment() {
    props.count++ // warning, and gets overwritten by parent
}
</script>
If you need an editable local version of a prop, initialize your own local state from it instead:
<script setup>
import { ref } from 'vue'

const props = defineProps(['count'])
const localCount = ref(props.count)

function increment() {
    localCount.value++
}
</script>
If the intent is really for the child to change the parent's data, the correct pattern is to emit an event and let the parent update its own state (or use v-model / defineModel, which is exactly this pattern formalized).
51. How do you use PropType for typing props in the Options API?
PropType is a TypeScript helper Vue exports so you can give a prop a more specific type than what a plain JavaScript constructor (like Object or Array) can express. When you write type: Object, TypeScript only knows the value is some object, it can't tell you it's specifically a User or an array of Todo items. Casting the constructor as PropType<User> tells TypeScript the real shape without changing anything at runtime, Vue still just checks that it's an object.
<script>
import { defineComponent, type PropType } from 'vue'

interface User {
    id: number
    name: string
}

export default defineComponent({
    props: {
        user: {
            type: Object as PropType<User>,
            required: true
        },
        roles: {
            type: Array as PropType<string[]>,
            default: () => []
        }
    }
})
</script>
This is specifically an Options API concern with TypeScript. In <script setup> with TypeScript, you'd normally skip PropType entirely and use the type-only generic syntax instead, defineProps<{ user: User }>(), which is more concise and doesn't need the as cast.
52. What are custom events, and how do you emit one with defineEmits?
Custom events are how a child component talks back up to its parent, the mirror image of props. Since props only flow downward, events are the mechanism for the child to notify the parent that something happened, optionally with a payload.
You declare which events a component can emit with defineEmits, which returns an emit function you call to actually fire the event.
<script setup>
const emit = defineEmits(['add-to-cart'])

function handleClick() {
    emit('add-to-cart', { id: 42, quantity: 1 })
}
</script>

<template>
    <button @click="handleClick">Add to cart</button>
</template>
The parent listens the same way it would for a native DOM event:
<ProductCard @add-to-cart="onAddToCart" />
Declaring emitted events isn't just documentation, Vue uses the list to make sure listeners like @add-to-cart are treated as component events rather than falling through as a plain HTML attribute, and it powers the emits validation and TypeScript typing for the payload.
53. What is emits validation, and how does it work?
Emits validation is the event equivalent of prop validation: instead of declaring emits as a plain array of event names, you declare it as an object where each key is an event name and the value is a validator function. That function receives the arguments passed to emit(...) and should return true or false.
<script setup>
const emit = defineEmits({
    'add-to-cart': (payload) => {
        return typeof payload.id === 'number' && payload.quantity > 0
    },
    'close': null // no validation, just declares the event exists
})

function handleClick() {
    emit('add-to-cart', { id: 42, quantity: 1 })
}
</script>
If the validator returns false, Vue logs a console warning in development pointing at exactly which emitted event had a bad payload. Like prop validation, it's development-only tooling, it doesn't block the event from firing or throw at runtime, it just makes mistakes visible early instead of silently propagating a malformed payload up to the parent.
54. How does v-model on a custom component work under the hood?
v-model on a component is syntactic sugar for a prop plus an event listener. When you write v-model="value" on a component, Vue expands that (by default, in Vue 3) into binding a modelValue prop and listening for an update:modelValue event:
<CustomInput v-model="searchText" />

<!-- is shorthand for -->
<CustomInput
    :model-value="searchText"
    @update:model-value="newValue => searchText = newValue"
/>
For the component to actually support this, it needs to declare the matching prop and emit the matching event itself:
<script setup>
const props = defineProps(['modelValue'])
const emit = defineEmits(['update:modelValue'])
</script>

<template>
    <input
        :value="modelValue"
        @input="emit('update:modelValue', $event.target.value)"
    />
</template>
So v-model isn't magic tied specifically to form elements, it's just a naming convention (modelValue in, update:modelValue out) that any component can implement to get two-way binding syntax for free. defineModel (Vue 3.4+) generates exactly this prop/emit pair for you automatically.
55. How do you support multiple v-model bindings on the same component?
A single component isn't limited to one v-model, you can give each binding a name as an argument, and Vue expands each named binding into its own prop/event pair instead of the default modelValue / update:modelValue.
<UserForm v-model:first-name="firstName" v-model:last-name="lastName" />
That expands to binding a firstName prop with an update:firstName listener, and separately a lastName prop with an update:lastName listener. The component needs to declare and emit each one:
<script setup>
defineProps(['firstName', 'lastName'])
defineEmits(['update:firstName', 'update:lastName'])
</script>

<template>
    <input
        :value="firstName"
        @input="$emit('update:firstName', $event.target.value)"
    />
    <input
        :value="lastName"
        @input="$emit('update:lastName', $event.target.value)"
    />
</template>
This is the same underlying mechanism as a plain v-model, just with a name attached instead of relying on the modelValue default, so a component can expose as many independent two-way bindings as it needs.
56. What is defineModel (Vue 3.4+), and how does it simplify writing v-model support?
defineModel is a <script setup> compiler macro, stabilized in Vue 3.4, that collapses the manual "declare a prop, declare an emit, wire them together" boilerplate for v-model support into a single line. It automatically declares the underlying prop and the matching update: event for you, and returns a ref you can read and write directly, writing to it automatically emits the update event.
<script setup>
const model = defineModel()
</script>

<template>
    <input v-model="model" />
</template>
That's the entire component, no manual defineProps/defineEmits pairing needed, model.value = x behaves just like updating any other ref, but under the hood it emits update:modelValue for the parent.
It also supports named models and options, mirroring what you'd otherwise write by hand:
<script setup>
const firstName = defineModel('firstName', { required: true })
const disabled = defineModel('disabled', { default: false })
</script>
Before 3.4, achieving this required a computed with a getter reading the prop and a setter calling emit. defineModel is purely a developer-experience improvement, the compiled output is functionally the same prop/emit pair described in question 54.
57. What is $attrs, and what does setting inheritAttrs: false do?
$attrs holds all the attributes and event listeners passed to a component from its parent that weren't declared as props (or explicitly listed in emits). Things like id, class, data-* attributes, or a random @click handler someone put on your component tend to end up here if you didn't declare them yourself.
By default, Vue automatically applies everything in $attrs to the component's single root element, this is called "attribute fallthrough" and is why you can slap a class or id on a custom component and have it just land on the right DOM element without you writing any code for it.
inheritAttrs: false turns that automatic behavior off, which you use when the automatic target (the root element) isn't actually where those attributes should go, for example a component that wraps a <label> and an <input>, where attrs like id really belong on the <input>, not the outer wrapper.
<script setup>
defineOptions({ inheritAttrs: false })
</script>

<template>
    <div class="field">
        <label>Name</label>
        <input v-bind="$attrs" />
    </div>
</template>
Here $attrs is bound explicitly to the <input> instead of being auto-applied to the outer <div>.
58. How does attribute fallthrough work for components with multiple root nodes?
Attribute fallthrough (auto-applying $attrs to the DOM) only works cleanly when a component has a single root element, Vue knows exactly where those leftover attributes should land. When a component template has multiple root nodes (a "fragment" component, like a <template> with a couple of sibling elements), Vue has no way to guess which of those roots should receive the attributes, so it does not apply them automatically, and in development it logs a warning if there are unresolved attrs.
<template>
    <header>...</header>
    <main>...</main>
</template>
To fix the warning and actually apply the fallthrough attributes somewhere sensible, you bind $attrs manually to whichever root element makes sense:
<template>
    <header v-bind="$attrs">...</header>
    <main>...</main>
</template>
This is really the same rule as inheritAttrs: false, Vue only auto-applies attrs when it's unambiguous which element should receive them, and steps back to let you decide explicitly whenever that's not the case.
59. What is defineExpose, and why do you need it with <script setup>?
defineExpose is a compiler macro that lets a component explicitly choose which of its internal properties and methods a parent is allowed to access through a template ref. By default, components written with <script setup> are "closed": everything declared inside the script block is private to that component and invisible from the outside, even if the parent holds a template ref pointing at it.
<!-- Child.vue -->
<script setup>
import { ref } from 'vue'

const count = ref(0)
function reset() {
    count.value = 0
}

defineExpose({ reset })
</script>
<!-- Parent.vue -->
<script setup>
import { ref } from 'vue'
const childRef = ref(null)

function resetChild() {
    childRef.value.reset()
}
</script>

<template>
    <Child ref="childRef" />
</template>
Without the defineExpose({ reset }) call, childRef.value.reset would be undefined, since <script setup> doesn't expose anything by default (unlike the Options API, where every property on this is reachable through a template ref automatically). It's an intentional design choice: it keeps a component's internals private unless it explicitly opts in to being controlled imperatively from outside.
60. What is the difference between locally and globally registering a component?
Local registration makes a component available only within the specific component that registers it. In <script setup>, this happens automatically just by importing the component, no separate registration step needed, and it's usable in that file's template right away.
Global registration makes a component available in every template in the entire app, with no per-file import required, by calling app.component() on the app instance during setup, typically in main.js.
// Global registration (main.js)
import { createApp } from 'vue'
import BaseButton from './components/BaseButton.vue'

const app = createApp(App)
app.component('BaseButton', BaseButton)
<!-- Local registration -->
<script setup>
import BaseButton from './components/BaseButton.vue'
</script>

<template>
    <BaseButton />
</template>
Global registration is convenient for components you truly use everywhere, like a base button or icon component, but it comes with a real cost: bundlers can't tree-shake globally registered components, they end up in the main bundle whether or not a given page actually uses them. Local registration keeps the dependency explicit and lets unused components be excluded from a page's bundle, which is why it's the recommended default for most components in most apps.
61. What are functional components, and when would you reach for one?
A functional component is a component with no internal state, no lifecycle hooks, and no component instance at all, it's just a plain function that takes props and returns a VNode (the same thing a render function returns). Because there's no instance to create or track, they're cheaper to render than a stateful component.
import { h } from 'vue'

function StatusIcon(props) {
    return h('span', { class: `icon icon-${props.status}` })
}

StatusIcon.props = ['status']

export default StatusIcon
In modern Vue 3, this trade-off matters much less than it used to, stateful components are already fast, so functional components aren't a general-purpose performance trick. They're worth reaching for when you have a genuinely simple, purely presentational component that just renders differently based on its props, and you're instantiating a lot of them, for example an icon component rendered hundreds of times in a table, where skipping instance creation adds up. Outside of that fairly narrow case, a normal <script setup> component is simpler to read and maintain.
62. What does defineOptions do in <script setup>?
defineOptions is a compiler macro that lets you declare plain component options inside <script setup> that don't already have their own dedicated macro (like defineProps or defineEmits). It exists because <script setup> has no export default { ... } object to attach arbitrary options to, so without it there'd be no way to set things like a component name.
<script setup>
defineOptions({
    name: 'UserCard',
    inheritAttrs: false
})
</script>
The most common use is setting name explicitly, which <script setup> can usually infer automatically from the filename during build, but that inference doesn't always work (for example with certain build setups or dynamic imports), and an explicit name is needed for things like Vue devtools display, <KeepAlive include="UserCard"> matching, and recursive self-referencing components. It can also carry any other Options API-style option that isn't covered by a more specific <script setup> macro.
Slots and Content Distribution
63. What are slots in Vue, and what problem do they solve?
Slots are how a component lets its parent inject markup into a specific spot in its template, instead of only accepting data through props. Props are great for passing values, but they are awkward for passing chunks of HTML or other components. Slots solve that by giving a component a "hole" that the parent fills in.
This is what makes wrapper components like cards, modals, or layout shells reusable: the component owns the structure and styling, and the parent owns the content.
<!-- Card.vue -->
<template>
    <div class="card">
        <slot></slot>
    </div>
</template>
<!-- usage -->
<Card>
    <h2>Title</h2>
    <p>Some content passed in from the parent.</p>
</Card>
Whatever markup you put between <Card> and </Card> gets rendered wherever <slot></slot> sits inside Card.vue. If a component has no <slot> tag, anything you place between its tags is simply discarded.
64. What is a named slot?
A named slot lets a component expose more than one insertion point, each identified by a name, so the parent can send different content to different parts of the child's template. You define one with <slot name="header"></slot> in the child, and fill it from the parent using <template #header> (shorthand for v-slot:header).
Any slot content without a #name goes to the special "default" slot.
<!-- Layout.vue -->
<template>
    <header><slot name="header"></slot></header>
    <main><slot></slot></main>
    <footer><slot name="footer"></slot></footer>
</template>
<!-- usage -->
<Layout>
    <template #header>
        <h1>Page Title</h1>
    </template>

    <p>Main content goes in the default slot.</p>

    <template #footer>
        <small>© 2026</small>
    </template>
</Layout>
Named slots are what make multi-region components (page layouts, dialogs with a header/body/footer) possible without hardcoding structure.
65. What is a scoped slot, and why would a child component pass data back through its slot?
A scoped slot is a slot that carries data from the child back out to the parent, so the parent's slot content can use information the child owns, such as loop items or internal state. Normally content flows one way: parent to child. A scoped slot flips a small part of that, letting the child hand data to the slot content while still letting the parent decide how to render it.
The child passes data by binding it as attributes on the <slot> element, and the parent reads it through v-slot="props" (or destructured, v-slot="{ item }").
<!-- UserList.vue -->
<template>
    <ul>
        <li v-for="user in users" :key="user.id">
            <slot :user="user" :is-active="user.active"></slot>
        </li>
    </ul>
</template>
<!-- usage -->
<UserList :users="users">
    <template #default="{ user, isActive }">
        <span :class="{ active: isActive }">{{ user.name }}</span>
    </template>
</UserList>
This is powerful because UserList can own the fetching, looping, and business logic, while the parent decides exactly how each user is displayed, without UserList needing to know anything about presentation. It is the pattern behind flexible, reusable list, table, and dropdown components: the child provides data and behaviour, the parent provides markup.
66. How do you provide fallback content for a slot?
You put default content directly between the <slot> tags in the child component. If the parent does not supply anything for that slot, Vue renders the fallback; if the parent does supply content, it replaces the fallback entirely.
<!-- Button.vue -->
<template>
    <button>
        <slot>Click me</slot>
    </button>
</template>
<Button />
<!-- renders: <button>Click me</button> -->

<Button>Save</Button>
<!-- renders: <button>Save</button> -->
This is handy for components that should work with sensible defaults out of the box (buttons, labels, empty states) but still remain fully customizable when the parent needs something different.
67. What is a dynamic slot name?
A dynamic slot name lets you choose which named slot to fill at runtime, using a JavaScript expression instead of a hardcoded name. You write it as #[expression] on a <template> tag.
<template #[currentSlotName]>
    <p>This fills whichever slot name is currently stored in currentSlotName.</p>
</template>
This is useful for components that render a variable set of regions, such as a tabbed panel where each tab corresponds to a differently-named slot, or a table component where column slots are generated from a columns array. It follows the same rules as dynamic argument syntax used elsewhere in Vue templates, like :[attrName] for dynamic prop binding.
68. What is the difference between the modern v-slot/# syntax and the legacy slot/slot-scope syntax?
The slot and slot-scope attributes were the original Vue 2 way of targeting and reading data from a slot. They were deprecated in Vue 2.6 in favor of the unified v-slot directive, and removed entirely in Vue 3, so any codebase running Vue 3 must use v-slot (or its # shorthand).
Old syntax (no longer valid in Vue 3):
<template slot="header" slot-scope="props">
    {{ props.title }}
</template>
Current syntax:
<template #header="props">
    {{ props.title }}
</template>
The old approach needed two separate attributes, one for the slot name and one for scoped data, and it was easy to misuse since slot-scope could technically be placed on a plain element rather than a <template>. v-slot merges both concerns into a single directive that only works on <template> (or the component tag itself for the default slot), which is clearer and less error prone. If you are reading a Vue 2 tutorial or maintaining an older codebase, recognizing slot/slot-scope as the legacy equivalent of v-slot is mostly what you need; in new Vue 3 code you should never write it.
69. When would you choose a slot over a prop for passing content into a component?
Use a prop when you are passing a simple value: a string, number, boolean, or a plain object of data. Use a slot when you are passing markup, structure, or something that needs to stay reactive to the DOM, such as icons, custom formatting, nested components, or entire sections of layout.
A quick rule of thumb: if what you are passing could reasonably be typed and validated (a title string, a count, a flag), it is a prop. If what you are passing is "arbitrary content that only the parent knows how to render," it is a slot. For example, a Modal component takes a title prop for its heading text, but takes its body as a default slot, since the body's content is entirely up to whoever uses the modal. Mixing them up leads to awkward code, like passing raw HTML strings through a prop and rendering them with v-html, which loses reactivity on nested components and opens the door to XSS if that content is ever user supplied.
70. What does useSlots() do, and when would you use it in <script setup>?
useSlots() is a Composition API function that gives you programmatic access to a component's slots inside <script setup>, returning the same slots object that this.$slots exposes in the Options API. You would not need it to simply render a slot in the template (<slot></slot> handles that on its own), but you need it when you have to inspect slots from script logic.
<script setup>
import { useSlots, computed } from 'vue'

const slots = useSlots()

const hasFooter = computed(() => !!slots.footer)
</script>

<template>
    <div>
        <slot></slot>
        <footer v-if="hasFooter">
            <slot name="footer"></slot>
        </footer>
    </div>
</template>
Common cases: conditionally rendering a wrapper element only if a particular slot was passed, or writing a render function/component library helper that needs to loop over slots manually. For everyday templates, plain <slot> and v-if="$slots.footer" cover most needs; useSlots() matters most when you are working from script logic rather than the template.
Provide/Inject and Component Communication
71. What is provide/inject, and what problem does it solve?
provide and inject let an ancestor component make a value available to any descendant, no matter how deeply nested, without passing it down manually through every component in between. That manual passing-down problem is often called "prop drilling": if a deeply nested component needs a value from a distant ancestor, every intermediate component has to accept and re-pass a prop it does not actually use itself.
An ancestor calls provide(key, value), and any descendant calls inject(key) to read it, regardless of how many layers sit between them.
<!-- App.vue -->
<script setup>
import { provide, ref } from 'vue'

const theme = ref('dark')
provide('theme', theme)
</script>
<!-- DeeplyNestedButton.vue -->
<script setup>
import { inject } from 'vue'

const theme = inject('theme')
</script>
It is commonly used for things like theming, current user/auth state, or app-wide configuration that many unrelated components need to read. It is not meant to replace props for normal parent-to-child data flow, and it is not a substitute for a proper state management library when the shared state needs complex mutation logic across many independent branches of the tree; for that, most teams reach for Pinia instead.
72. Why is it a good idea to use a Symbol as a provide/inject key in larger applications?
provide/inject keys can be plain strings, but strings can collide: if two unrelated parts of a large codebase (or two different libraries) both provide('config', ...), the second one silently overwrites the first for anything injecting below it, and there is no error to warn you. A Symbol is guaranteed unique, so two Symbols created separately can never accidentally match, even if they have the same description text.
// keys.js
export const themeKey = Symbol('theme')
// providing component
import { provide } from 'vue'
import { themeKey } from './keys'

provide(themeKey, theme)
// injecting component
import { inject } from 'vue'
import { themeKey } from './keys'

const theme = inject(themeKey)
Beyond avoiding naming collisions, centralizing keys in a shared module also gives you a single source of truth to import from, and in TypeScript you can type a Symbol key with InjectionKey<T> so inject() automatically infers the correct return type instead of coming back as unknown.
73. How do you keep an injected value reactive?
An injected value stays reactive only if what you provided was itself reactive, a ref or a reactive object, not a plain destructured value. If you provide a raw value pulled out of a ref (like provide('count', count.value)), you are handing over a frozen snapshot; the injecting component will never see later updates.
<!-- provider -->
<script setup>
import { provide, ref } from 'vue'

const count = ref(0)
provide('count', count)   // provide the ref itself, not count.value
</script>
<!-- consumer -->
<script setup>
import { inject } from 'vue'

const count = inject('count')   // still a ref, stays reactive
</script>

<template>
    <p>{{ count }}</p>
</template>
If you want the provider to control mutations and keep the injected value read-only for consumers, wrap it with readonly() before providing it, and provide an accompanying function (like setCount) for consumers to request changes. This keeps state changes centralized in the provider instead of letting any descendant mutate shared state directly.
74. What are the different ways components can communicate with each other in Vue?
The right mechanism depends on the relationship between the two components:
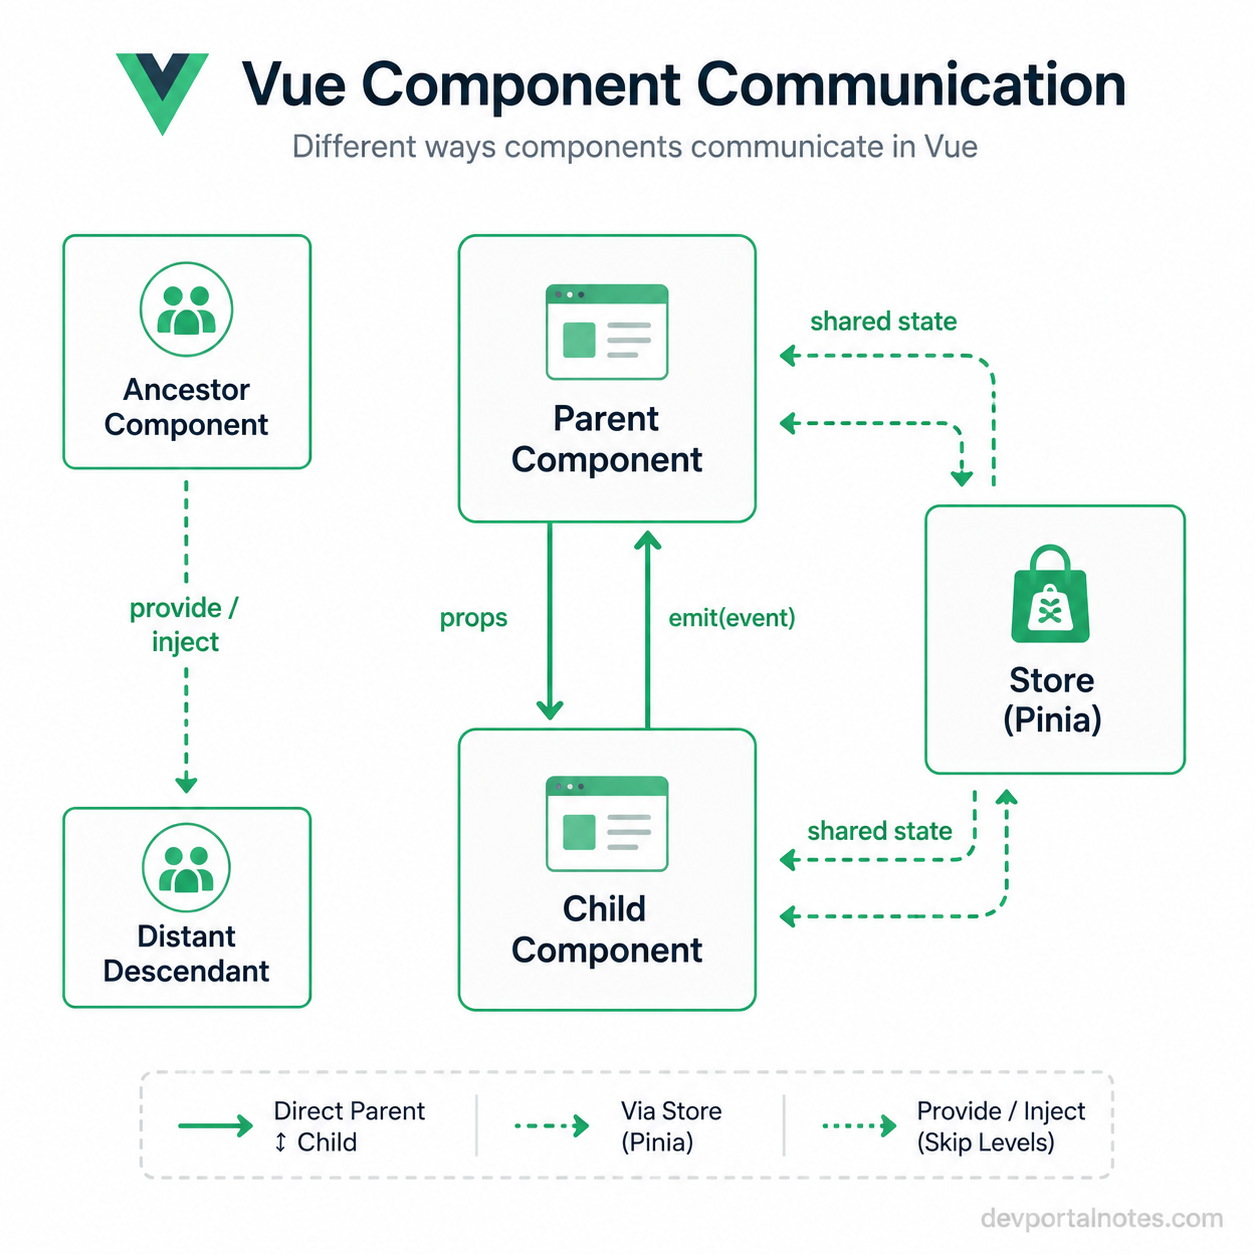
| Relationship | Mechanism |
|---|---|
| Parent to child | Props |
| Child to parent | Custom events (emit) |
| Two-way binding | v-model (sugar over a prop + an update event) |
| Ancestor to any descendant | provide / inject |
| Parent reading child internals | Template refs + defineExpose |
| Sibling or unrelated components | Shared state (Pinia/Vuex), or a shared reactive object/composable |
| Passing markup, not data | Slots |
Props and events cover the vast majority of everyday communication, and Vue nudges you toward "props down, events up" as the default pattern because it keeps data flow predictable and easy to trace. provide/inject and refs handle less common cases (deep nesting, imperative access), while a shared store like Pinia is the usual answer once two components that are not directly related need to read or write the same state.
75. What is a template ref, and how do you call a method exposed by a child component from its parent?
A template ref is a way to get a direct reference to a DOM element or a child component instance from your script code, by putting ref="someName" on a template tag and declaring a matching ref() in <script setup> with the same name.
<!-- Child.vue -->
<script setup>
function focusInput() {
    console.log('child method called')
}

defineExpose({ focusInput })
</script>
<!-- Parent.vue -->
<script setup>
import { ref, onMounted } from 'vue'
import Child from './Child.vue'

const childRef = ref(null)

onMounted(() => {
    childRef.value.focusInput()
})
</script>

<template>
    <Child ref="childRef" />
</template>
As covered in the defineExpose question above, <script setup> components are closed by default, so the parent cannot reach focusInput through the template ref unless the child explicitly opts in. That opt-in step is the piece that actually makes this pattern work; the template ref itself just gives the parent a handle to call it on.
76. What does useAttrs() do, and when would you use it?
useAttrs() gives you access to "fallthrough attributes": attributes and listeners passed to a component that are not declared as props (or emits). By default, Vue automatically applies these attributes to the component's root element, which is usually what you want (class, id, data-* attributes, ARIA attributes all just work without extra effort).
You reach for useAttrs() when you need to inspect or manually redirect those attributes yourself, typically because the component has multiple root nodes (no automatic single-root fallthrough) or you want to apply them to a specific inner element rather than the outermost one.
<script setup>
import { useAttrs } from 'vue'

defineProps(['label'])
defineOptions({ inheritAttrs: false })

const attrs = useAttrs()
</script>

<template>
    <div class="wrapper">
        <label>{{ label }}</label>
        <input v-bind="attrs" />
    </div>
</template>
Here, inheritAttrs: false stops Vue from dumping attributes onto the outer <div>, and v-bind="attrs" forwards them onto the actual <input> instead, so something like placeholder or maxlength passed from the parent lands where it is actually meaningful.
Lifecycle Hooks
77. What are the Vue component lifecycle hooks, in order, from creation to destruction?
A Vue component goes through a predictable sequence of stages as it is created, mounted to the DOM, updated, and eventually removed. Here they are in order, with the Options API hook name and its Composition API equivalent:
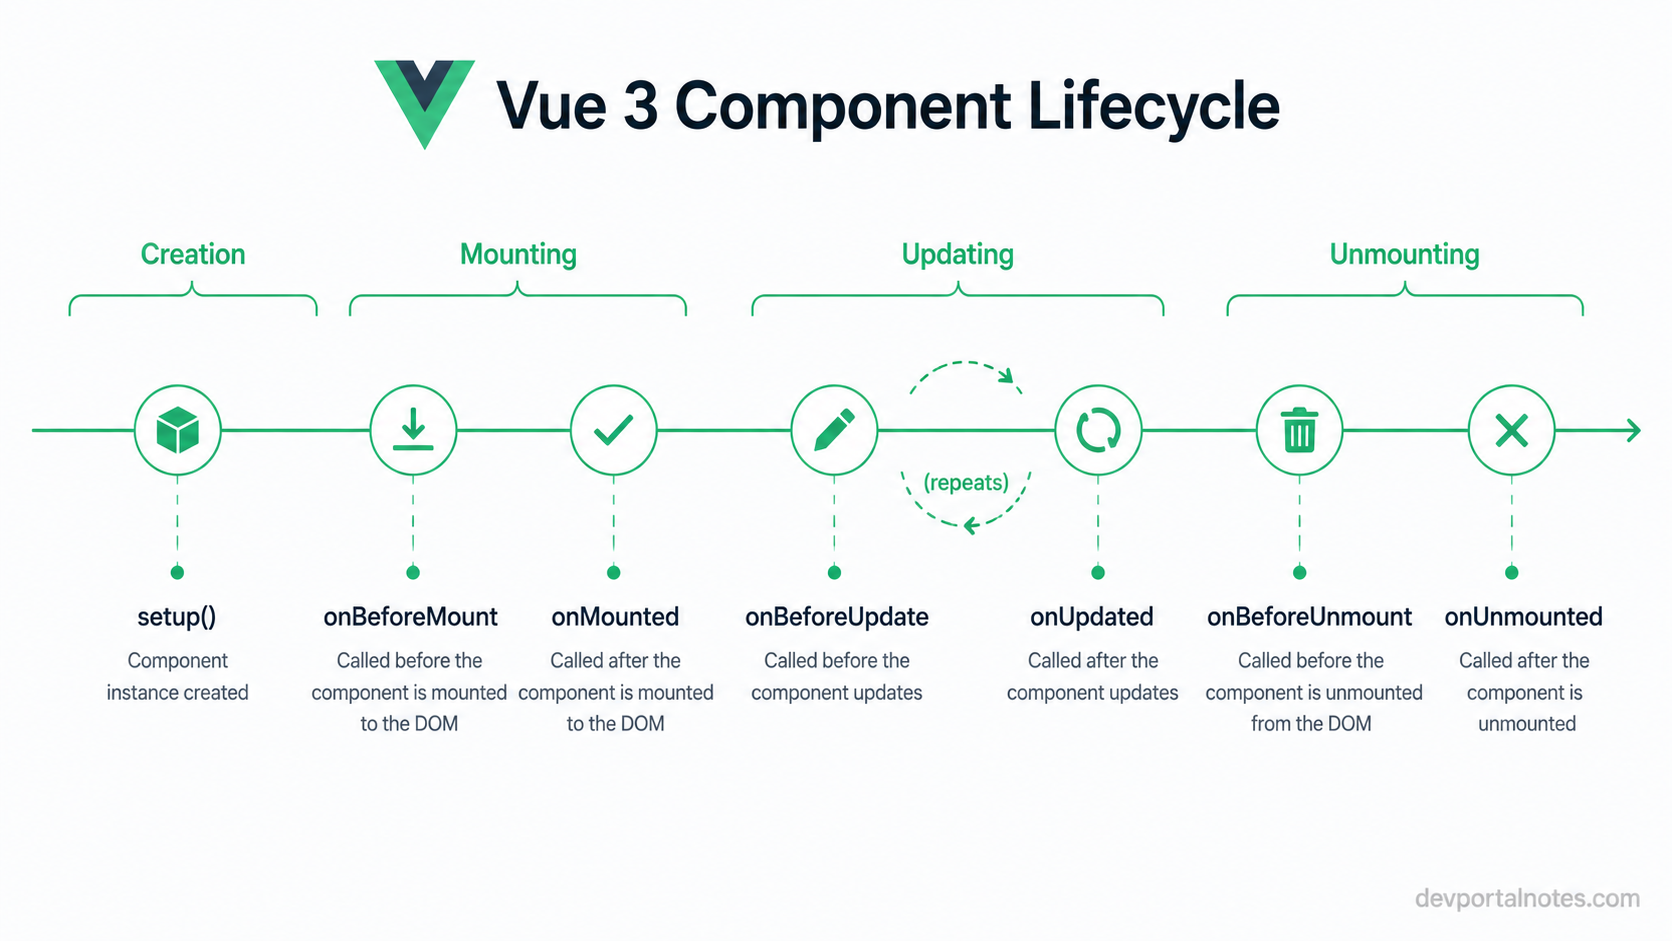
| Stage | Options API | Composition API |
|---|---|---|
| Before instance setup | beforeCreate | (not needed, code runs directly in setup()) |
| After state/computed set up | created | (not needed, code runs directly in setup()) |
| Before first DOM render | beforeMount | onBeforeMount |
| After first DOM render | mounted | onMounted |
| Before re-render on data change | beforeUpdate | onBeforeUpdate |
| After re-render on data change | updated | onUpdated |
| Before component teardown | beforeUnmount | onBeforeUnmount |
| After component teardown | unmounted | onUnmounted |
There are also two extra hooks tied specifically to <KeepAlive> (activated/onActivated and deactivated/onDeactivated), and an error-handling hook (errorCaptured/onErrorCaptured) that does not fit neatly into the create-to-destroy timeline. The general pattern to remember: setup/fetch data in the "before mount" or "created" stage, do DOM-dependent work (measuring elements, third-party widget initialization) in mounted, and clean up timers, subscriptions, and event listeners in beforeUnmount/unmounted.
78. What is the difference between beforeMount and mounted?
beforeMount fires right before Vue inserts the component's DOM into the page; the template has been compiled and reactive state is ready, but nothing exists in the actual DOM yet, so $el (or the equivalent template ref) is not usable. mounted fires immediately after the DOM has been created and inserted, so at that point you can safely query or manipulate real DOM elements.
<script setup>
import { onBeforeMount, onMounted, ref } from 'vue'

const box = ref(null)

onBeforeMount(() => {
    console.log(box.value)   // null, DOM not created yet
})

onMounted(() => {
    console.log(box.value)   // the actual <div>, ready to use
})
</script>

<template>
    <div ref="box">Hello</div>
</template>
In practice, beforeMount is rarely used for anything meaningful; mounted is the hook you reach for when you need to measure an element, integrate a third-party DOM library (like a chart or map widget), or trigger an initial focus/scroll.
79. What is the difference between beforeUpdate and updated?
Both fire in response to a reactive data change that requires a re-render, but at different points relative to the actual DOM patch. beforeUpdate runs after Vue detects the change but before it touches the DOM, so the DOM still reflects the old state at that point. updated runs after Vue has finished patching the DOM to match the new state.
<script setup>
import { ref, onBeforeUpdate, onUpdated } from 'vue'

const count = ref(0)

onBeforeUpdate(() => {
    console.log('about to patch DOM')
})

onUpdated(() => {
    console.log('DOM now reflects', count.value)
})
</script>
updated is the one you would use if you need to read the DOM after a change lands, for example checking a scroll position after a list re-renders. Be careful mutating reactive state inside either hook, since changing state in updated can trigger another update cycle and potentially loop; if you need to react to a specific value changing, a watch or watchEffect is usually a cleaner and more targeted tool than these hooks.
80. What is the difference between beforeUnmount and unmounted?
beforeUnmount fires right before a component instance is torn down; at this point the component is still fully functional; event listeners are still attached, and the instance is still reactive, which makes it the right place to clean things up while everything the cleanup code needs is still alive. unmounted fires after the teardown is complete: child components have been destroyed, DOM event listeners bound by Vue have been removed, and reactive effects tied to the component have been stopped.
<script setup>
import { onBeforeUnmount, onUnmounted } from 'vue'

let timerId

onBeforeUnmount(() => {
    clearInterval(timerId)   // instance still active, safe to clean up
})

onUnmounted(() => {
    console.log('component fully removed')
})
</script>
The practical guidance: put cleanup logic (clearing intervals, removing manually added window/document listeners, closing WebSocket connections, cancelling subscriptions) in beforeUnmount, since it runs while you still have full access to everything you set up. unmounted is mostly useful for final bookkeeping, like logging that a component was removed, after everything is already gone.
81. How do Composition API lifecycle hooks (onMounted, etc.) differ from Options API lifecycle hooks?
Options API hooks are object properties (mounted() { ... }) tied to a single component definition, and a component can only define each one once. Composition API hooks are plain imported functions (onMounted(() => { ... })) that you call from inside setup() or <script setup>, and you can call the same one multiple times in one component; each callback registered that way runs, in the order it was registered.
<script setup>
import { onMounted } from 'vue'

onMounted(() => {
    console.log('first mounted callback')
})

onMounted(() => {
    console.log('second mounted callback')
})
</script>
This matters most for composables: a composable function can register its own onMounted/onUnmounted logic internally, and using that composable from multiple components, or multiple times in the same component, does not clash with hooks the component itself defines. Composition API hooks must be called synchronously during setup() (or at the top level of <script setup>, which compiles into setup()); calling one later, inside an async callback after an await, will not register correctly because Vue loses track of which component instance is "current" at that point.
82. What lifecycle hooks does <KeepAlive> add, and what are they for?
<KeepAlive> caches inactive components instead of destroying them when they are toggled out (for example, switching between tabs or routes), preserving their state and DOM so switching back is instant. Because the component is not actually destroyed and recreated, the normal mounted/unmounted hooks do not fire again on toggling; instead, <KeepAlive> adds two dedicated hooks: activated (Options API) / onActivated (Composition API), which fires when a cached component is inserted back into the DOM, and deactivated / onDeactivated, which fires when it is removed from the DOM but kept in the cache.
<script setup>
import { onActivated, onDeactivated } from 'vue'

onActivated(() => {
    console.log('component shown again, resume polling')
})

onDeactivated(() => {
    console.log('component hidden, pause polling')
})
</script>
These are useful for pausing and resuming expensive work tied to visibility, like polling intervals, video playback, or subscriptions, that should not keep running while the component is cached out of view but also should not be fully torn down and reinitialized every time the user switches back.
83. What does onErrorCaptured (or the Options API errorCaptured) do?
onErrorCaptured registers a hook on an ancestor component that catches errors thrown anywhere in its descendant component tree, including errors from render functions, watchers, and lifecycle hooks of child components. It works similarly to an error boundary in other frameworks: it lets a parent component gracefully handle failures in its children instead of letting an uncaught error crash the whole app.
<script setup>
import { ref, onErrorCaptured } from 'vue'

const error = ref(null)

onErrorCaptured((err, instance, info) => {
    error.value = err.message
    return false   // stop the error from propagating further up
})
</script>

<template>
    <p v-if="error">Something went wrong: {{ error }}</p>
    <slot v-else></slot>
</template>
The callback receives the error itself, the component instance where it occurred, and a string describing the source (info, such as "render function" or a lifecycle hook name). Returning false from the hook stops the error from bubbling up further and prevents it from also being sent to the app-level app.config.errorHandler; returning nothing (or true) lets it continue propagating. This is the building block for a reusable ErrorBoundary-style wrapper component in Vue.
84. Why doesn't the Composition API have beforeCreate or created hooks?
In the Options API, beforeCreate and created exist to mark two points around Vue's internal setup of data, computed, and methods, since those are defined declaratively as object options and Vue has to process them before they exist. The Composition API does not need that distinction, because in setup() (or the top level of <script setup>), your code runs immediately and synchronously as the component instance is being created; there is no separate "options processing" step to wait for.
<script setup>
// this code itself runs at the point where
// beforeCreate/created would have fired
import { ref } from 'vue'

const count = ref(0)
console.log('this runs immediately, no hook needed')
</script>
Anything you would have put in beforeCreate or created (initializing reactive state, calling an API on load, setting up computed values) just becomes regular top-level code in <script setup>. If you genuinely need to run something after the DOM exists, onMounted is still there for that; beforeCreate/created are simply redundant once your setup code already runs at that exact point in the component's life by default.
Composition API vs Options API
85. What is the Composition API, and why was it introduced alongside the Options API?
The Composition API is a set of functions (ref, reactive, computed, watch, lifecycle hooks like onMounted, and so on) that you import and call to build a component's logic, instead of declaring it as fixed options on an object. It was added in Vue 3, alongside the original Options API, to solve two problems that grew as components got bigger: logic that belonged together (a search feature's state, computed values, and watchers) ended up scattered across separate data, computed, and methods blocks, and reusing that logic across components required mixins, which had their own downsides.
It was kept alongside the Options API rather than replacing it because the Options API is still easier to learn for beginners and is perfectly fine for small, simple components. Vue 3 lets you mix both styles in the same project, and even in the same component in some cases, though most codebases pick one style and stay consistent.
86. What are the main practical differences between the Composition API and the Options API?
The core difference is how you organize code: the Options API organizes by option type (all data together, all methods together, all computed properties together), while the Composition API organizes by logical concern (everything related to one feature lives together, usually inside a setup() function or a <script setup> block).
| Options API | Composition API | |
|---|---|---|
| Organization | Grouped by option (data, methods, computed) | Grouped by feature/concern |
| Code reuse | Mixins (implicit, can clash) | Composables (explicit imports) |
this | Central to accessing state and methods | Not used; state accessed via variables/closures |
| TypeScript inference | Weaker, needs extra typing helpers | Strong, works naturally with plain functions |
| Bundle size | Slightly larger for tiny components | Better tree-shaking for larger apps |
| Learning curve | Gentler for beginners | Steeper at first, pays off at scale |
In practice, a small form component with a handful of fields reads fine either way. A dashboard component with data fetching, filters, pagination, and websockets gets much easier to follow with the Composition API, because you can read top to bottom and see "here is everything related to pagination" instead of jumping between four different option blocks. <script setup> is the recommended way to write the Composition API today; it is compiler sugar over a setup() function that removes most of the boilerplate.
87. What is the setup() function, and what arguments does it receive?
setup() is the entry point for the Composition API. It runs once, before the component instance is fully created, before data, computed, and other Options API properties are resolved. Anything you return from it (state, computed values, functions) becomes available to the template.
It receives two arguments: props, a reactive object of the resolved props (you should not destructure it directly, since that breaks reactivity, unless you wrap it in toRefs), and context, a plain object exposing attrs, slots, emit, and expose.
export default {
    props: {
        title: String
    },
    setup(props, { emit, attrs }) {
        function save() {
            emit('save', props.title)
        }

        return {
            save
        }
    }
}
<script setup> is compiled into a setup() function like this behind the scenes, with props declared via defineProps() and emits via defineEmits(), so you rarely write setup() by hand in modern Vue code.
88. Why is there no this inside setup() or <script setup>?
setup() runs before the component instance is fully constructed, so at that point there is no finished instance for this to point to; Vue calls setup() with this set to undefined on purpose so nobody accidentally relies on it. Instead, the Composition API gives you plain variables and closures: a ref you create inside setup() is just a JavaScript variable you close over, not a property looked up on an instance at render time.
This also makes composables possible. A composable function like useMouse() can be called from anywhere, not just inside a component, because it never depends on a this binding to a specific component instance. It also sidesteps a classic Options API gotcha where this inside a regular (non-arrow) callback function loses its binding to the component. With no this to lose, that whole category of bug disappears.
89. What are composables, and how do they solve problems that Vue 2 mixins had?
A composable is a plain JavaScript function, conventionally named useSomething, that uses Composition API functions internally and returns reactive state and behavior for a component to consume. It is the Composition API's answer to "how do I reuse stateful logic across components."
// useMouse.js
import { ref, onMounted, onUnmounted } from 'vue'

export function useMouse() {
    const x = ref(0)
    const y = ref(0)

    function update(event) {
        x.value = event.pageX
        y.value = event.pageY
    }

    onMounted(() => window.addEventListener('mousemove', update))
    onUnmounted(() => window.removeEventListener('mousemove', update))

    return { x, y }
}
<script setup>
import { useMouse } from './useMouse'

const { x, y } = useMouse()
</script>
Vue 2 mixins had two well-known problems. First, source ambiguity: if a component used two mixins and both defined a data property called status, it was not obvious at a glance which one "won" or where a property in the template actually came from. Second, implicit merging: mixin options got silently merged into the component's options, so adding a second mixin could quietly break the first one if their properties collided.
Composables avoid both. Everything a composable exposes comes back through an explicit return value that you destructure by hand (const { x, y } = useMouse()), so there is no merging and no guessing; you can even rename on the way in (const { x: mouseX } = useMouse()) if two composables would otherwise clash.
90. What are the rules of thumb for writing a good composable?
- Name it
useX. This is a strong convention in the Vue ecosystem and instantly signals "this function uses reactivity and probably has lifecycle behavior." - Return refs, not a single reactive object, when the caller needs to destructure the result. Destructuring a
reactive()object loses reactivity; returning individualrefs (or an object of refs) keeps it intact. - Accept refs or plain values as arguments, and normalize with
unref()internally, so callers can pass either a static value or a reactive one without extra ceremony. - Clean up after yourself. If a composable adds an event listener, opens a websocket, or starts a timer in
onMounted, it should remove it inonUnmounted. - Keep it focused on one concern. A
useFetchcomposable should fetch data; it should not also manage form validation. Small composables compose well together, large ones become mixins in disguise. - Avoid relying on being called in a specific component lifecycle phase unless documented; some composables (like a simple
useLocalStorage) work fine outsidesetup(), others need to run during component setup because they register lifecycle hooks.
Vue Router
91. What is Vue Router, and how do you set it up in an application?
Vue Router is the official routing library for Vue. It maps URL paths to components so a Vue app can behave like a multi-page site while staying a single-page application: navigating between routes swaps components in and out without a full browser reload.
Setup has three parts: define an array of routes (each one a path paired with a component), create a router instance with createRouter, and install it on the app.
// router.js
import { createRouter, createWebHistory } from 'vue-router'
import Home from './views/Home.vue'
import About from './views/About.vue'

const routes = [
    { path: '/', component: Home },
    { path: '/about', component: About }
]

const router = createRouter({
    history: createWebHistory(),
    routes
})

export default router
// main.js
import { createApp } from 'vue'
import App from './App.vue'
import router from './router'

createApp(App).use(router).mount('#app')
Finally, add a <router-view /> somewhere in App.vue; that is where the component matching the current route gets rendered.
92. What is the difference between hash mode and history mode routing?
Both are ways Vue Router keeps the URL in sync with the current view, and both are configured through the history option passed to createRouter.
createWebHashHistory() puts the route after a #, like example.com/#/about. Everything after the hash is never sent to the server, so the server only ever needs to serve one file (index.html); the browser handles the rest. This makes it trivial to deploy anywhere, including a plain static file host with no routing config, but the URLs look less clean and the # historically interfered with anchor-link scrolling and some SEO tooling.
createWebHistory() uses the browser's native History API to produce clean URLs, like example.com/about. This looks and behaves like a normal server-rendered site, but it requires the server (or CDN/edge config) to be set up to return index.html for any unmatched path; otherwise, refreshing the page on /about sends a real request to /about, which returns a 404 because no such file exists on the server.
For most modern deployments (Vercel, Netlify, Cloudflare Pages, etc.) history mode is the default choice since these platforms make the fallback rewrite easy to configure; hash mode is mostly a fallback for hosts where you cannot control server-side routing at all.
93. What are dynamic route parameters, and how do you read them in a component?
A dynamic route parameter is a named segment of a path, written with a colon, that matches a variable value instead of a fixed string. /users/:id matches /users/1, /users/42, and so on, with id captured as a parameter.
const routes = [
    { path: '/users/:id', component: UserProfile }
]
Inside a component, you read it with useRoute():
<script setup>
import { useRoute } from 'vue-router'
import { watch } from 'vue'

const route = useRoute()

console.log(route.params.id)

watch(() => route.params.id, (newId) => {
    // re-fetch data because the component instance is reused
    // when only the param changes, not re-created
})
</script>
The gotcha here is that navigating from /users/1 to /users/2 reuses the same component instance for efficiency, so plain onMounted fetch logic will not re-run automatically; you need to watch the param (or use the beforeRouteUpdate guard) to react to the change.
94. What is the difference between route params and query strings?
| Route params | Query strings | |
|---|---|---|
| Location | Part of the path pattern (/users/:id) | After the ? (/users?sort=asc) |
| Required to match | Yes, part of the route definition | No, always optional |
| Access | route.params.id | route.query.sort |
| Typical use | Identifying a specific resource | Filters, sorting, pagination, search state |
Params define the shape of the route itself: if a route is declared as /users/:id, a URL without that segment simply will not match the route at all. Query strings sit on top of whatever route matched and carry optional, often changeable state, like ?page=2&sort=name, that does not affect which route/component is used, only how it behaves. A good rule of thumb: use a param for "which resource," and a query string for "how do you want it filtered or displayed."
95. What are nested (child) routes, and when would you use them?
Nested routes let a route render its own component while also rendering a child component inside a nested <router-view />, mirroring the way a URL like /user/1/profile is really "a user page, with a profile section inside it."
const routes = [
    {
        path: '/user/:id',
        component: User,
        children: [
            { path: '', component: UserHome },
            { path: 'profile', component: UserProfile },
            { path: 'posts', component: UserPosts }
        ]
    }
]
<!-- User.vue -->
<template>
    <div class="user">
        <h2>User {{ $route.params.id }}</h2>
        <nav>
            <router-link :to="`/user/${$route.params.id}/profile`">Profile</router-link>
            <router-link :to="`/user/${$route.params.id}/posts`">Posts</router-link>
        </nav>
        <router-view />
    </div>
</template>
This is the right tool whenever a section of the UI (a sidebar, a set of tabs, a shared header) needs to stay on screen while only the inner content changes as the user navigates, like a settings page with /settings/account, /settings/billing, and /settings/security all sharing the same page shell.
96. What are named routes and named views?
A named route is a route with a name property, which lets you navigate to it by name instead of hardcoding the path string. This is useful because paths change more often than names do, and it avoids fragile string concatenation for dynamic segments.
const routes = [
    { path: '/user/:id', name: 'user', component: User }
]
router.push({ name: 'user', params: { id: 123 } })
A named view is different: it lets a single route render multiple components at once into multiple <router-view> outlets, by giving the route a components object (plural) instead of a single component.
const routes = [
    {
        path: '/',
        components: {
            default: Home,
            sidebar: Sidebar
        }
    }
]
<router-view />
<router-view name="sidebar" />
Named views are typically used for layouts where more than one region of the page changes based on the route, like a main content area plus a contextual sidebar that both depend on which page is active.
97. What are navigation guards, and what are the differences between beforeEach, beforeEnter, and beforeRouteLeave?
Navigation guards are functions Vue Router calls during a navigation that can allow it, redirect it, or cancel it. They exist so you can gate access to routes (auth checks), warn about unsaved changes, or update page metadata before a route actually renders.
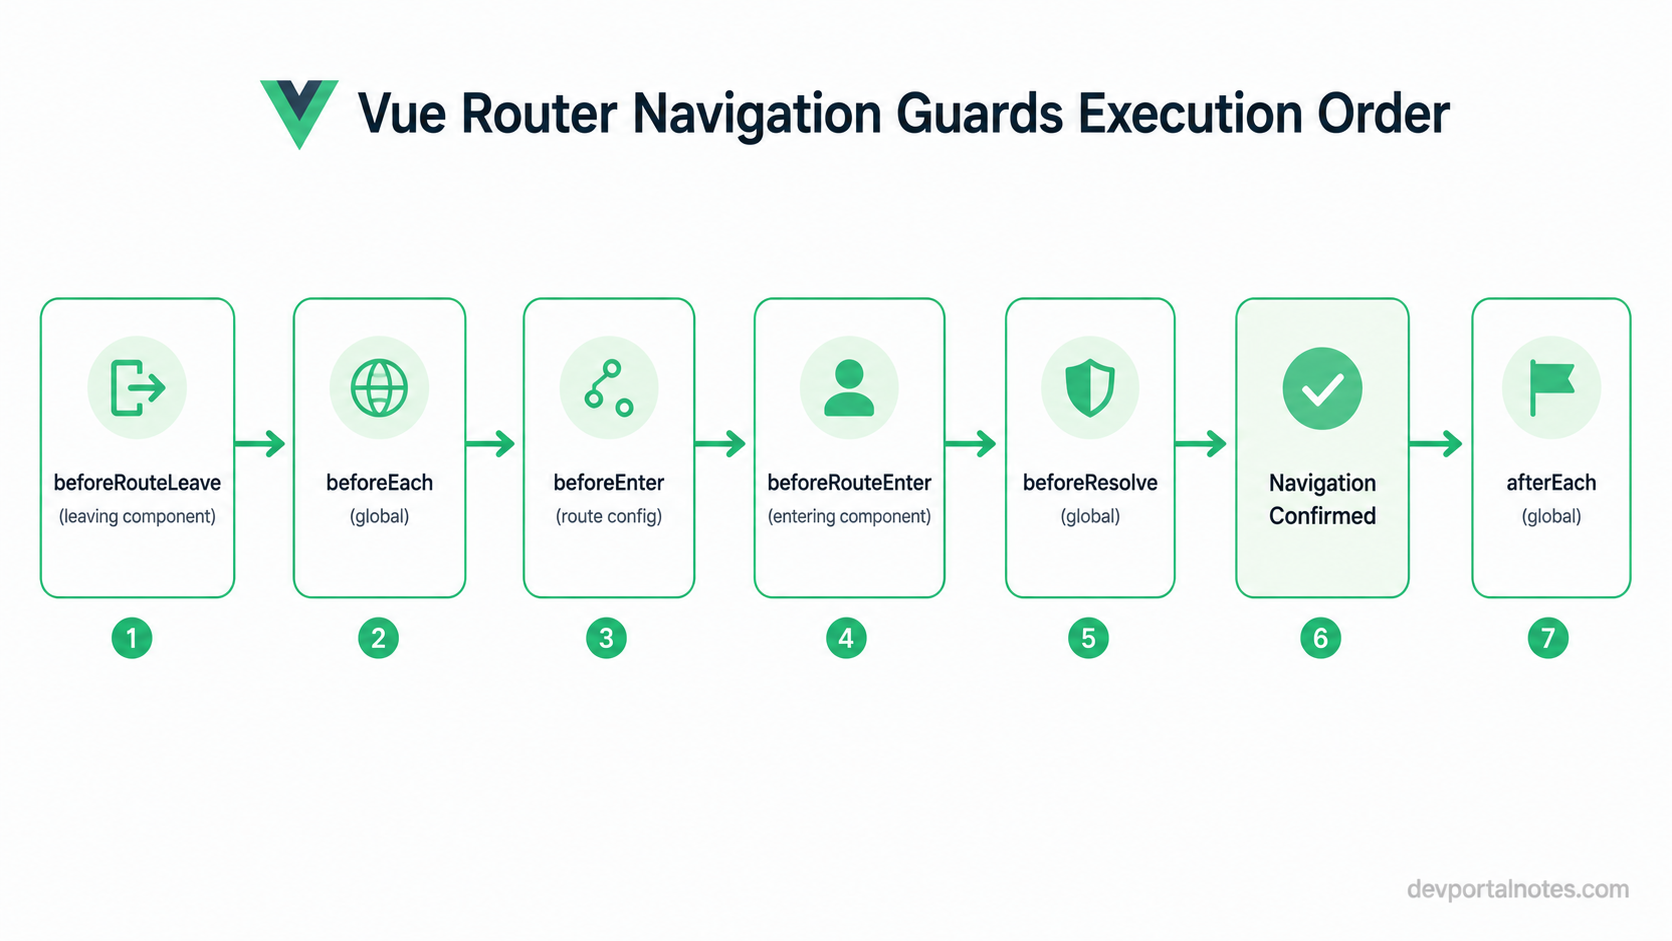
The three you asked about live at different scopes:
router.beforeEachis a global guard, registered once on the router instance. It runs on every single navigation in the app, regardless of which route is involved, which makes it the natural place for app-wide checks like "is the user logged in."beforeEnteris a per-route guard, defined directly in that route's config. It only runs when navigating to that specific route, and it does not fire again on in-place param changes (going from/users/1to/users/2on the same route record does not re-trigger it, since that is an "update," not a fresh "entry").beforeRouteLeaveis an in-component guard, defined inside the component being navigated away from (as a component option in the Options API, or via theonBeforeRouteLeavecomposable in<script setup>). It runs when the user is about to leave the route that renders this component, which makes it the right spot for "you have unsaved changes, are you sure?" prompts.
router.beforeEach((to, from) => {
    if (to.meta.requiresAuth && !isLoggedIn()) {
        return { name: 'login' }
    }
})
<script setup>
import { onBeforeRouteLeave } from 'vue-router'

onBeforeRouteLeave(() => {
    const confirmed = window.confirm('Leave without saving changes?')
    if (!confirmed) return false
})
</script>
The full resolution order, which is worth memorizing since it is commonly tested, is:
- Navigation is triggered.
beforeRouteLeaveguards run in components being deactivated.- Global
beforeEachguards run. beforeRouteUpdateguards run in reused components (same component, changed params).beforeEnterguards run for the route(s) being entered.- Async route components are resolved.
beforeRouteEnterguards run in components being activated.- Global
beforeResolveguards run. - The navigation is confirmed.
- Global
afterEachhooks run. - The DOM updates.
- Callbacks passed to
next()insidebeforeRouteEnterrun, now with access to the mounted instance.
98. What is route meta information used for?
meta is an arbitrary object you attach to a route definition to store custom data that has nothing to do with matching the URL, but that guards, components, and navigation logic can read off to.meta or route.meta.
const routes = [
    {
        path: '/admin',
        component: Admin,
        meta: { requiresAuth: true, title: 'Admin Dashboard' }
    }
]
router.beforeEach((to) => {
    document.title = to.meta.title || 'My App'
    if (to.meta.requiresAuth && !isLoggedIn()) {
        return { name: 'login' }
    }
})
Common uses are marking routes as requiring authentication or a specific role, picking which layout component to wrap a page in, setting the page title or breadcrumb label, and flagging routes that should be excluded from analytics or a sitemap. Because meta is inherited by nested routes (child route meta merges with parent meta), it is also a convenient way to apply a rule, like "requires auth," to an entire section of the app at once by setting it once on the parent route.
99. How do you lazy load a route's component?
Instead of importing a route's component normally at the top of the file, you give the route a function that returns a dynamic import(). Build tools like Vite or webpack recognize this pattern and automatically split that component into its own chunk, which is only downloaded when the user actually navigates to that route.
const routes = [
    {
        path: '/about',
        component: () => import('./views/About.vue')
    },
    {
        path: '/dashboard',
        component: () => import('./views/Dashboard.vue')
    }
]
This keeps the initial JavaScript bundle small, since a visitor landing on the home page does not need to download the code for the admin dashboard or a rarely visited settings page until they actually go there. It is one of the easiest performance wins in a Vue app and is recommended for any route that is not part of the critical first-load path.
100. What is the difference between router.push and router.replace?
Both methods navigate programmatically to a new route, and both accept the same arguments (a path string or a location object like { name: 'user', params: { id: 1 } }), but they treat browser history differently.
router.push() adds a new entry to the history stack, so the browser's back button takes the user to the route they were on before. router.replace() swaps out the current history entry instead of adding a new one, so the back button skips over it entirely, as if that navigation never happened.
replace is the right choice for redirects (sending an unauthenticated user from /dashboard to /login should not leave /dashboard sitting in history for the back button to return to), for login flows, and for any multi-step wizard step you do not want the user landing back on by accident. push is the default for normal navigation, like clicking a link to a different page, where going back is expected to work.
101. How does Vue Router control scroll position when navigating between routes?
By default, a single-page app does not reset scroll position when the route changes, since there is no real page load. Vue Router exposes a scrollBehavior function, passed as an option to createRouter, to control this explicitly.
const router = createRouter({
    history: createWebHistory(),
    routes,
    scrollBehavior(to, from, savedPosition) {
        if (savedPosition) {
            return savedPosition
        }
        if (to.hash) {
            return { el: to.hash }
        }
        return { top: 0 }
    }
})
The function receives the target route, the route being left, and savedPosition, which is populated only when the navigation was triggered by the browser's back/forward buttons, letting you restore exactly where the user was, similar to native browser scroll restoration. Returning { top: 0 } resets scroll to the top for a normal forward navigation, returning { el: '#some-id' } scrolls to an anchor (useful for in-page hash links), and returning false or nothing leaves scroll position untouched. The function can also return a Promise, which is handy for waiting on a page transition to finish before scrolling.
102. What is the difference between <router-link> and a plain <a> tag?
<router-link> is Vue Router's component for internal navigation. It renders to an <a> tag under the hood, but it intercepts the click and performs the route change client-side through the router, instead of letting the browser make a full request for a new document. That means no full page reload, no re-downloading the app's JavaScript, and the component state elsewhere on the page stays intact.
<router-link to="/about">About</router-link>
<router-link :to="{ name: 'user', params: { id: 1 } }">User</router-link>
It also adds a few conveniences a plain <a> does not have: it automatically applies router-link-active and router-link-exact-active classes when its target matches the current route, which is handy for styling nav links as "current page" without writing that logic yourself, and it still behaves correctly for modifier-key clicks (ctrl/cmd-click still opens the link in a new tab, since router-link does not hijack those).
A plain <a href="/about"> pointing at an internal route would trigger a real browser navigation, a full document request and reload, unless you manually call preventDefault and push the route yourself. For internal links within a Vue Router app, <router-link> is the correct choice; a plain <a> is still exactly right for external URLs.
State Management: Pinia and Vuex
103. What problem does a centralized state management library solve that props and provide/inject do not?
Props work well when data flows in one direction from a parent to its direct children, but once a piece of state needs to reach a component many levels down, you end up "drilling" it through every component in between, even ones that do not care about it. provide/inject fixes the drilling problem: an ancestor can expose a value directly to any descendant. But it does not fix ownership. Anyone with access to the injected value can mutate it, there is no single place that shows every action that changed it, and Vue devtools cannot show you a timeline of what happened and why.
A centralized store (Pinia or Vuex) solves both problems at once. State lives in one place, changes go through named actions (or mutations in Vuex), and every component that needs the data reads from the same source regardless of where it sits in the component tree. This makes state changes traceable, testable in isolation, and visible in devtools, none of which come for free with props or provide/inject.
104. What is Pinia, and how do you define a store with it?
Pinia is Vue's official state management library. It gives you a single, reactive store you can read from and write to anywhere in your app, with full TypeScript support and Vue devtools integration (time travel, action logging), without the boilerplate Vuex used to require.
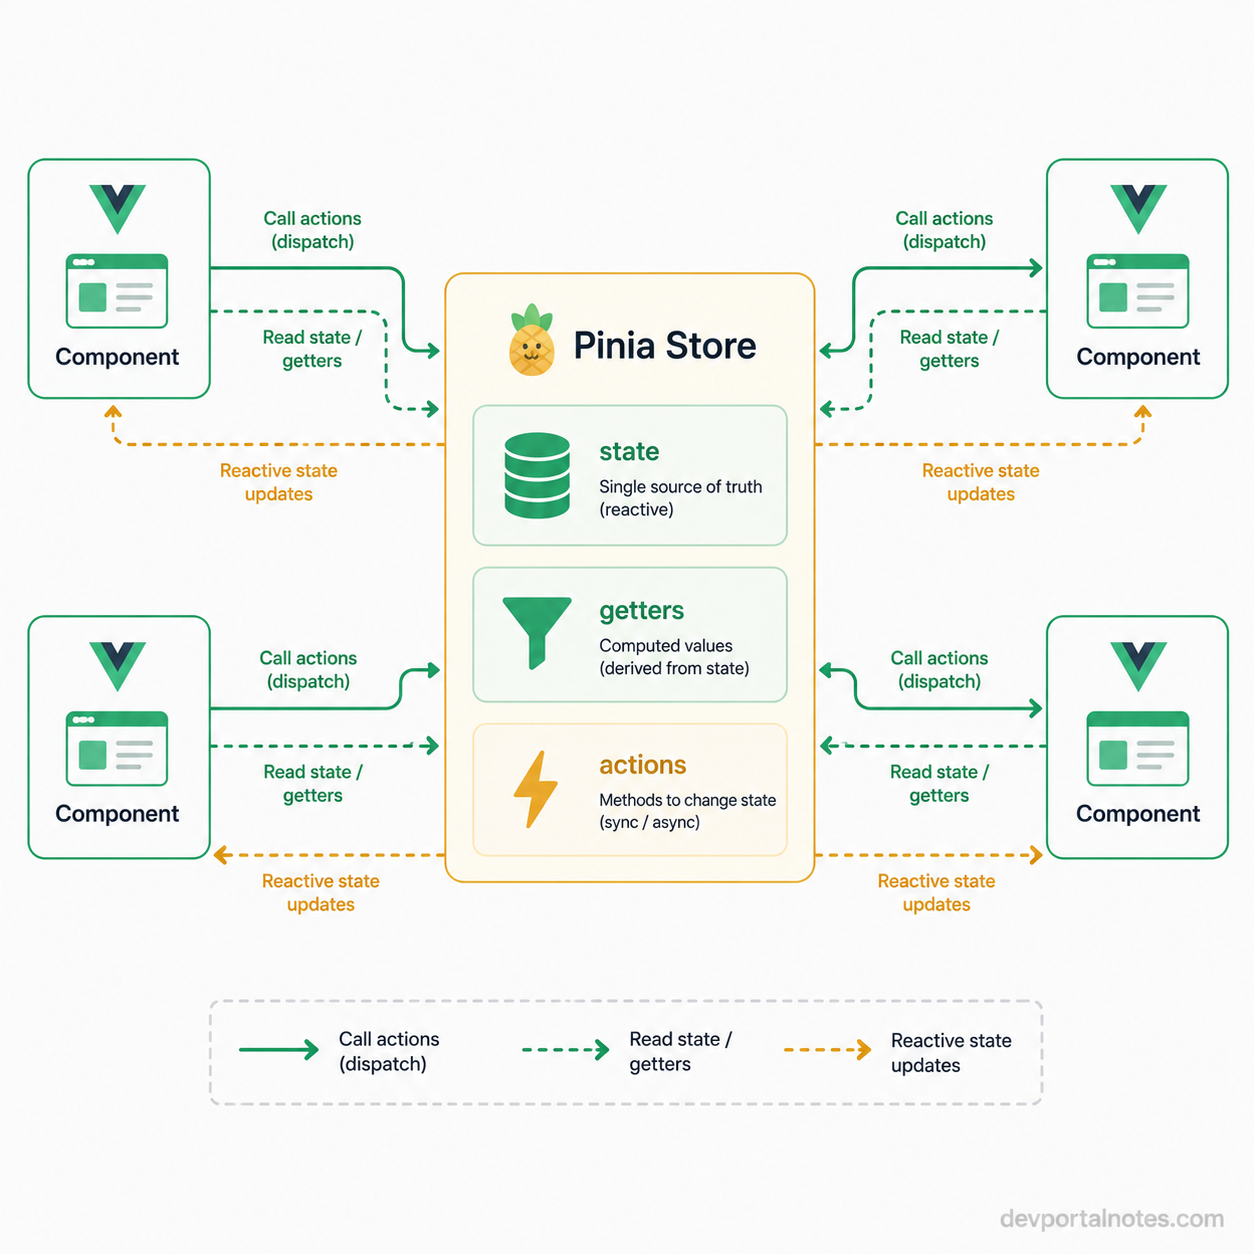
You define a store by calling defineStore with a unique id and either an options object or a setup function. The setup style looks like a component's <script setup>: refs become state, computeds become getters, and plain functions become actions.
import { defineStore } from 'pinia'
import { ref, computed } from 'vue'

export const useCounterStore = defineStore('counter', () => {
    const count = ref(0)
    const doubled = computed(() => count.value * 2)

    function increment() {
        count.value++
    }

    return { count, doubled, increment }
})
Any component can then call useCounterStore() to get a reactive instance of the store.
105. What are state, getters, and actions in a Pinia store?
state is the reactive data the store owns, the single source of truth for that store, similar to data() in a component. getters are derived values computed from state (and other getters), cached like computed properties and recalculated only when their dependencies change. actions are functions that read and mutate state, this is where you put business logic, API calls, or anything that changes more than one piece of state at once.
In an options-style store these map directly onto three separate options:
export const useUserStore = defineStore('user', {
    state: () => ({
        firstName: 'Ada',
        lastName: 'Lovelace'
    }),
    getters: {
        fullName: (state) => `${state.firstName} ${state.lastName}`
    },
    actions: {
        async login(credentials) {
            const user = await api.login(credentials)
            this.firstName = user.firstName
            this.lastName = user.lastName
        }
    }
})
Unlike Vuex, actions can be asynchronous directly, there is no separate "mutations" concept, actions are allowed to change state themselves.
106. What is the difference between the Options-style and the Composition (setup)-style Pinia store?
Pinia lets you write a store two ways, and both produce the exact same kind of store at runtime. The options store takes an object with state, getters, and actions keys, it should feel familiar if you have used Vuex or the Options API.
export const useCartStore = defineStore('cart', {
    state: () => ({ items: [] }),
    getters: {
        total: (state) => state.items.reduce((sum, i) => sum + i.price, 0)
    },
    actions: {
        addItem(item) {
            this.items.push(item)
        }
    }
})
The setup store takes a function, the same shape as <script setup>. ref/reactive values become state, computed values become getters, and regular functions become actions.
export const useCartStore = defineStore('cart', () => {
    const items = ref([])
    const total = computed(() => items.value.reduce((sum, i) => sum + i.price, 0))

    function addItem(item) {
        items.value.push(item)
    }

    return { items, total, addItem }
})
The setup style is more flexible: you can use watchers and other composables inside the store, and it is generally the recommended default once you are comfortable with the Composition API. The options style is easier to read for people coming from Vuex and needs less explanation of what counts as state versus a getter.
107. Why did Pinia replace Vuex as the officially recommended state management library?
Pinia was built to fix the pain points Vuex had accumulated over the years. Vuex needed a strict split between mutations (synchronous, for state changes) and actions (for anything async), which meant a lot of ceremony for a simple state update. Pinia drops mutations entirely, actions can change state directly and can be sync or async.
TypeScript support was also a big driver: Vuex's typing was awkward, especially around modules and mapState/mapActions helpers, while Pinia is written with TypeScript first, so types are inferred automatically without extra typing gymnastics.
Pinia stores are also flat, not nested. Vuex leaned on nested, namespaced modules that needed careful string based namespacing ('cart/addItem'); Pinia stores are just separate, independently importable store definitions, so there is no nesting or namespace typos to worry about.
Finally, Pinia works outside of components more naturally, has a smaller footprint, and its devtools support (action tracking, time travel) matches or beats Vuex's. Given all this, the Vue core team adopted Pinia as the official recommendation for Vue 3, and it works with Vue 2 as well through a compatibility layer.
108. What is Vuex, and what are its four core building blocks?
Vuex is the state management library that was the official recommendation for Vue 2, and it is still found in plenty of production codebases even though Pinia has taken over for new projects. Vuex enforces a strict, predictable flow for state changes so that large apps stay debuggable.
It is built around four pieces:
| Piece | Purpose |
|---|---|
state | The single, reactive source of truth for the whole store |
getters | Computed values derived from state, cached until dependencies change |
mutations | The only way to change state directly, must be synchronous |
actions | Business logic, can be async, commit one or more mutations |
Components dispatch actions (store.dispatch('login', creds)), actions do their async work then commit mutations (store.commit('setUser', user)), and mutations are the only code allowed to touch state directly. This one-way flow (dispatch, then action, then commit, then mutation, then state, then view) is what made Vuex apps predictable and easy to trace in devtools.
109. Why does Vuex require mutations to be synchronous?
Vuex's devtools integration relies on being able to take a snapshot of the state before and after every mutation and log it as a single, discrete step in a timeline. This is what makes "time travel debugging" possible, jumping the app back to any previous state by replaying mutations in order.
If a mutation could run asynchronously, the devtools would have no reliable way to know when the state change actually happened relative to other mutations firing around the same time. Two async mutations could interleave, and the snapshot logged for one mutation might actually contain changes from another. That breaks the guarantee that each entry in the timeline corresponds to exactly one state change.
This is why async work belongs in actions, not mutations: an action can await an API call, then commit a mutation once the result is ready, and that commit is the synchronous, trackable event Vuex records. It is a debugging and predictability guarantee, not a technical limitation of Vue's reactivity.
110. What are Vuex modules, and why would you split a store into them?
A Vuex module is a self contained slice of the store, it has its own state, getters, mutations, and actions, and gets registered under a key on the root store.
const cart = {
    namespaced: true,
    state: () => ({ items: [] }),
    mutations: {
        addItem(state, item) {
            state.items.push(item)
        }
    }
}

const store = createStore({
    modules: { cart }
})
As an app grows, keeping everything in one flat store file becomes hard to navigate, unrelated features start colliding on getter or mutation names, and it gets hard to tell which part of the app owns which piece of state. Splitting into modules (one per feature, like cart, auth, products) keeps related state, getters, mutations, and actions together and makes ownership obvious.
Setting namespaced: true on a module prefixes its getters, mutations, and actions with the module name (cart/addItem), which prevents naming collisions between modules and makes it clear, when you read dispatch('cart/checkout') in a component, exactly where that logic lives.
111. How do you access a Pinia store outside of a component, for example inside a router navigation guard?
Since Pinia stores are just functions you call (useXStore()), you can call them from plain JavaScript too, as long as the Pinia instance has already been installed on the app before that code runs. In a router guard this is usually fine because the guard only runs after the app (and Pinia) is set up.
import { useAuthStore } from '@/stores/auth'

router.beforeEach((to) => {
    const auth = useAuthStore()

    if (to.meta.requiresAuth && !auth.isLoggedIn) {
        return { name: 'login' }
    }
})
The one thing to be careful about is calling useXStore() at the top of a module, outside any function, before Pinia has been installed via app.use(pinia). That will fail because there is no active Pinia instance yet. Call the store function lazily, inside the guard callback itself as shown above, rather than storing the result in a module level variable at import time.
112. What are Pinia plugins, and what can you use them for?
A Pinia plugin is a function you register once, with pinia.use(myPlugin), that Pinia then runs against every store that gets created. The plugin receives a context object (including the store instance) and can add new properties, wrap actions, or subscribe to state changes on every store, without you having to repeat that logic inside each store definition.
function loggerPlugin({ store }) {
    store.$subscribe((mutation, state) => {
        console.log(`${store.$id} changed:`, mutation)
    })
}

pinia.use(loggerPlugin)
Common real world uses include: persisting state to localStorage on every change, resetting all stores on logout, adding a shared property (like a router or an api client) to every store so actions can use this.router without importing it, and logging or sending state changes to an analytics tool. Plugins are the main extension point of Pinia, and most of the community packages you will use (like persistence plugins) are built exactly this way.
113. How would you persist Pinia state across page reloads?
The simplest option in real projects is the community plugin pinia-plugin-persistedstate. You register it once on the Pinia instance, then opt individual stores in with persist: true, and it automatically saves the store to localStorage (or sessionStorage) on change and restores it on load.
import { createPinia } from 'pinia'
import piniaPluginPersistedstate from 'pinia-plugin-persistedstate'

const pinia = createPinia()
pinia.use(piniaPluginPersistedstate)
export const useAuthStore = defineStore('auth', () => {
    const token = ref(null)
    return { token }
}, {
    persist: true
})
If you do not want a dependency, you can do it manually with store.$subscribe, which fires whenever any part of the store's state changes, plus a one time read on startup:
const saved = localStorage.getItem('auth')
if (saved) authStore.$patch(JSON.parse(saved))

authStore.$subscribe((mutation, state) => {
    localStorage.setItem('auth', JSON.stringify(state))
})
Either way, the two moving parts are the same: write state out on every change, and read it back in before the store is first used.
114. When should you reach for a store instead of provide/inject or lifting state up?
Lifting state up (moving it to a shared parent and passing it down via props) works well when the components that need the state are close together in the tree. provide/inject works well when one ancestor needs to expose something to a deep subtree without drilling props through every level in between. Both assume there is a natural, findable "owner" component for the state.
Reach for a store instead once that assumption breaks down: when the state needs to be read or written from components that live in completely different, unrelated branches of the tree (like a shopping cart icon in the header and a checkout page); when the state needs to outlive a particular component tree, for example surviving route navigation; or when you want the debugging benefits, action logging and devtools time travel, that come with a real store. A rough rule of thumb: if you catch yourself passing a prop through three or more components that do not use it themselves just to reach a fourth, or if two unrelated routes both need the same live data, that is a strong sign it belongs in a store rather than in props or provide/inject.
Forms and Input Handling
115. How does v-model behave differently on a text input, a checkbox, a radio button, and a select?
v-model is really just sugar over an event listener and a value binding, but which event and which prop it uses changes depending on the element.
| Element | Value bound | Event listened |
|---|---|---|
| Text input / textarea | value | input |
| Checkbox (single) | checked, bound value is a boolean | change |
Checkbox (bound to array, with a value attr) | pushes or removes the value from the array | change |
| Radio button | checked, bound variable gets the radio's value when selected | change |
<select> | value, matches the selected <option>'s value | change |
For a text input, v-model="text" is shorthand for :value="text" @input="text = $event.target.value", updating on every keystroke. For a checkbox bound to a plain variable, the variable becomes true/false. For a radio group, every radio shares the same v-model, and each one sets that variable to its own value attribute when picked. For a select, the bound variable takes on the value of whichever <option> is currently selected. Vue picks the right prop and event automatically based on the element type, that mapping is what v-model abstracts away.
116. How do you bind v-model to a group of checkboxes or radio buttons?
For a group of checkboxes that should all update the same array, bind the same v-model to every checkbox and give each one a value attribute. Vue automatically pushes the value into the array when the box is checked and removes it when unchecked.
<template>
    <label><input type="checkbox" v-model="selected" value="apple" /> Apple</label>
    <label><input type="checkbox" v-model="selected" value="banana" /> Banana</label>
</template>

<script setup>
import { ref } from 'vue'

const selected = ref([])
</script>
Radio buttons work the same way conceptually, but since only one can be picked, the bound variable becomes a single value, not an array. Every radio in the group shares the same v-model, only their value attributes differ.
<template>
    <label><input type="radio" v-model="size" value="small" /> Small</label>
    <label><input type="radio" v-model="size" value="large" /> Large</label>
</template>

<script setup>
import { ref } from 'vue'

const size = ref('small')
</script>
In both cases, the key detail is that every input in the group points at the exact same reactive variable, only the static value attribute changes between inputs.
117. What is the difference between a controlled and an uncontrolled form input in Vue?
A controlled input's value is driven entirely by reactive state: the input's value comes from a ref, and every change flows back into that same ref through v-model or a manual @input handler. Vue state is the single source of truth, the DOM element just reflects it.
An uncontrolled input is left to manage its own value internally, in the DOM, and Vue does not bind it to any reactive variable. You would read its value only when needed, typically using a template ref and reading .value off the actual DOM element (for example, when the form is submitted), rather than tracking every keystroke in reactive state.
<template>
    <input ref="nameInput" type="text" />
    <button @click="submit">Submit</button>
</template>

<script setup>
import { ref } from 'vue'

const nameInput = ref(null)

function submit() {
    console.log(nameInput.value.value)
}
</script>
Most Vue forms use controlled inputs via v-model because it keeps validation, computed values, and conditional UI trivial to write against reactive state. Uncontrolled inputs show up when you genuinely do not need to react to every change, for example a rarely touched field, or when integrating a non-Vue widget that manages its own DOM state.
118. How do you approach form validation in Vue, and when would you reach for a library like VeeValidate?
For simple forms, you can validate by hand: bind each field with v-model, keep a ref (or a reactive object) for error messages, and run your checks either on submit or with a computed/watch on the field. This keeps validation logic fully visible and dependency free.
<script setup>
import { ref, computed } from 'vue'

const email = ref('')
const error = computed(() => {
    if (!email.value) return 'Email is required'
    if (!email.value.includes('@')) return 'Email looks invalid'
    return ''
})
</script>
This works fine for a login form with two fields, but it gets messy fast once you have many fields, cross field rules (like "confirm password must match password"), async checks (like "is this username taken"), or nested/dynamic form arrays. That is when a library like VeeValidate earns its place: it gives you a schema based way to describe rules (often paired with a validation schema library like Yup or Zod), handles touched/dirty state, error message display, and submit blocking, and provides composables (useField, useForm) that plug straight into Vue's reactivity so you are not reinventing that state tracking yourself. The rule of thumb: hand rolled validation for a couple of simple fields, a library once the form has real complexity or you are repeating the same validation patterns across many forms.
119. What is the difference between listening to @input and @change on a text field?
@input fires on every value change as it happens, for a text field that means every keystroke, paste, or programmatic value change. @change fires only once the value has been committed, for a text field that is when the field loses focus (blurs) after its value changed, not on every keystroke.
<input @input="onInput" @change="onChange" />
v-model on a plain text input uses input under the hood, which is why the bound variable updates live as you type. If you want to react to every keystroke (live character count, live search suggestions), listen for @input (or just use v-model and a watch). If you only care about the final value once the user is done editing a field (like triggering a validation check or an expensive computation when they tab away), @change avoids running that logic on every single keystroke.
120. How would you debounce a v-model bound search input?
v-model itself does not debounce, it updates the bound variable on every keystroke, so if that variable directly triggers a network request, you will fire a request per character typed. The usual fix is to separate the "what the user is typing" state from the "what we actually search for" state, and only update the second one after typing has paused.
<template>
    <input v-model="query" placeholder="Search..." />
</template>

<script setup>
import { ref, watch } from 'vue'

const query = ref('')
let timer = null

watch(query, (value) => {
    clearTimeout(timer)
    timer = setTimeout(() => {
        search(value)
    }, 300)
})

function search(value) {
    // fire the actual API call here
}
</script>
v-model stays bound to query so the input feels instant, but the expensive search call only runs 300ms after the user stops typing. If you are already using VueUse, refDebounced or useDebounceFn do the same thing with less boilerplate, but the underlying idea is the same: let v-model update local state immediately, and debounce the side effect that reads from it.
Performance Optimization
121. What is v-memo, and when would you use it?
v-memo is a directive that memoizes a chunk of template, telling Vue to skip re-rendering that subtree as long as a list of dependency values hasn't changed. You give it an array of values to watch; if every value in that array is the same as last render, Vue reuses the existing vnode tree instead of re-diffing it.
It exists for edge cases where Vue's default reactivity and compiler optimizations (patch flags, block tree) aren't enough, typically huge v-for lists where most rows never change and you've measured an actual bottleneck. It is not something you reach for by default; misusing it can cause stale UI if you forget to include a value the subtree actually depends on.
<template>
    <div v-for="item in list" :key="item.id" v-memo="[item.id === selectedId]">
        <ExpensiveRow :item="item" :selected="item.id === selectedId" />
    </div>
</template>
Here, a row only re-renders when its selected state flips, not every time selectedId changes and forces a full list re-render.
122. What is <KeepAlive>, and how does it improve performance?
<KeepAlive> is a built-in component that caches the component instances of its dynamic children instead of destroying and recreating them when they're toggled out and back in. Normally, switching a <component :is> or a <router-view> unmounts the old component and mounts a fresh one, which re-runs setup(), loses local state, and rebuilds the DOM from scratch.
Wrapping the dynamic content in <KeepAlive> keeps the unmounted instance alive in memory, so switching back to it just reattaches its existing DOM and state. This is useful for things like tabs, forms with unsaved input, or list/detail views where you want scroll position and form state preserved.
<template>
    <KeepAlive :include="['UserForm', 'Settings']" :max="10">
        <component :is="activeTab" />
    </KeepAlive>
</template>
include/exclude control which components get cached by name, and max bounds the cache size with an LRU eviction policy. Cached components gain activated and deactivated lifecycle hooks instead of mounted/unmounted on every switch.
123. How do you lazy load a component with defineAsyncComponent?
defineAsyncComponent wraps a function that returns a dynamic import(), so the component's code is only fetched and evaluated when it's actually needed, instead of being bundled into the initial page load. Vue renders a placeholder (nothing, by default) until the import resolves, then swaps in the real component.
import { defineAsyncComponent } from 'vue'

const AdminPanel = defineAsyncComponent(() => import('./AdminPanel.vue'))
For more control you pass an options object instead of a bare function:
const AdminPanel = defineAsyncComponent({
    loader: () => import('./AdminPanel.vue'),
    loadingComponent: LoadingSpinner,
    errorComponent: LoadError,
    delay: 200,
    timeout: 5000,
})
delay avoids flashing a spinner for fast loads, and timeout falls back to the error component if the chunk takes too long. This pairs naturally with route-level code splitting, where each route's component is its own async component so users only download the JavaScript for the page they visit.
124. What are patch flags, and how do they let Vue 3 skip unnecessary diff work?
Patch flags are numeric hints that the Vue 3 compiler attaches to a vnode at compile time, describing exactly what kind of dynamic content that vnode contains, such as TEXT, CLASS, STYLE, PROPS, or FULL_PROPS. The compiler can figure this out because it statically analyzes the template and knows which bindings are dynamic ({{ msg }}, :class="foo") and which parts are plain static markup.
At render time, the patch function checks a vnode's flag instead of blindly comparing every attribute, child, and prop against the previous vnode. If a vnode is flagged TEXT, Vue knows only the text content can differ and updates just that, skipping class, style, and prop comparisons entirely. A vnode with no dynamic bindings at all gets no patch flag and is skipped from diffing completely.
This is the core reason Vue 3's compiled templates outperform a naive virtual DOM diff: the compiler does the analysis once, ahead of time, so the runtime doesn't have to rediscover "what changed" by brute-force comparison on every render.
125. What is static hoisting in the Vue 3 compiler?
Static hoisting is a compiler optimization where vnodes that contain no dynamic bindings are created once, outside of the render function, and then reused on every subsequent render instead of being recreated each time.
In a naive virtual DOM implementation, the entire render function runs on every update, including the code that creates vnodes for markup that never changes, like a static heading or a hardcoded icon. Since the Vue 3 compiler can see at compile time that a piece of template has no {{ }} interpolations, directives, or bindings, it "hoists" that vnode creation out of the render function so it only runs once, and the render function just references the same cached vnode object on every call.
<template>
    <div>
        <h1>Static Title</h1>
        <p>{{ dynamicMessage }}</p>
    </div>
</template>
Here <h1>Static Title</h1> gets hoisted; only the <p> vnode is recreated on re-renders. The benefit is fewer object allocations and less garbage collection pressure on every render pass, which adds up in components that re-render frequently.
126. What is the "block tree" optimization in the Vue 3 compiler?
A "block" is a vnode that also tracks all of its dynamic descendant vnodes in a flat array called dynamicChildren, gathered at compile time. Instead of the runtime having to walk the entire tree recursively to find what changed, Vue can jump straight to the dynamicChildren array of a block and only diff those specific nodes, skipping every static node in between automatically.
Templates compile into a tree of nested blocks, forming the "block tree." The root template is a block, and structural directives like v-if and v-for create their own nested blocks, because the set of dynamic children they produce can change shape between renders (a v-for might add or remove items, a v-if branch might swap out entirely). Keeping these as separate blocks means the parent block's flat diff doesn't get confused by children whose structure isn't stable.
The combination of patch flags (what changed) and the block tree (where to look) is what lets Vue 3 turn a full tree diff into something closer to "diff a flat list of known-dynamic nodes," which scales much better as templates grow larger.
127. How do you avoid performance problems when rendering large lists?
A few practices matter most:
- Always give
v-fora stable, unique:key(an id from your data), never the array index for lists that can reorder, insert, or delete, since index keys cause Vue to misattribute state to the wrong DOM node during diffing. - Never combine
v-ifandv-foron the same element; Vue 3 will warn/error sincev-ifhas higher precedence, and evaluating a condition per item is wasteful anyway. Filter the list with acomputedproperty first. - Use
computedproperties for any derived/filtered/sorted view of the list so the work is cached and only reruns when the source data changes, not on every render. - Reach for
v-memoon expensive rows only when the default diffing is a measured bottleneck. - For very large datasets that don't need per-item reactivity, use
shallowReformarkRawto avoid Vue making every nested object deeply reactive, which has real overhead at scale. - Beyond a few hundred rows, consider virtual scrolling instead of rendering the full list at once.
128. What is virtual scrolling, and when would you need it?
Virtual scrolling (or "windowing") is a technique where only the list items currently visible in the viewport, plus a small buffer, are actually rendered as real DOM nodes. As the user scrolls, nodes are recycled and repositioned to represent whatever data has scrolled into view, rather than the browser holding thousands of live DOM nodes for the entire dataset.
You need it once a list gets large enough that rendering every item up front becomes the bottleneck, commonly somewhere in the hundreds to thousands of rows. The cost isn't really about Vue's diffing at that point, it's that the browser itself struggles with layout, paint, and memory for that many real DOM nodes, and Vue's reactivity has to track and patch all of them too.
In practice you don't hand-roll this; libraries like vue-virtual-scroller or @tanstack/vue-virtual calculate which slice of the list is visible based on scroll offset and item height, and render only that slice, keeping the DOM node count roughly constant regardless of how many total items exist.
129. How do computed properties help performance compared to calling a method directly in a template?
As covered in the computed caching question above, a computed property only recomputes when one of its reactive dependencies changes, while a method called from a template reruns on every single re-render of that component, whether or not its inputs actually changed. The performance angle is what that caching buys you in practice, once the derived value is expensive.
<script setup>
import { ref, computed } from 'vue'

const items = ref([/* large array */])

// recalculates only when items.value changes
const sortedItems = computed(() => {
    return [...items.value].sort((a, b) => a.price - b.price)
})

// reruns this sort on every re-render, regardless of cause
function sortedItemsMethod() {
    return [...items.value].sort((a, b) => a.price - b.price)
}
</script>
If this component re-renders for an unrelated reason (a sibling prop changing, a parent re-rendering it), sortedItemsMethod() redoes the full sort every time, while sortedItems just returns the cached array. For cheap operations this difference is invisible, but for expensive derived data (sorting, filtering, aggregating large arrays) it can be the difference between a snappy UI and visible jank. The rule of thumb: if a template expression is derived purely from reactive state and doesn't need arguments, make it a computed.
130. What tools would you use to profile and debug performance problems in a Vue application?
Vue Devtools is the first stop: its component inspector shows re-render counts and highlights which components updated on a given tick, and its performance tab can visualize component init, render, and patch timings, which quickly points to a component that's re-rendering far more often than expected.
For deeper timing analysis, the browser's own Performance panel (Chrome DevTools) records a flame graph of actual JavaScript execution and layout/paint work, letting you see whether time is going into Vue's render function, into a specific expensive computed/method, or into layout thrashing from DOM changes.
Vue also exposes debug hooks for tracking exactly why a component re-rendered:
<script setup>
import { onRenderTracked, onRenderTriggered } from 'vue'

onRenderTracked((event) => {
    console.log('dependency tracked', event)
})
onRenderTriggered((event) => {
    console.log('re-render triggered by', event)
})
</script>
You can also set app.config.performance = true in development to have Vue emit performance marks/measures for component init, compile, render, and patch, which then show up in the browser's Performance timeline. For overall page-level metrics (not Vue-specific but relevant when Vue hydration/rendering is the bottleneck), Lighthouse and the Web Vitals extension round out the toolkit.
Vue 3 Specific Features
131. What is Teleport, and what problem does it solve?
Teleport is a built-in component that lets you render part of a component's template into a different location in the DOM, anywhere outside the component's own hierarchy, while the content stays logically part of that component (same instance, same props, same events, same reactive scope).
The problem it solves: things like modals, tooltips, and dropdown menus need to be positioned relative to the whole viewport and need to sit outside any parent's overflow: hidden or z-index stacking context to display correctly, but they're conceptually owned by a deeply nested component and need access to that component's local state. Before Teleport, you'd either fight CSS stacking issues or manually manage DOM manipulation outside of Vue's control.
<template>
    <button @click="open = true">Open Modal</button>
    <Teleport to="body">
        <div v-if="open" class="modal">
            <p>Modal content, rendered at the end of body</p>
            <button @click="open = false">Close</button>
        </div>
    </Teleport>
</template>
The modal's markup physically lives at the end of <body> in the actual DOM, avoiding any ancestor's clipping or stacking issues, but open and the click handlers still belong to this component exactly as if it weren't teleported.
132. What is Suspense, and how do you use it with an async setup() or async component?
Suspense is a built-in component that lets you show fallback content while one or more async dependencies in its child tree are still resolving, then automatically swaps to the real content once everything is ready. It's Vue's way of handling "this part of the tree needs to wait for a promise" declaratively, instead of manually tracking loading flags in every component.
A component becomes an async dependency either by using defineAsyncComponent, or by having a <script setup> with a top-level await, which implicitly makes that component's setup() async.
<!-- UserProfile.vue -->
<script setup>
const res = await fetch('/api/user')
const user = await res.json()
</script>

<template>
    <p>{{ user.name }}</p>
</template>
<!-- Parent.vue -->
<template>
    <Suspense>
        <template #default>
            <UserProfile />
        </template>
        <template #fallback>
            <p>Loading user...</p>
        </template>
    </Suspense>
</template>
Suspense waits for UserProfile's async setup to resolve before rendering the #default slot content, showing #fallback in the meantime. It's worth noting Vue's own docs still label Suspense an experimental feature, its API could change in a future minor version, so it's common in interviews but worth using cautiously in production apps that need long-term stability guarantees.
133. What are Fragments, and how did they remove the "single root node" restriction from Vue 2?
A Fragment is Vue's internal representation of a component template that has more than one root-level element. In Vue 2, every component template had to be wrapped in a single root element, because Vue 2's virtual DOM model tied one component to exactly one root vnode; if you needed multiple top-level elements you had to add an artificial wrapper <div> just to satisfy the compiler.
Vue 3's virtual DOM and compiler support a component returning an array of vnodes as its root, internally treated as a Fragment. This means a template can look like this without any wrapping element:
<template>
    <header>Title</header>
    <main>Content</main>
    <footer>Footer</footer>
</template>
This removes a common source of unnecessary wrapper <div>s that used to exist purely to satisfy Vue 2's constraint, which is especially useful for layout components, table rows, or list items where an extra wrapper element would break CSS layout (like inserting a <div> between <tr> elements).
One practical side effect: attribute inheritance ("fallthrough attributes") is ambiguous with multiple roots, since Vue doesn't know which root element should receive attributes passed from the parent. Vue 3 will warn if you have multiple roots and don't explicitly bind v-bind="$attrs" to one of them or set inheritAttrs: false.
134. What is the Virtual DOM, and how does Vue use it to update the real DOM efficiently?
The Virtual DOM is a lightweight, in-memory tree of plain JavaScript objects (vnodes) that mirrors the structure of the real DOM. Instead of a component directly manipulating DOM elements when its data changes, its render function produces a new vnode tree describing what the UI should look like, and Vue compares that tree to the previous one to figure out the minimal set of real DOM operations needed to make the actual page match.
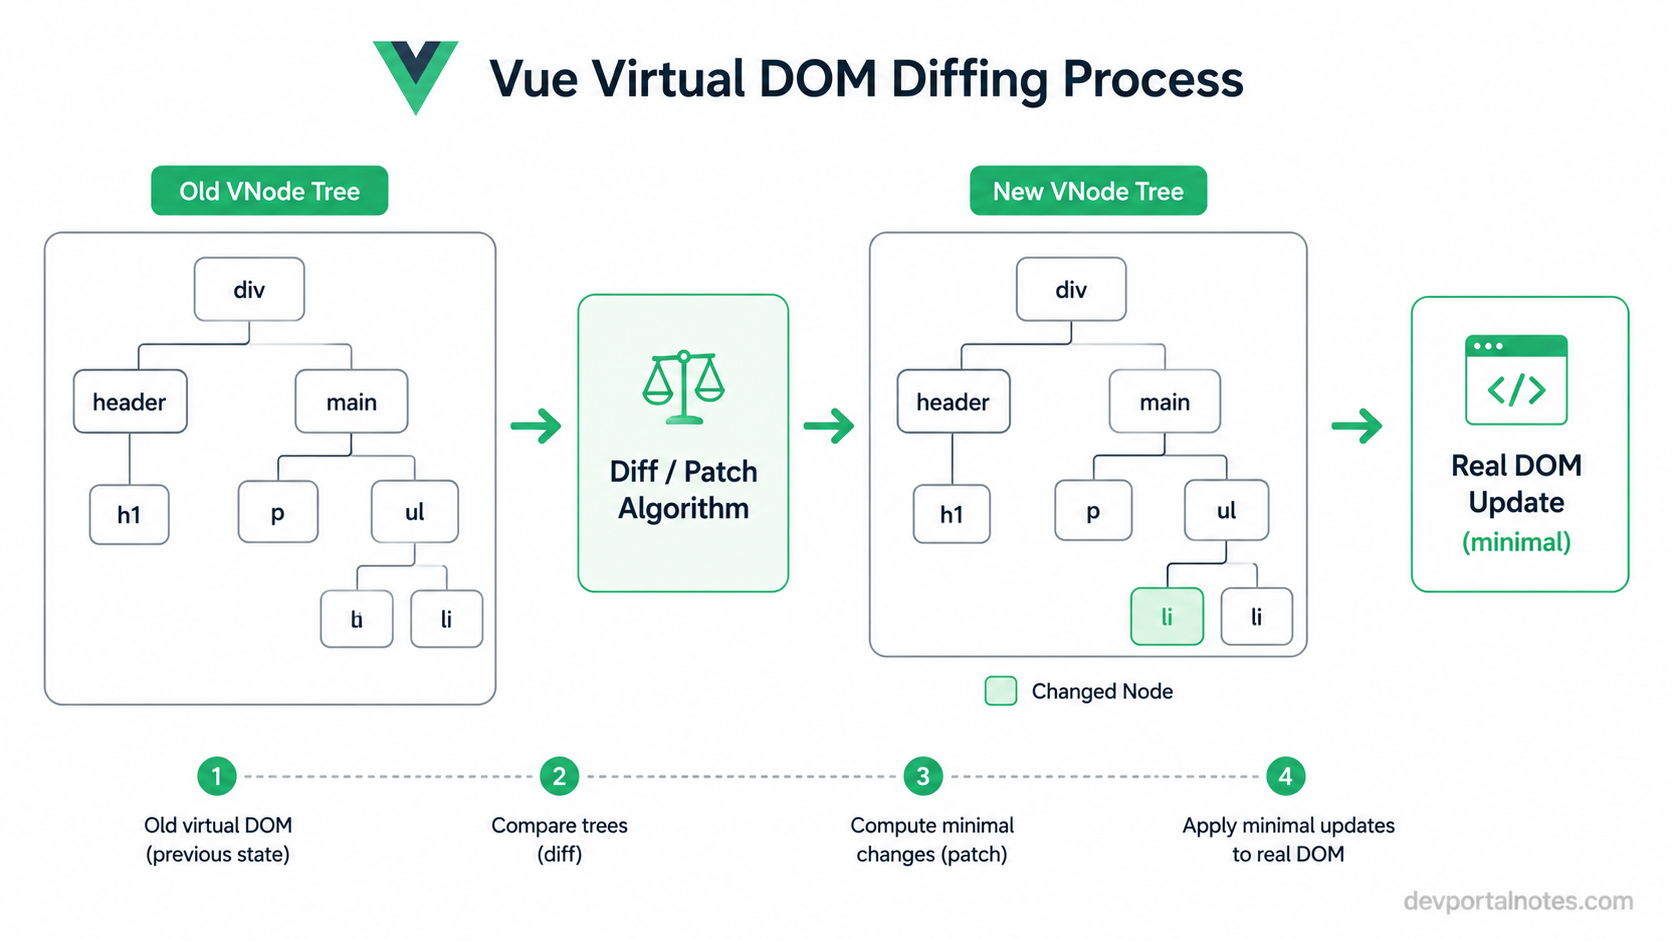
The reason this exists at all: real DOM operations (creating elements, inserting nodes, mutating attributes, triggering layout) are relatively expensive because they touch the browser's rendering engine, while creating and comparing JavaScript objects in memory is cheap. By batching and minimizing actual DOM writes, Vue avoids repeated expensive operations like reflow and repaint that would happen if you mutated the DOM directly on every small change.
It's worth knowing that Vue 3 doesn't rely purely on runtime vnode diffing the way a naive virtual DOM implementation would; the compiler adds patch flags and the block tree so the "diff" step already knows what's dynamic and what to skip, before the vnodes are even compared at runtime. The virtual DOM is still the underlying model, but Vue 3 uses compile-time information to make working with it much faster than a generic diff algorithm would be on its own.
135. How does Vue's diffing (patch) algorithm decide what to update in the real DOM?
When patching, Vue first compares the new vnode against the old vnode at the same position: if the element type and key match, Vue reuses the existing DOM node and only updates what actually differs; if the type or key differs, Vue tears down the old DOM subtree and mounts a new one rather than trying to reconcile mismatched structures.
For a compiled template, this comparison is guided by patch flags: a vnode flagged TEXT only has its text content re-checked, one flagged CLASS only has its class re-checked, and so on, rather than Vue comparing every attribute blindly. Within a block, only the nodes present in that block's dynamicChildren array get visited at all; static nodes are skipped outright because the compiler already proved they can't change.
For keyed lists (v-for), Vue runs a specialized algorithm that compares old and new children by their key. It first skips matching nodes at the start and end of both lists (the common case of appending/prepending), then for the remaining middle section it computes the longest increasing subsequence of matched indices, that subsequence represents nodes that are already in the correct relative order and can stay untouched, while everything else gets moved, added, or removed with the minimum number of DOM operations. This is why a stable, unique :key matters so much: without it, Vue can't reliably tell which old node corresponds to which new one, and falls back to less efficient in-place patching that can scramble component state.
136. What are compiler macros like defineProps and defineEmits, and why don't you need to import them?
defineProps, defineEmits, defineExpose, defineOptions, and defineModel are compiler macros, special identifiers that only have meaning inside <script setup> and are processed entirely at compile time by the Vue single-file component compiler. They aren't real JavaScript functions with a runtime implementation; when the compiler sees defineProps({...}) in your <script setup> block, it strips that call out and rewrites it into the equivalent of the Options API's props option on the underlying component definition.
That's exactly why you never import them: importing a macro would imply it's a normal function you call at runtime, but there's nothing to call, the compiler recognizes the identifier by name and transforms the surrounding code before any of it executes in the browser. If you did try to import defineProps from 'vue', you'd find it isn't even exported as a real function for this purpose, since the whole mechanism depends on static, compile-time analysis of your source code.
<script setup>
const props = defineProps({
    title: { type: String, required: true },
})

const emit = defineEmits(['update', 'close'])
</script>
This code compiles down to a component with a props option and an emits option, and props/emit become locally scoped variables bound to that instance, all without any import statement needed.
137. What is app.config.globalProperties, and when would you use it?
app.config.globalProperties is an object where you can attach properties or methods that become available on every component instance in the app, accessed via this in Options API components. It's the Vue 3 replacement for Vue 2's pattern of assigning things onto Vue.prototype.
// main.js
const app = createApp(App)

app.config.globalProperties.$http = axios
app.config.globalProperties.$formatDate = (date) => new Intl.DateTimeFormat('en-US').format(date)

app.mount('#app')
It's mainly meant for plugin authors who need to expose something app-wide, like an HTTP client or a translation function, without every component having to import it individually. In Options API components you'd then call this.$http.get(...) anywhere.
It's less useful, and a bit awkward, in <script setup> code, since there's no this; you'd have to reach for getCurrentInstance().appContext.config.globalProperties, which the Vue team explicitly discourages outside of internal/advisory use. For Composition API codebases, provide/inject or plain composables (exporting a shared instance from a module) are the preferred way to share app-wide functionality, since they're explicit about where a value comes from and work cleanly with TypeScript, unlike global properties which are essentially untyped ambient state.
138. How do you write and register a custom Vue plugin?
A Vue plugin is an object with an install(app, options) function (or, more rarely, just a function itself) that receives the application instance and can use it to add app-wide functionality: global components, custom directives, global properties, or values provided via provide for inject to pick up anywhere in the tree.
// plugins/toast.js
export default {
    install(app, options = {}) {
        const duration = options.duration ?? 3000

        app.config.globalProperties.$toast = (message) => {
            console.log(`[toast, ${duration}ms]:`, message)
        }

        app.directive('focus', {
            mounted(el) {
                el.focus()
            },
        })

        app.provide('toastDuration', duration)
    },
}
You register it by calling app.use() before mounting:
// main.js
import { createApp } from 'vue'
import App from './App.vue'
import ToastPlugin from './plugins/toast'

const app = createApp(App)
app.use(ToastPlugin, { duration: 5000 })
app.mount('#app')
app.use() calls the plugin's install method once, passing the app instance and any options you supply, and Vue tracks which plugins are already installed so calling use() twice with the same plugin is a no-op.
139. What is the difference between a mixin and a plugin, and why are composables usually preferred over both today?
A mixin is a plain object of component options (data, methods, lifecycle hooks) that gets merged into a component's own options when you add it to the component's mixins array. It's meant for sharing logic between individual components. The problem is the merge is implicit: once merged, you can't easily tell whether this.someMethod came from the component itself or from one of its mixins, and if two mixins define a property with the same name, Vue has to apply merge rules that aren't always obvious. This makes mixins hard to trace and refactor, especially as a codebase grows.
A plugin operates at the app level, not the component level. It's for installing cross-cutting functionality once (global components, directives, global properties, provided values), not for injecting reusable stateful logic into many individual components' internals.
A composable is just a plain function that uses Composition API primitives (ref, computed, lifecycle hooks like onMounted) internally and returns whatever reactive state and functions the consuming component needs.
// composables/useMouse.js
import { ref, onMounted, onUnmounted } from 'vue'

export function useMouse() {
    const x = ref(0)
    const y = ref(0)

    function update(event) {
        x.value = event.pageX
        y.value = event.pageY
    }

    onMounted(() => window.addEventListener('mousemove', update))
    onUnmounted(() => window.removeEventListener('mousemove', update))

    return { x, y }
}
<script setup>
import { useMouse } from './composables/useMouse'

const { x, y } = useMouse()
</script>
Composables are preferred because everything is explicit: you can see exactly which values and functions a component pulls in and from where, there's no implicit merging or naming collision since you choose the local variable names yourself (including renaming with destructuring), and TypeScript can infer proper types for the returned values, none of which mixins offer.
140. What is a render function, and when would you write one instead of a template?
A render function is a plain JavaScript (or TypeScript/JSX) function that returns a vnode tree directly, typically using the h() helper, instead of writing a <template> block that Vue's compiler turns into a render function for you automatically. Templates and render functions produce the same underlying thing; a template is just a more constrained, more optimizable syntax that compiles down to calls like h() under the hood.
import { h, ref } from 'vue'

export default {
    setup() {
        const count = ref(0)
        return () => h('button', { onClick: () => count.value++ }, `Count: ${count.value}`)
    },
}
You'd reach for a render function when the logic you need to express doesn't map cleanly onto template directives, for example: a component that recursively renders itself with structure determined by deeply dynamic data, a component library helper that needs to generate arbitrary combinations of elements based on runtime configuration, or functional/renderless components where a template would need awkward, deeply nested v-if/v-for chains that are clearer as plain JavaScript control flow (loops, conditionals, array methods).
The trade-off is that render functions lose the compiler-level optimizations templates get for free, static hoisting and patch flags rely on the compiler statically analyzing a template's structure, which it can't do for arbitrary hand-written JavaScript. For the vast majority of components, templates are more readable and already fast enough, so render functions stay a tool for specific, more advanced cases rather than a default approach.
Testing Vue Applications
141. What is Vue Test Utils, and what is the difference between mount and shallowMount?
Vue Test Utils is the official low level library for testing Vue components. It renders a component outside of a real browser and gives you a wrapper object with helpers like wrapper.find(), wrapper.text(), and wrapper.trigger() to inspect and interact with it. It's almost always paired with Vitest as the test runner, since Vitest reuses your Vite config and already knows how to process .vue files.
The difference between mount and shallowMount is how child components are handled. mount renders the component and every child component fully, so you get a real, complete DOM tree. shallowMount renders only the component under test and replaces every child component with a simple stub element, so a bug in a child never breaks a test for the parent.
import { mount, shallowMount } from '@vue/test-utils'
import UserCard from './UserCard.vue'

const full = mount(UserCard, { props: { name: 'Ada' } })
const shallow = shallowMount(UserCard, { props: { name: 'Ada' } })
mount is the better default for most tests because it verifies real parent-child integration. shallowMount is worth reaching for when a child is heavy, slow, or genuinely irrelevant to what you're testing, such as a chart library or a rich text editor.
142. How do you simulate a user interaction in a test and assert that a component emitted an event?
Vue Test Utils simulates interactions with wrapper.trigger(eventName), which fires a native DOM event (click, input, submit, and so on) on an element you've already found with wrapper.find(). Because Vue batches DOM updates, you should await the trigger call so the component has a chance to react before your assertions run.
To check what a component emitted, use wrapper.emitted(). It returns an object keyed by event name, where each value is an array of the arguments passed to every emit of that event.
<!-- LikeButton.vue -->
<script setup>
const emit = defineEmits(['like'])
</script>

<template>
    <button @click="emit('like')">Like</button>
</template>
import { mount } from '@vue/test-utils'
import { it, expect } from 'vitest'
import LikeButton from './LikeButton.vue'

it('emits like when clicked', async () => {
    const wrapper = mount(LikeButton)

    await wrapper.find('button').trigger('click')

    expect(wrapper.emitted()).toHaveProperty('like')
    expect(wrapper.emitted('like')).toHaveLength(1)
})
A common gotcha is forgetting the await before trigger, which can lead to assertions running before Vue has finished processing the event.
143. How do you unit test a composable in isolation from any component?
A composable is just a function built on top of Vue's reactivity primitives (ref, computed, watch, and so on), so if it doesn't rely on lifecycle hooks or inject, you can call it directly in a test like any other function, no component or mounting required.
// useCounter.js
import { ref } from 'vue'

export function useCounter(initial = 0) {
    const count = ref(initial)
    function increment() {
        count.value++
    }
    return { count, increment }
}
import { it, expect } from 'vitest'
import { useCounter } from './useCounter'

it('increments count', () => {
    const { count, increment } = useCounter(5)
    increment()
    expect(count.value).toBe(6)
})
If a composable does depend on lifecycle hooks like onMounted, or on provide/inject, it needs a component instance to run inside. The usual approach is to mount a small throwaway component whose setup() just calls the composable, then assert against what it exposes, either through the returned template refs or by exposing values via expose(). This keeps the test focused on the composable's logic while still giving Vue a valid instance to attach the lifecycle hooks to.
144. How do you mock Vue Router or a Pinia store inside a component test?
For Pinia, the recommended approach is createTestingPinia from @pinia/testing. It creates a real Pinia instance but automatically replaces every store action with a spy (so no real logic or network calls run) and lets you seed initialState directly, so a component reading from a store doesn't need the store's actual implementation to be correct.
import { mount } from '@vue/test-utils'
import { createTestingPinia } from '@pinia/testing'
import UserProfile from './UserProfile.vue'

const wrapper = mount(UserProfile, {
    global: {
        plugins: [createTestingPinia({
            initialState: { user: { name: 'Ada' } },
        })],
    },
})
For Vue Router, the cleanest option is to install a real router built with createMemoryHistory (rather than a browser history), pushed to whatever route the test needs, then passed in as a global plugin. This gives you real $route/$router behavior without a browser.
import { createRouter, createMemoryHistory } from 'vue-router'
import { mount } from '@vue/test-utils'

const router = createRouter({
    history: createMemoryHistory(),
    routes: [{ path: '/', component: Home }, { path: '/about', component: About }],
})

router.push('/about')
await router.isReady()

const wrapper = mount(App, {
    global: { plugins: [router] },
})
For simpler cases where a component just reads route.params or calls router.push, you can skip a real router entirely and provide lightweight mocks through global.mocks.
145. What is snapshot testing, and what are its tradeoffs for Vue components?
Snapshot testing renders a component, serializes its output (usually with wrapper.html()), and saves that output to a file. On later test runs, the current output is compared against the saved snapshot; if anything differs, the test fails and you decide whether the change is an intended update (in which case you update the snapshot) or a real regression.
import { mount } from '@vue/test-utils'
import { it, expect } from 'vitest'
import Badge from './Badge.vue'

it('matches snapshot', () => {
    const wrapper = mount(Badge, { props: { label: 'New' } })
    expect(wrapper.html()).toMatchSnapshot()
})
The upside is speed: you get regression coverage on markup with almost no test-writing effort, which is handy for stable, mostly presentational components. The tradeoffs are real, though. Snapshots don't test behavior, only output shape, so a snapshot passing tells you nothing about whether an emitted event or a computed value is correct. They also tend to grow stale; developers get into the habit of running the "update snapshots" command without carefully reviewing the diff, which defeats the purpose. And snapshots are brittle against unrelated markup changes (a class name tweak fails every snapshot that touches that component) and against dynamic content like generated ids or timestamps, unless you specifically mock or strip those. In practice, snapshot testing works best sparingly, for a handful of stable UI components, alongside explicit assertions on props, emitted events, and text content for anything that actually has logic.
Server-Side Rendering and Nuxt
146. What is server-side rendering (SSR), and what specific benefits does it bring to a Vue application?
Server-side rendering means running your Vue component tree on the server for each request and sending the browser a fully formed HTML page, instead of an empty shell that JavaScript fills in later. In a plain client-rendered Vue app, the initial response is close to <div id="app"></div>, and the user sees nothing meaningful until the JS bundle downloads, parses, and Vue mounts and renders the tree. With SSR, that rendering already happened on the server, so the browser can paint real content immediately.
This brings two concrete benefits. First, faster perceived performance, particularly on slow networks or devices, since there's visible content before any JavaScript has run. Second, better SEO and link-preview support, since crawlers and social media bots that don't execute JavaScript (or execute it poorly) still receive complete HTML. The tradeoff is that the server now has to do rendering work on every request, and the app needs to run in a Node environment, which is part of why Nuxt exists, to handle that server-side rendering setup for you.
147. What is Nuxt, and how does it relate to Vue?
Nuxt is the official meta-framework built on top of Vue. Vue itself is just the component and reactivity library; it doesn't dictate how routing, data fetching conventions, server rendering, or deployment work. Nuxt fills in that layer: it adds file-based routing (files in pages/ automatically become routes), auto-imports (components and composables are available without manual import statements), a Nitro server engine that can run API routes and server middleware alongside your app, and hybrid rendering, where you choose per-route whether a page is server-rendered, statically prerendered, or client-rendered, via routeRules.
A useful analogy: Nuxt is to Vue roughly what Next.js is to React. You could hand-wire Vue Router, Vite, an SSR entry point, and a Node server yourself, but Nuxt packages all of that into sensible conventions so you write pages and components and get routing, SSR, and deployment mostly for free.
148. What is hydration, and what causes a hydration mismatch in an SSR Vue app?
Hydration is the process of taking HTML that the server already rendered and making it interactive on the client, without throwing it away and re-rendering from scratch. Vue walks the existing DOM nodes the server produced, matches them up against its virtual DOM tree, and attaches the event listeners and reactive bindings needed to turn static markup into a live, working app. Because it reuses the DOM nodes instead of recreating them, hydration is much cheaper than a full client render.
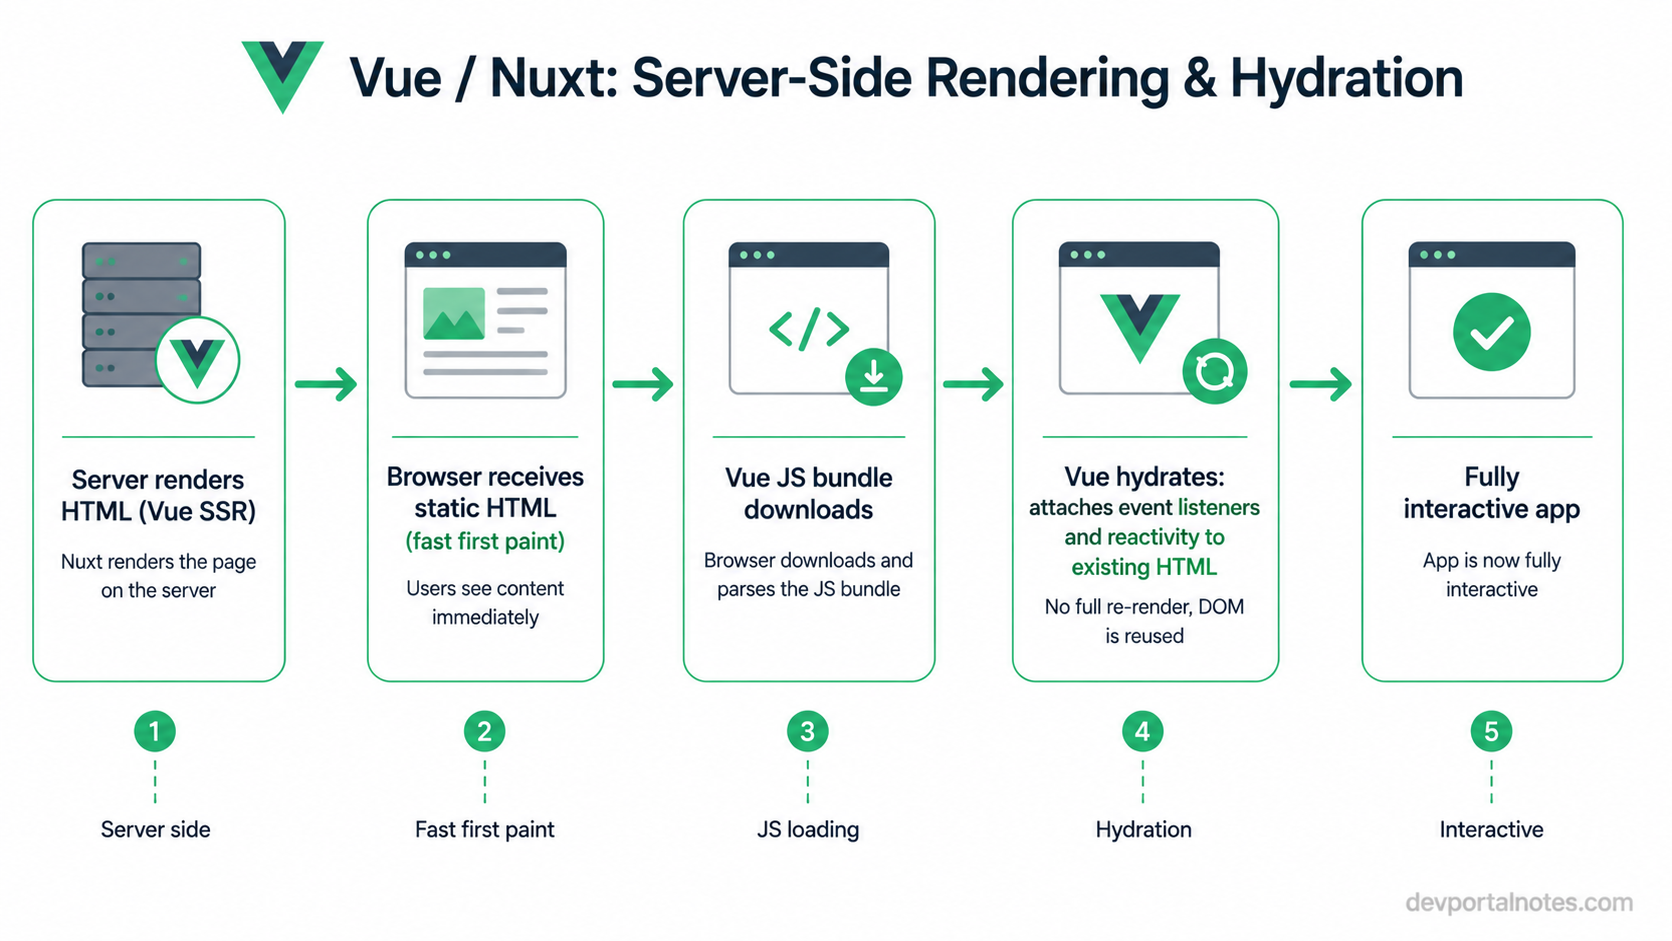
A hydration mismatch happens when the HTML Vue expects to produce on the client doesn't match what the server actually sent. The most common cause is using a browser-only API during render, things like window, localStorage, Date.now(), or Math.random(), since those produce different values (or throw) on the server versus the client. It can also come from invalid HTML nesting that the browser silently auto-corrects (for example a <div> placed inside a <p>), which changes the DOM structure the browser hands back versus what the server sent. When Vue detects the mismatch, it warns in the console and, in development, patches the affected DOM to match the client's version, which causes a visible flicker and throws away the performance benefit SSR was supposed to provide for that part of the page.
<script setup>
// bad: differs between server render and client render
const now = Date.now()
</script>

<template>
    <p>{{ now }}</p>
</template>
The fix is usually to compute anything environment-dependent inside onMounted (so it only ever runs on the client) or to wrap that part of the template in <ClientOnly>.
149. What is the <ClientOnly> component used for?
<ClientOnly> is a Nuxt component that renders its default slot only on the client, and skips it entirely during server-side rendering. It's used for anything that depends on browser-only APIs or assumes a real DOM to work, common examples being chart libraries, rich text editors, or animation libraries that would either throw an error during SSR or produce output that doesn't match what the client renders, causing a hydration mismatch.
<template>
    <ClientOnly>
        <HeavyChart :data="chartData" />
        <template #fallback>
            <p>Loading chart...</p>
        </template>
    </ClientOnly>
</template>
The optional #fallback slot renders on the server (and briefly on the client before hydration finishes), which lets you show a placeholder instead of leaving an empty gap and avoids layout shift once the real content mounts.
150. What is the difference between Nuxt's useFetch and useAsyncData for data fetching?
Both are Nuxt composables for fetching data in a way that's SSR-aware: they run during server rendering, serialize the result into the page payload, and skip re-fetching on the client during hydration, avoiding the double-fetch problem you'd get from calling a plain fetch in onMounted. Both also return the same shape, { data, pending, error, refresh }, and integrate with Nuxt's loading and Suspense handling.
The difference is scope. useFetch(url, options) is a thin, convenient wrapper around useAsyncData plus $fetch, purpose-built for "call this URL." It generates a cache key from the URL and options automatically, so you don't have to think about it.
useAsyncData(key, handler) is the more general primitive. The handler can be any async function, not just a single URL call, so it's what you reach for when you need to combine multiple requests, call a Pinia store action, or run logic that isn't a plain fetch. You're expected to provide the key yourself.
// useFetch: shorthand for a single endpoint
const { data: posts } = await useFetch('/api/posts')

// useAsyncData: custom or combined logic
const { data: dashboard } = await useAsyncData('dashboard', async () => {
    const [posts, user] = await Promise.all([
        $fetch('/api/posts'),
        $fetch('/api/user'),
    ])
    return { posts, user }
})
A good rule of thumb: reach for useFetch when you're calling a single API endpoint, and drop down to useAsyncData as soon as the fetching logic needs to do more than that. For a closer look at what happens after the server sends that HTML, the hydration in frontend frameworks article covers hydration in more general, framework-agnostic detail.
Final Thoughts
These 150 Vue JS questions cover the bulk of what Vue interviews actually ask, from template basics to the internals of the compiler and the reactivity system. Do not try to memorize every answer word for word. Instead, build a mental model of how Vue actually works.
For detailed guide, visit Vue 3 Official Documentation
If React comes up too, 50 Most Asked React JS Interview Questions covers it the same way.
Good luck with your interviews.